Introduction
In this tutorial, we will be demonstrating connectivity to IBM's Watson IoT platform (internetofthings.ibmcloud.com). We will use a RediGate 120e to demonstrate, but this tutorial can be applied to any RediGate device with internet connectivity.
...
- Confirm that you can ping the Modbus device using its built-in ping utility (See Ping Utility for more info)
- Open the configuration you used in the "Field Device Quick Start" in the same ACE window as your Watson IoT configuration that is producing the simulated data.
- Copy and paste the "Master Channel" object from the ModbusTCP configuration into your Watson IoT configuration (paste under "Master Channels").
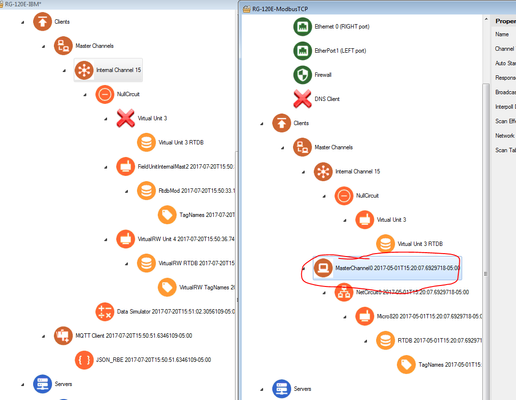
- Save and upload configuration to the RediGate.
- If you followed the "Device Publish" topic structure in the "Publishing Simulated Data to Watson IoT" example above, you should see a new device named (your serial number)_(your unit name), which will be publishing data as it changes based on your channel scan rate:
Example 3: Sending Data from Watson IoT Node-RED to Field Device
Once your device is successfully publishing data to Watson IoT, the next step is to subscribe to commands sent from Watson to the field devices connected to the RediGate. Details on the JSON structure that the RediGate expects to receive can be found in the JSON-RBE MQTT Payload Format document. The steps below outline how to write data to an integer tag under a virtual field unit:
Pre-Requisites
- Completion of "Example 1" above.
Instructions
- Launch the Node-RED editor in Bluemix for your Watson IoT Platform (such as https://yoursitename.mybluemix.net/red – you may need to use Chrome or Firefox for this, not Internet Explorer).
- Add some logic to create a command message for the RediGate, as follows:
- In the Node- RED flow menu, select Import | Clipboard. Copy and paste the following into the node text:
[{"id":"50b45600.8752c4","type":"inject","z":"d12d4d27.9ed49","name":"Trigger CMD","topic":"topic","payload":"{\"d\":{\"40001\":15}}","payloadType":"json","repeat":"","crontab":"","once":false,"x":170,"y":1800,"wires":[["87c66b13.34b61"]]},{"id":"87c66b13.34b61","type":"ibmiot out","z":"d12d4d27.9ed49","authentication":"boundService","apiKey":"","outputType":"cmd","deviceId":"deviceId","deviceType":"RG1","eventCommandType":"CMD","format":"json","data":"{}","qos":0,"name":"IBM IoT Command Output","service":"registered","x":410,"y":1800,"wires":[]}]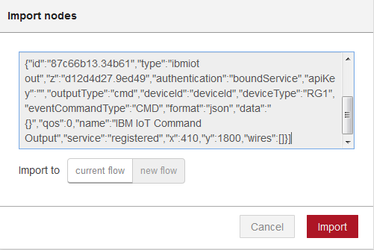
- The "Trigger CMD" inject node contains the JSON payload of the command. In this example we are using:
IntValue: 15 (this is register 30001 in the example configuration)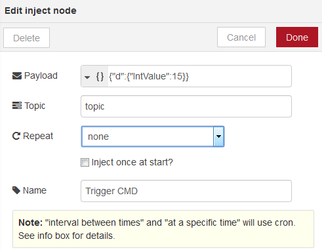
- Modify the "IBM IoT Command Output" node to match the properties of the RediGate. In this example, we are using:
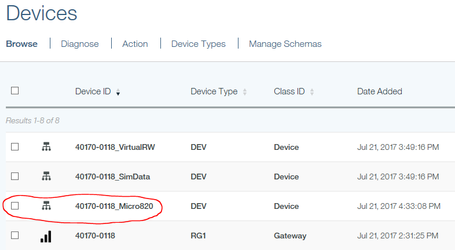
Device Type: DEV
Device Id: 40170-0118_VirtualRW (this is a combination of RediGate serial, underscore, and virtual RTU name)
Command Type: CMD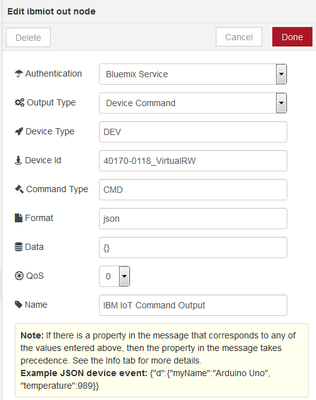
- After deploying changes in Node-RED, click the button on the "Trigger CMD" node to publish a command to the RediGate.

- Confirm that the data was written to the RediGate by logging in to the RediGate with Putty and accessing MQTT Client Diagnostic screen (Option 3 → 17). Here you should see a value in the "Last Recv Topic" that looks similar to the screenshot below:
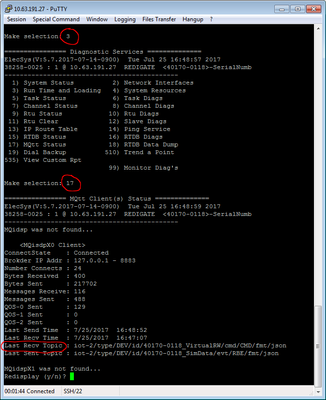
- The value that you published should be saved in the Internal Channel 15 → Virtual RTU 4 → RTDB → Register 30001. See Accessing RTDB Data Dump for info on viewing RTDB values in the RediGate.
Congratulations! You can successfully published data to and subscribed to data from the IBM Watson IoT Platform with your RediGate. You are now ready to start connecting real field devices to Watson IoT. Check out our "Field Device Quick Starts" found at http://partner.elecsyscorp.com/examples/ for examples showing how to connect the RediGate to 60+ industrial protocols. For more in-depth detail about how the IBM subscription works, check out the IBM Watson IoT Use Case Notes.