
Product Information
Full information about other Elecsys products is available on our website at www.elecsyscorp.com and the RediGate Product Support Page, http://redigate.elecsyscorp.com.
Product Support
Tel: +1-913-890-8905
Fax: +1-913-982-5766
Email: idc-support@elecsyscorp.com
Headquarters, Sales, Support & Manufacturing
Elecsys Corporation
846 N Mart-Way Court
Olathe, KS 66061
Tel: +1-913-647-0158
Fax: +1-913-982-5766
Email: info@elecsyscorp.com
While Elecsys may assist customers with their choice of products, the final choice of product for a specific application is entirely the responsibility of the buyer. Elecsys' entire liability with respect to its products or systems is defined in the Elecsys standard terms and conditions of sale.
Any example code is provided only to illustrate the use of Elecsys products. No warranty, either expressed or implied, is made regarding any example code provided by Elecsys and Elecsys shall incur no liability whatsoever arising from any use made of this code.
Disclaimers
The information in this manual is believed to be accurate at the time of publication. Elecsys Corporation assumes no responsibility for inaccuracies that may be contained in this document and makes no commitment to update or keep current the information contained in this manual. Elecsys Corporation assumes no responsibility for any infringements of patents or other rights of third parties that may result from its use. Elecsys Corporation reserves the right to make changes or improvements to this document and/or product at any time and without notice. While Elecsys may assist customers with their choice of products, the final choice of product for a specific application is entirely the responsibility of the buyer. Elecsys' entire liability with respect to its products or systems is defined in the Elecsys standard terms and conditions of sale.
Any example code is provided only to illustrate the use of Elecsys products. No warranty, either expressed or implied, is made regarding any example code provided by Elecsys and Elecsys shall incur no liability whatsoever arising from any use made of this code.
Electrostatic Discharge (ESD) Protection
These units contain devices that could be damaged by the discharge of static electricity. At all times, please observe industry standard ESD precautions when handling the unit.
![]() WARNING: DO NOT CONNECT OR DISCONNECT CABLES WHEN ENERGIZED, UNLESS POWER HAS BEEN REMOVED FROM THE EQUIPMENT OR THE AREA IS KNOWN TO BE FREE OF IGNITABLE CONCENTRATIONS OF FLAMMABLE SUBSTANCES.
WARNING: DO NOT CONNECT OR DISCONNECT CABLES WHEN ENERGIZED, UNLESS POWER HAS BEEN REMOVED FROM THE EQUIPMENT OR THE AREA IS KNOWN TO BE FREE OF IGNITABLE CONCENTRATIONS OF FLAMMABLE SUBSTANCES.
© 2017 Elecsys Corporation
Table of Contents
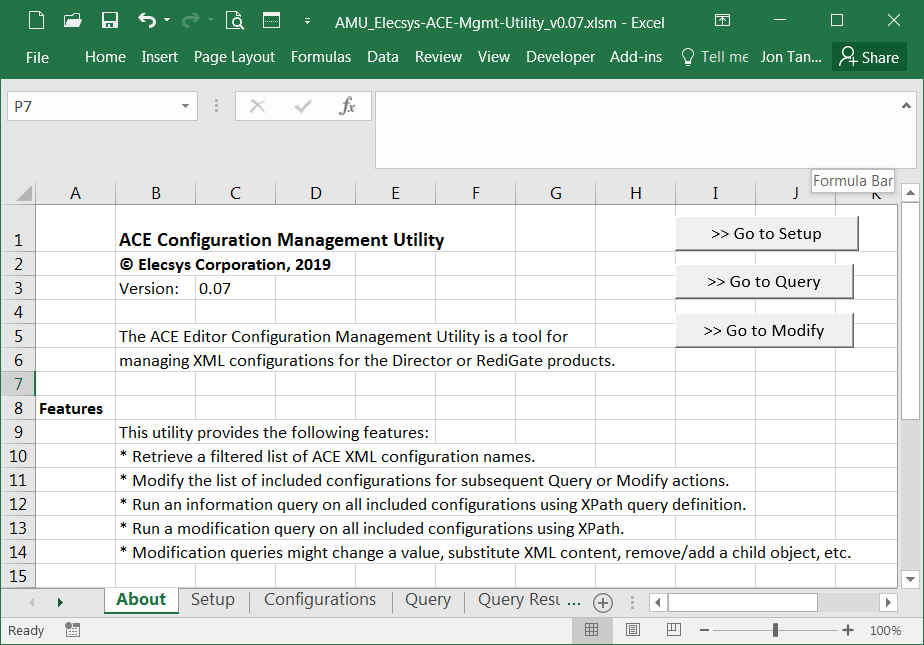
About the ACE Configuration Management Utility
The ACE Configuration Management Utility is a tool for managing XML configurations for the Director or RediGate products that are created in the Elecsys ACE Editor software.
This utility provides the following features:
Retrieve a filtered list of ACE XML configuration names and descriptions.
Modify the list of included configurations for subsequent Query or Modify actions.
Run an information query on all included configurations using XPath query definition.
Run a modification query on all included configurations using XPath.
Modification queries might change a value, substitute XML content, remove/add an XML child object, etc.
Because the tool is designed to perform a set of actions on a group of configurations, it is ideal for batch queries or batch modification of configurations to update ACE properties, add new features, etc. The Elecsys ACE Editor is still needed to view and upload configurations, and will still be used for individually setting properties or adding objects to a single configuration.
The master copy of this spreadsheet can be opened, configured for individual combinations and varieties of queries, and saved under different names for future reference. It is not required that the spreadsheet retain its originally distributed filename. This will allow a user to keep multiple logs of information obtained from devices or results of a modification action.
Installation
The ACE Configuration Management Utility is a Microsoft Excel workbook, which includes Visual Basic macros. This platform was chosen for its wide support on Windows operating system, which is also required for the Elecsys ACE Editor; and because Excel Visual Basic for Applications (VBA) supports XPath and XML methods.
Because the utility uses VBA macros, the default security settings in Microsoft Excel may prevent a user from being able to run the macros.
To set up macro security in Excel, select the menu:
File | Options | Trust Center | Trust Center Settings | Trusted Locations.
Click the Add New Location button, and add the file location where the utility (Excel file) will be stored.
Also, you may wish to disable the "/" key as an Excel menu option. In Options | Advanced | Lotus Compatibility, clear the "Microsoft Excel menu key" property. This will allow you to type XPath queries starting with "/" in a worksheet cell.
Test the ability to run macros by clicking the ">> Go to Setup" button on the About sheet.
Other Utilities
In addition to the ACE Configuration Management Utility and the ACE Configuration Editor software, the following utilities are also recommended for help in designing the XPath queries used in the utility:
A good text editor, such as Notepad++, to view XML files. (This will help by showing the XML structure of the configuration.)
A good text diff program, such as WinMerge, to view differences between the original and modified XML files. (This is useful when designing the XPath queries, to ensure that XML changes are made as intended.)
Setup Sheet
On the About page, click the ">>Go to Setup" button. Or click on the tab for the Setup sheet. Make the following settings:
Configuration Path: Enter the path where ACE XML configurations are found.
For instance, C:\Users\username\Documents\Elecsys\ACE\CFG
FileName Filter: (optional) Enter a filename criteria to select a subset of the XML files.
Examples: *.XML (this is the default filter)
abc*.xml
or the Configuration Path could be “C:\Users\username\Documents\Elecsys\ACE”
and the FileName Filter could be “CFG\*.xml”
Output XML Path: (optional) Enter the path where the (modified) output XML files will be stored.
If the Output XML Path is blank, output files will be stored in the same as the Configuration Path.
Output File Suffix: (optional) Enter a suffix to add to the modified output files.
For instance, a suffix of "_MOD" will create files with the output name
OriginalConfigurationName_MOD.XML
NOTE: If you use the same Output XML Path as the source Configuration Path and no Output File Suffix then the output file will overwrite the original configuration! This is not recommended.

After setting up the paths, filter, and file suffix, click the "> List Configurations <" button. This will generate a list of configuration names based on the above criteria.
Configurations Sheet
The Configurations sheet lists the names and descriptions of XML configuration files that will be queried or modified by this utility. Only ACE XML configurations (with a TemplateProperties/Description XML field) will be included automatically. You can click on the tab for the Configurations sheet at any time, or click the ">> Go to Configurations" button.
After clicking the "> List Configurations <" button on the Setup sheet, you will automatically be taken to the Configurations sheet.

On the Configurations sheet, there are three columns:
Include
The configurations are automatically marked with "1".
The Query or Modify actions will act only on the configurations with a 1 in this column.
You can exclude configurations by changing the "1" to something else, or clearing the cells.
Configuration Name
The configuration names listed are based on the Configuration Path and FileName Filter on the Setup page. If there are many configurations listed that you don't want to query, you can change the filter and re-run the list.
You can also manually enter configuration names in this column – you don't have to use the "> List Configurations <" button.
Description
The Description column is obtained from the <TemplateProperties> property in the ACE XML configuration file. It has no purpose in the ACE Management Utility, other than information.
Query Sheet
The Query sheet is used to request information from each XML configuration included on the Configurations sheet. After setting up the list of configurations on the Configurations sheet, define one or more XML queries on the Query sheet.
Query rows must begin on the row immediately below the "Column Header" row.
After defining the Select Query, click the "> Query Configurations <" button. This will run the listed Query definitions for each configuration on the Configurations sheet that has a "1" in the Include column.
The results of all queries for all configurations will be stored on the Query Results sheet.

Query definitions consist of 4 columns, with one Query definition per row:
Column Header
The Column Header defines one or more columns of data to be stored on the Query Results sheet. The Column Header is just descriptive, but does need to be non-blank.
Any Query definitions following a row with a blank Column Header will not be run. This can be used (by inserting a blank row) to run only a few of the Query definitions for testing, then delete the blank row to run additional queries.
If the Column Header ends with square brackets enclosing a positive integer number (e.g., “[2]”), it will create multiple columns in Query Results. The number defines the maximum number of columns in Query Results that will contain XML data matching the Select Query (XPath) criteria.
If the Select Query matches more XML nodes than the columns allow, the rest will be omitted from Query Results.
Example:
If Column Header is "Ethernet IP[2]", it will create two columns on the Query Results page. The columns will be labeled "Ethernet IP (1)" and "Ethernet IP (2)". If the Select Query yields the IP address of Ethernet port objects, only the first two will be listed in these columns.
Be aware that if the Query that you are using returns more XML nodes than are allowed to be displayed by the Column Header, it may give the false impression that there aren't as many nodes as there actually are.
If the Column Header ends with [0], it will create only a single column in Query Results, but if the Select Query returns multiple nodes, the contents of each node is separate by braces { }. If the Select Query returns only a single node, it will be shown without braces.
Example:
If Column Header is "Ethernet IP[0]", it will create one column on the Query Results sheet. The column will be labeled "Ethernet IP" and may include contents such as: "{10.95.213.86}{192.168.100.1}".
Description
This column has no purpose and is only descriptive to help remember what the Query definition is for.
Select Query
The Select Query column uses XPath notation to select one or more XML nodes in each configuration file. The element(s) selected (one or more, depending on the Column Header) will have their text stored in the Query Results page. See the section Understanding XPath Queries for help in understanding XPath query format used in the ACE Management Utility.
Condition Query
The Condition Query column is currently unused. It may eventually support the ability to include an additional condition for whether or not to include XML nodes obtained in the XPath query.
Understanding XPath Queries
XML is a structured document format that uses a nested hierarchy of parent/child elements. The Elecsys ACE Editor (3.0 and higher) uses XML for both the template and configuration definitions. XPath is a very powerful query language that allows a complex set of criteria to search an XML document. See www.w3schools.org for more generic information and tutorials on XML and XPath.
XML Structure
When defining XPath queries, it is important to understand the XML structure of the ACE configurations.
Example:
An EtherPort object in the ACE Editor defines the Ethernet network interface. It is represented in the configuration file by the following XML text (abbreviated here) such as:
<Node Type="EtherPort" Name="EtherPort0" Enabled="Yes">
<Properties>
<Instance>0</Instance>
<DownFile>netethr0</DownFile>
</Properties>
<Fields>
<Field Name="Network Card IP" Width="2147483647" Type="IPADDRESS">
<Value>10.63.191.26</Value>
</Field>
<Field Name="Subnet Mask" Width="2147483647" Type="IPADDRESS">
<Value>255.255.0.0</Value>
</Field>
<Field Name="Default Gateway" Width="2147483647" Type="IPADDRESS">
<Value>0.0.0.0</Value>
</Field>
</Fields>
</Node>
XML syntax consists of elements (such as <Node>, <Properties>, and <Field>), attributes (such as Type, Name, and Enabled), and text content (such as "netethr0", "10.63.191.26", and "EtherPort0"). All XML elements must have an opening and closing tag (such as <Node> and </Node>) and be properly nested. Note that XML is case-sensitive, so you must ensure that all queries use the proper case.
XPath Example – selection of XML nodes
On the Query or Modify sheet, you can define a Select Query such as:
//Properties[DownFile='netethr0' || DownFile='netethr1'] ~~~ ../Fields/Field[@Name='Network Card IP']/Value/text()
This XPath query first locates all XML elements called <Properties> (every object in the ACE configuration has one). The initial double forward slashes (//) at the beginning of the XPath statement finds any element called <Properties>, no matter how deep it is nested in the XML document. Using a single forward slash (/) would begin at the topmost (root) element of the file.
The above XPath query is further limited to <Properties> elements which have a child element called <DownFile>, with a text content of either "netethr0" or "netethr1" (i.e., ACE uses these values to define objects for the eth0 and eth1 interfaces in Linux). XPath uses square brackets [ ] after an element name to provide one or more qualifiers (predicates) to select specific XML nodes.
A special notation used in the ACE Management Utility (not part of XPath) is the "~~~" notation, which may be used to chain together two XPath queries where necessary. In the above example, two separate XPath statements are joined together sequentially with "~~~". The ACE Management Utility only currently supports up to two joined statements.
In this example, the first XPath statement selects the <Properties> element from two different ACE "EtherPort" objects (netethr0 and netethr1). The second XPath statement begins with "..", which moves up a level to the <Node> parent of both <Properties> elements.
Then the XPath query descends through the children of those elements: <Fields><Field><Value>
Note that the <Field> elements of an ACE object include all the first-level properties shown in the ACE Editor. In this example, this includes the IP address, Subnet Mask, and Default Gateway of an Ethernet object definition.The <Field> element above is further qualified to only include those elements with an attribute (using a leading "@" symbol) whose "Name" is equal to "Network Card IP". Thus, at this point in the XPath query, we have selected two nodes: the IP address XML element of both "netethr0" and "netethr1" (if they both exist in the ACE configuration).
The second XPath query further descends into each <Field> element (whose Name="Network Card IP"), to the <Value> element, and finally to the text content of <Value>, using the syntax "text()". When retrieving the text content inside a <tag>...</tag> structure, the "/text()" suffix is required at the end of the XPath query in most cases; omitting it will return the XML that includes “<tag>text</tag>”, rather than just the “text” value.
Another example
As a second example, we can define a Select Query similar to the example above using only a single XPath statement, not requiring the chaining of two statements (i.e., avoiding the "~~~" notation that is unique to the ACE Management Utility).
(For the more technically minded, the reason the first example required the chaining of two queries is that Microsoft Excel/Visual Basic's XPath handling doesn't appear to support the "/../" notation in the middle of an XPath query. Thus, because we started the query at the <Properties> level and had to back up to its parent, it required a second query to ascend to the parents of the nodes selected in the first query.)
Here is another Select Query definition that does exactly the same thing as the Select Query in the previous example.
//Node[@Type='EtherPort' && Properties[Instance='0' || Instance='1']]/Fields/Field[@Name='Network Card IP']/Value/text()
In this case, we start by selecting all <Node> elements in the document (i.e., every object in ACE starts with <Node>), but with the qualifiers given in brackets [ ].
The first qualifier is that the <Node> must have an attribute "Type" with a value of "EtherPort". This will select only EtherPort ACE objects. Note that the "@" symbol is required in "@Type='EtherPort'" because Type is an attribute as opposed to an element.
The second qualifier is that the <Node> must have a child element <Properties>, which in turn must have a child element <Instance> with a text value of either "0" or "1". This is a different way of selecting both the eth0 and eth1 Ethernet object definitions (we could have used the <DownFile> element instead).
So far, we have selected two <Node> XML elements. Everything else in the XPath query up to this point (between the nested sets of square brackets) consists of qualifiers to determine which <Nodes> to pick. Next, the XPath statement descends into the children and grandchildren of those two <Node> elements, by selecting the elements:
<Fields>, <Field> (whose Name attribute is "Network Card IP"), <Value>, and finally the text() content of <Value> (the IP address of the Ethernet configuration).
What is the result?
Let's put together all the above and see what data may be obtained in the Query Results sheet.
Using a single row in the Query (or Modify) sheet with one of the above two examples, we will have the following Query definition:
Column Header | Description | Select Query | Condition Query |
|---|---|---|---|
IP Address[3] | Get up to three IP addresses | //Node [@Type='EtherPort' && Properties[Instance='0' || Instance='1']] /Fields /Field [@Name='Network Card IP'] /Value/text() | (blank) |
Assuming the configuration(s) listed on the Configurations sheet have one or more Ethernet objects configured, the resulting data on the Query Results sheet might look something like this:
Configuration Name | IP Address(1) | IP Address(2) | IP Address(3) |
|---|---|---|---|
configuration1.xml | 10.63.191.26 | 192.168.1.1 | n/a |
configuration2.xml | 10.1.2.3 | n/a | n/a |
Note that in this example, we purposely defined the Column Header to include three columns, but the first configuration only has two Ethernet nodes, and the second configuration only has one. The remaining columns will be included in Query Results,but will be populated with "n/a" if there are no XML nodes matching the XPath criteria defined in Select Query.
If, instead, the Column Header had been set as "IP Address" (no square brackets), the data would have included only a single column of “IP Address”, containing the first Ethernet port’s IP address from each configuration.
Getting a count of nodes
If you wish to retrieve the number of matching nodes for an XPath query, rather than the data content of them, add "/count()" at the end of a Select Query. This is a unique notation of the ACE Management Utility (not part of XPath syntax).
As an example, define a Column Header of "# of IP addresses" and a Select Query listed below:
//Node[@Type='EtherPort']] /Fields/Field[ @Name='Network Card IP'] /Value/text()/count()
or just
//Node[@Type='EtherPort']]/count()
Note that we haven't limited the <Instance> numbers to specific Ethernet objects, as in the previous examples. The Query Results might be:
Configuration Name | # of IP Addresses |
|---|---|
configuration1.xml | 4 |
configuration2.xml | 1 |
Retrieving an attribute
If you wish to get the value of an attribute, as opposed to the text content inside a “<tag>...</tag>” structure, use the "@" symbol with the attribute name. For instance, to get the visible name of the ACE object representing the eth0 Ethernet configuration, you might use a Select Query like:
//Node[@Type='EtherPort' && Properties[Instance='0']]/@Name
or
//Node[DownFile='netethr0']/@Name
or
//Properties[DownFile='netethr0'] ~~~ ../@Name/text()
Each of the above three XPath examples does the exact same thing. In the first two cases above (single query), the "/text()" suffix is NOT allowed for retrieving attribute values (due to some apparent quirk in VBA). In the third example (two queries chained with "~~~") the "/text()" suffix is allowed but optional for getting the attribute value.
Querying a section of XML
If you wish the query to return a section of XML text, rather than just an individual property value, just broaden the scope of the XPath query; that is, don't go as deep into the nested XML hierarchy of tags, down to the last “/text()” element.
This will often be necessary especially in cases where you are doing a Modify query and need to either remove a section (whole object or table row) or modify a section of XML with new XML from a file. It will also be necessary when adding a section of XML, because the Select Query must select the parent node where the new XML element is to be added.
For instance, to return the entire XML section that represents the eth0 Ethernet configuration, you could use:
//Node[@Type='EtherPort' && Properties[Instance='0']]
or
//Node[DownFile='netethr0']
This would return all the XML text between <Node> and </Node>, such as:
<Node Type="EtherPort" Name="EtherPort0" Enabled="Yes">
(content omitted here for brevity)
</Node>
As a troubleshooting tool, retrieving the XML content can be used when designing queries. If your query isn't giving the results you expected, just omit some of the right-hand (more specific) portions of the query, look at the resulting XML, and adjust the query to match the correct tag and attribute hierarchy.
Rules for dealing with ACE configurations
Unlike the ACE Editor, which imposes a number of programmatic constraints on instance numbers, adding, deleting and naming of objects, the ACE Configuration Management Utility is kind of like a loaded gun – you have a lot of power, but you can do a lot of damage.
To be more explicit, the XPath Modify queries currently allow you make many changes to the XML file which are not allowed, and which could break a perfectly good ACE configuration. Be warned.
Some rules on ACE objects which are required by ACE Editor but not enforced by the management utility:
Unique instance numbers are required for all sibling <Node> elements under a parent node, within the instance number limitations defined in the XML template.
Unique object names are required for all <Node> elements in a configuration.
Object types, DownFile properties, and all property and table columns must agree with with the XML template definition.
Using Variable Values
On the Modify sheet only (not the Query sheet), you can use variables to store data for reuse in later query definitions. The 'SaveToVAR' and 'ConstToVAR' actions will store data to a numbered variable. Any of the functional columns on the Modify sheet (Select Query, Mod Type, Source Data/File, or Source Query) can use the variables that have been previously saved in an earlier row in the table.
Variables that are used in these columns must have the form:
${VARxx}
where "xx" is a non-negative integer. The form is important - they must start with "${VAR", end with "}", and contain a number in between.
Leading zeros are not required (i.e., "${VAR00}" is identical to "${VAR0}"). More than one variable may be included in a query (etc.). Variables may contain any text, whether a number (count of items) or a queried section of XML text that could be used in a Modify action.
Values saved to variables are NOT saved between separate runs of the "> Modify Configurations <" macro.
Modify Sheet
The Modify sheet is used to both request and modify information in each XML configuration included on the Configurations sheet.
After setting up the list of configurations on the Configurations sheet, define one or more XML queries on the Modify sheet.
Query rows must begin on the row immediately below the "Column Header" row.
After defining the Select Query and other columns, click the "> Modify Configurations <" button.
This will run the listed Modify Query definitions for each configuration on the Configurations sheet that has a "1" in the Include column.The results of all actions for all configurations will be stored on the Modify Results sheet.
Modify Query definitions consist of 7 columns, with one Query definition per row.
The Column Header, Description, Select Query, and Condition Query columns serve the same purpose as on the Query sheet, when used as a simple query (no Modify action). When a “Mod Type” action is selected, the Select Query chooses one or more nodes (or parents of nodes) in the XML document, at which point the action will be performed (such as modifying a value, adding a child node, or removing a node).

Column Header
The Column Header defines one or more columns of data to be stored on the Modify Results sheet. The Column Header is just descriptive, but does need to be non-blank.
Any Query definitions following a row with a blank Column Header will not be run. This can be used (by inserting a blank row) to run only a few of the Query definitions for testing, then delete the blank row to run additional queries.
If the Column Header ends with square brackets enclosing a positive integer number (e.g. “[2]”), it will create multiple columns in Modify Results. The number defines the maximum number of columns in Modify Results that will contain XML data matching the Select Query (XPath) criteria, and/or the maximum number of nodes that will be modified.
If the Select Query matches more XML nodes than the columns allow, the rest will be omitted from Modify Results.
Example:
If Column Header is "Ethernet IP[2]", it will create two columns on the Modify Results page.
The columns will be labeled "Ethernet IP (1)" and "Ethernet IP (2)". If the Select Query yields the IP address of Ethernet port objects, only the first two will be listed in these columns.
Be aware that if the query that you are using returns more XML nodes than are allowed to be displayed by the Column Header, it may give the false impression that there aren't as many nodes as there actually are. Only the nodes selected will be modified.
If the Column Header ends with [0], it will create only a single column in Modify Results, but if the Select Query returns multiple nodes, every node will be modified. (Or if no Modify action is select, the contents of each node is displayed, separated by braces { }. If the Select Query returns only a single node, it will be shown without braces.)
Description
This column has no purpose and is only descriptive to help remember what the Select Query definition is for.
Select Query
The Select Query column uses XPath notation to select one or more XML nodes in each configuration file. The element(s) selected (one or more, depending on the Column Header) will be acted on by the Modify action. See the section Understanding XPath Queries for help in understanding XPath query format used in the ACE Configuration Management Utility.
Condition Query
The Condition Query column is currently unused. It may eventually support the ability to include an additional condition for whether or not to include XML nodes obtained in the XPath query.
Mod Type
The following Modify actions are supported. See below under Examples of Modify Query actions for additional description of the types of actions that can be performed.
(blank)
Leave the Mod Type column blank to just run an informational query. The result is exactly the same as obtained with the Query and Query Results sheets, described above, but the output is stored on the Modify Results sheet. Source Data/File and Source Query are UNUSED.
AddFromFile
Add contents of a file, typically a chunk of XML text, as a child node *UNDER* each XML element selected by the Select Query.
The Source Data/File column contains the filename (if located in the Configuration Path configured on the Setup sheet), or a fully qualified directory and filename (such as C:\Data\mydata.XML). The Source Query is optional.
The source XML file may contain a small section of XML text, or it may be a complete ACE XML configuration or template file (with an additional qualifying Source Query).
self – The source XML data may also come from a different location within the same ACE configuration file being modified, using the word "self" for Source Data/File and a query defined under Source Query.
Note that the AddFromFile action will add the ENTIRE contents of the file (or Source Query) at ALL nodes selected by the Select Query (up to the limit specified by the Column Header). This is different from the behavior of the ModifyFromFile action.
AddFromFile[##]
Add contents of a file (same as AddFromFile) as a child node *UNDER* each XML element selected by the Select Query. The contents of the file (or part of the file specified by Source Query) is added ## number of times at each parent node. This is typically used to add multiple lines to a table, or multiple objects of the same kind at multiple Select Query insertion points.
Example:
Select Query points to the <TABLE> property of an ACE table (for one or more ACE objects).
Define Mod Type to be: AddFromFile[4]
This will take data from a file containing one or more <TR> elements and add all of those elements to every selected <TABLE>.
In place of the ## inside the [ ] brackets, you can use a variable such as ${VAR02} that has previously been set to a certain value. See Using Variable Values for more explanation of the variable feature.
Modify
Change the selected XML node(s) to the text included under the Source Data/File column in the Modify sheet. The Source Data may be a simple text value, such as "10.63.191.26", or a section of XML text, such as "<Value>10.63.191.26</Value>". Source Query is UNUSED.
If the Source Data contains XML text, it should only include one parent node, which may include children elements. If it includes multiple top-level sibling nodes, only the first will be used.
ModifyFromFile
Change the selected XML node(s) to the contents of a file.
The Source Data/File column contains the filename (if located in the Configuration Path configured on the Setup sheet), or a fully qualified directory and filename (such as C:\Data\mydata.XML). The Source Query is optional.
The source file may contain plain text, a small section of XML text, or another whole ACE XML configuration or template file (with an additional qualifying Source Query).
self – The source XML data may also come from a different location within the same ACE configuration file being modified, using the word "self" for Source Data/File and a query defined under Source Query.
Note that if the source data used with the ModifyFromFile actions contains plain text or a single top-level XML node, then the entire source data will be used to modify ALL Select Query nodes.
But if the source data contains multiple top-level XML sibling nodes, EACH sibling node will be used to modify EACH Select Query node, one for one, until either the Select Query nodes or the Source nodes have been exhausted. After that, no more nodes will be modified. This is different behavior from the AddFromFile actions.
Examples:
If the source data contains "<Parent><Sibling1></Sibling1><Sibling2></Sibling2></Parent>", the data is considered a single XML element called "<Parent>". This single element will substitute for (modify) ALL Select Query nodes (up to the limit specified by the Column Header).
But if the source data contains "<Sibling1></Sibling1><Sibling2></Sibling2>", then a MAXIMUM of two Select Query nodes will be modified – the first selected node will be changed to <Sibling1>, and the second will be changed to <Sibling2>.
Remove
Remove the selected XML node(s) specified by Select Query.
Or, it may remove children of those nodes, by adding an additional XPath query under the Source Query column.
If the Source Data/File column contains a number (or variable such as ${VAR02} containing a number), up to that many nodes will be removed at EACH Select Query location.
If the Source Query column is non-blank, it will be added to the Select Query to choose child elements of Select Query.
Examples:
1. Select Query points to a set of <TABLE><TR> nodes. A Remove action (with no Source Data or Source Query) will delete all selected <TR> nodes, up to the number of nodes included in the Column Header brackets [ ] (or all selected <TR> nodes, if Column Header ends with [0]).
2. Select Query points to <TABLE> node, the parent of <TR>. A Remove action with "5" in Source Data and "./TR" in Source Query will remove ONLY the first five <TABLE><TR> elements under each <TABLE> node selected by the Select Query.
SaveToVAR
Save a value retrieved by Select Query into a numbered variable. The value of the variable can be used in later query or modify actions as a substitutable parameter. Source Data/File column contains an integer number, specifying the variable to use. Source Query is UNUSED.
Example:
Select Query retrieves a "/count()" of objects or a value (such as "10.63.191.26"). Source Data column is "2". The value returned by the Select Query is stored into variable #2, which can be retrieved later with "${VAR02}".
See Using Variable Values for more explanation of the variable feature.
ConstToVAR
Save the contents of the Select Query column into a numbered variable. The Select Query, in this case only, is NOT an XPath query, but a fixed value or text string. The value of the variable can be used in later query or modify actions as a substitutable parameter. Source Data/File column contains an integer number, specifying the variable to use. Source Query is UNUSED.
Example:
The Select Query column contains a value of “10”. Source Data column is "2". The value of 10 is stored into variable #2, which can be retrieved later with "${VAR02}".
See Using Variable Values for more explanation of the variable feature.
Source Data/File
The use of the Select Data/File column depends on the Mod Type and query definition on each row.
For a blank action (query only), the Source Data/File column is unused.
For 'Modify' action, Source Data column is a fixed text value that will be substituted at each matching Select Query node.
For 'AddFromFile', 'AddFromFile##', or 'ModifyFromFile' actions, Source File column contains the file name of the data to be added or modified. This may be just a filename (for files located in Configuration Path) or a fully qualified Drive:\Path\Filename. The contents of an XML file may be limited to a subset of elements using the Source Query.
For 'Remove' action, Source Data is a optional positive integer, giving the maximum number of nodes that will be removed at each Select Query location.
For 'SaveToVAR' and 'ConstToVAR' actions, the Source Data column is a non-negative integer containing the variable number into which to store the node value or constant.
Source Query
The use of the Source Query column depends on the Mod Type and query definition on each row.
For a blank action (query only), 'Modify', 'SaveToVAR', and 'ConstToVAR' actions, the Source Query column is unused.
For the 'AddFromFile', 'AddFromFile##', and 'ModifyFromFile' actions, the Source Query is optional and may be used to select one or more nodes within the XML file containing data to add or modify nodes within the ACE configuration file.
For the 'Remove' action, the Source Query is optional. If used, it would be an XPath query to further qualify children of the Select Query node(s) to be removed.
Examples of Modify Query actions
Below are several examples describing how the various Mod Type actions work.
1. List all Master Channel names that have Modbus Field Units as children.
This example queries for an object of a certain "Enabled=Yes" attribute and gets its grandchildren that have a certain "Name" attribute.
Column Header: ModChans[0]
This lists them all in one column. Use [##] for a set number, or omit [0] for only the first Master Channel.
Select Query: //Node[ @Enabled='Yes' && Node/Node[ (@Type='FieldUnitModbus32' || @Type='FieldUnitModbusTCP32')] ] /@Name
Select all enabled nodes whose grandchild has a Modbus FieldUnit type, and list the parent node's name(s).
Mod Type, Source Data/File, Source Query: (blank)
Modify Results (single column): {Omni Channel 01}{PLC Channel 05}
Output is in braces { } because the Column Header ends with [0] and more than one node was queried.
2. Disable all but the first two Modbus or Allen Bradley Field Units under channel 1
This can be done with two Modify queries – the first disables all units, and the second enables the first two.
Column Header: DisableAll[0]
Select Query: //Node[ Properties/Instance = 1] /Node/Node[ (@Type='FieldUnitModbus32' || @Type='FieldUnitModbusTCP32' || @Type='FieldUnitABDF1M')] /@Enabled
This query gets the Enabled property of all Modbus grandchild nodes under Master Channel with Instance=1.
Mod Type: Modify
Source Data/File: No
All ACE objects have an "Enabled" attribute that is either "Yes" or "No".
Modify Results (one column): modified 5x
This tells the number of source nodes that were modified.
(Note, Excel's XPath support doesn't seem to include "position()", which would make this simpler. This could also be done using a Select Query including instance numbers > 2, if the object instance numbers correspond to the correct objects to disable.)
Column Header: Enable[2]
Select Query: //Node[ Properties/Instance = 1] /Node/Node[ (@Type='FieldUnitModbus32' || @Type='FieldUnitModbusTCP32' || @Type='FieldUnitABDF1M')] /@Enabled
Mod Type: Modify
Source Data/File: Yes
Modify Results (two columns): Enable(1), Enable(2). Both say "modified 1x"
In this case, each of the two Select Query nodes requested in the query are given their own column of result data.
3. Add Automated Processing section under Clients, using a dedicated XML text file.
This example will add the entire contents of a file, which has been copied out of an existing configuration and includes only the Automated Processing section of XML text.
Column Header: ADD_AutoProc
Select Query: //Node[@Type='Clients']
Select the Networks parent where Automated Processing will be added.
Mod Type: AddFromFile
Source Data/File: autoProcSource.XML
autoProcSource.XML contains the entire XML of the Automated Processing node, with all its child objects needed in a configuration.
Source Query: (blank)
Modify Results (one column): added 1x
Note that in this example, we could obtain the source data from an existing configuration using a Source Query, such as:
Source Data/File: GoldenACEConfiguration.XML
GoldenACEConfiguration.XML contains a fully configured Automated Processing, to be copied into one or more other configurations.
Source Query: //Node [@Type="Automated_Processing"]
4. Remove existing table rows in the Automated Processing table that was imported.
This clears the table and allows it to be set up specifically for the ACE objects configured in each configuration.
Column Header: REM_Omni[0]
Select Query: //Node[ @Type='Omni-Modbus-Archives'] /Fields//TR
This removes all TR grandchildren (table rows) of the Omni-Modbus-Archives table, because the Column Header uses [0].
Mod Type: Remove
Source Data/File and Source Query: (blank in this example)
Modify Results: removed 4x
5. Count number of Modbus Field Units in the current configuration.
(For purpose of this example, these are assumed to be Omni flow computers.) This example illustrates the use of the SaveToVAR action. The saved value will be used in the next two examples.
Column Header: VAR00 (#Mod)
Select Query: //Node[ @Enabled='Yes' && (@Type='FieldUnitModbus32' || @Type='FieldUnitModbusTCP32') ] ~~~ ..[@Enabled='Yes'] /..[@Enabled='Yes'] /count()
This selects nodes of Modbus type that are enabled, which have both a parent Circuit and Master Channel that are also enabled. Note the use of the two XPath queries chained with "~~~", and the ".." indicates backing up to the parent of the node(s) selected in the first query. The "count()" at the end yields the number of such nodes with the above characteristics.
Mod Type: SaveToVAR
Source Data/File: 0
This setting will store the count of nodes into variable ${VAR00}.
Modify Results: The results page will display the value that was stored in the variable, such as "2".
6. Add two table rows to a table for every Modbus Field Unit.
This example uses a separate file containing a <TR> section with all its <TD> child rows rows which are the new Poll Table entries.
Column Header: ADD_OmniTimeSync
Select Query: //Node[ @Type='Time-Syncs'] /Fields/Field[@Name='Data Process Table']/TABLE
Select the intended object type, then select the <TABLE> grandchild which is the *parent* where new XML will be inserted.
Mod Type: AddFromFile[${VAR0}]
In the previous example, we used a SaveToVAR action to count the number of Modbus field units. Now we are using the phrase "${VAR0}" to substitute in the Mod Type for the number of iterations that we wish to insert the file contents. The Mod Type is translated to (for instance) "AddFromFile[5]" before being acted upon.
Source Data/File: TimeSyncTable-ModbusRow.XML
Source Query: blank
(But note that we could have pointed to an XML configuration file with the <TR> table rows we needed, and used a Source Query to request those rows as the items to be inserted.)
Modify Results: added 2x
7. Modify channel number in table based on Master Channel of every Modbus Field Unit.
This example queries all the Modbus units (assumed for this example to be Omni flow computers), gets the Master Channel number, and modifies the first column of the table rows inserted in the previous example.
Column Header: OmniTSChan[0]
Select Query: //Node[ @Type='Omni-Modbus-Archives'] /Fields/Field[@Name='Data Process Table'] /TABLE/TR [TD[4] = '8'] /TD[0]
This selects the first <TD> column in the table (Channel number), where the 5th <TD> column is a value of "8" (Omni Batch). (Note, this query only modifies half of the newly inserted rows in the table in this example. Another query would be needed to modify the rows where the 5th column is "9", Omni Hourly.)
Mod Type: ModifyFromFile
Source Data/File: self
This option queries this configuration for data to use for modification.
Source Query: //Node[ @Enabled='Yes' && Node[ @Enabled='Yes'] && Node/Node[ @Enabled='Yes' && (@Type='FieldUnitModbus32' || @Type='FieldUnitModbusTCP32')] ] /Properties/Instance/text()
This query selects an enabled channel, enabled circuit, enabled Modbus unit, and gets the Instance number (Master Channel number).
Modify Results: modified 2x
Note that the Select Query selects two rows in the table to be modified, and the Source Query selects potentially all of the Master Channel numbers, if they are different – if there had been more than one Channel, then the nodes would have been modified one for one. In reality, however, in this example all the Modbus field units are under the same channel, so the query actually on returns one node: the Master Channel <Instance> that is the parent of all the Modbus units. Therefore, the Modify query has a single node that is the source, so ALL of the Select Query nodes are modified, no matter how many (one to many).
Using TestXPath Sheet
The TestXPath sheet can be used for testing XPath query definitions (either Select Query, or any document used in a Source Query).
The first seven columns in this sheet are the same as in the Modify (or Query) sheets, except the second column is a filename of an XML document (full path, or relative to the Configuration Path).
Enter data for Column Header, Mod Type, Source Data/File, and/or Source Query, and click the "> Test XPATH <" button. The basic rules for these columns are followed, as described in the section Modify Sheet. The main differences are:
When clicking the "> Test XPATH <" button, the query and action are performed ONLY on the same row as the currently-selected cell.
The Number of Child Nodes column (H) gives the count of nodes requested by the Select Query, regardless of whether the query ends with "/count()".
The Select Query XML column (I) contains all queried nodes, separated by braces { }, as if the Column Header ended with [0].
The Modify Results column (J) contains the results of any Modify action, separated by braces { }, as they would appear in multiple columns of the Modify Results sheet.