Introduction
In this tutorial, we will be demonstrating connectivity from a RediGate 120C to an OpenVPN server.
Pre-Requisites
- A RediGate 120X or 400 series device with internet connectivity
- Completion of the Getting Started Guide for your respective RediGate device
- Successful completion of one of our IIoT Platform Quick Starts. In this example, we will be showing screenshots from the RediGate to Inductive Automation Ignition (MQ-RBE) quick start.
- An OpenVPN server that is accessible to the RediGate device. In this example, we will be using the OpenVPN AMI that is available on AWS
Setting up Your RediGate
Install OpenVPN on your RediGate
- Download and install the OpenVPN.star file. The file can be downloaded from http://redigate.elecsyscorp.com/examples/
- Download required .star file from the RediGate support site (http://redigate.elecsyscorp.com). In this example, we will be loading the OpenVPN software .star file
- Open ACE, and select the configuration that you wish to have loaded on the RediGate. Choose "File → Upload XML to Device", and check the "Upload Additional Files" checkbox
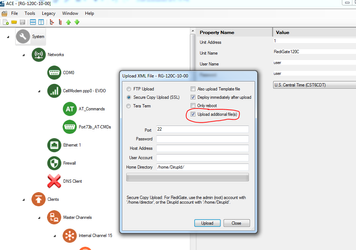
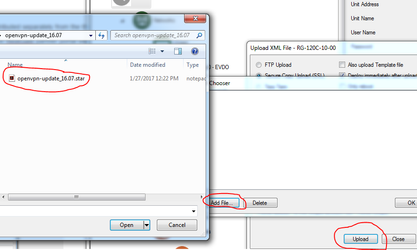
- Click "Upload" (using the correct SSL or Serial settings) and browse to the .star file you downloaded from the RediGate support site. NOTE: You will have to extract the .star file from the .zip downloaded from the site
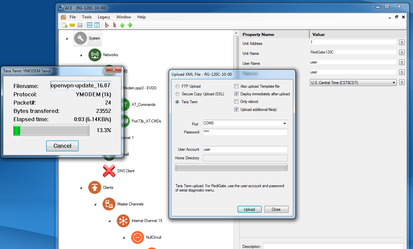
- You will see a dialog box showing the progress of the .star file transfer:
Once you have successfully loaded the .star file on the RediGate, using the root user credentials in putty, you should be able to run the command “openvpn --version” and see a Sep 13 2016 build of OpenVPN:

Update Configuration with OpenVPN Settings
- Download the "RediGate-to-OpenVPN-V2.zip" file from the http://redigate.elecsyscorp.com/examples website
- This .zip contains an example RediGate-to-OpenVPN-V2.xml ACE configuration and a couple of example OpenVPN configurations for your reference
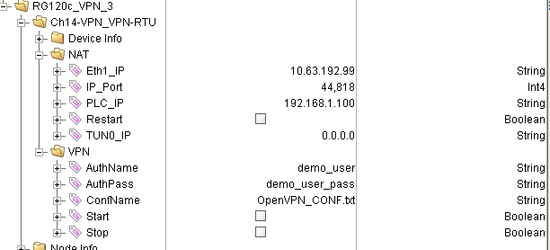
- Copy and paste the "VPN_Configuration_Ch14" object from the RediGate-to-OpenVPN-V2.xml configuration into your configuration

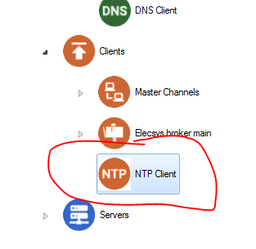
- If your RediGate has access to the public internet, copy and paste the "NTP Client" from the RediGate-to-OpenVPN-V2 configuration into your configuration. If not, you will need to manually set the date/time of the RediGate in order for the timestamps on the generated certificates to work
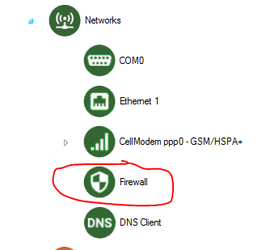
Copy and paste the "Firewall" object from the RediGate-to-OpenVPN configuration into your configuration:
Delete or Edit Existing Firewall
Each configuration can only have 1 firewall, so if you already have a firewall object, you will need to delete the existing one or edit the "Port Management" and "Custom IPTABLES" objects to match that of the RediGate-to-OpenVPN firewall configuration
- Upload configuration and confirm that the VPN tags are being published to your broker. The example below shows a screenshot of the tags published to Inductive Automation's Ignition SCADA:
Setting up Your OpenVPN Server
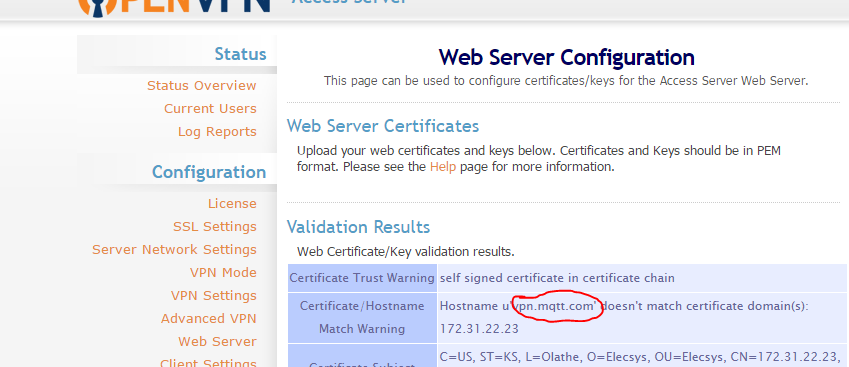
Set the server hostname
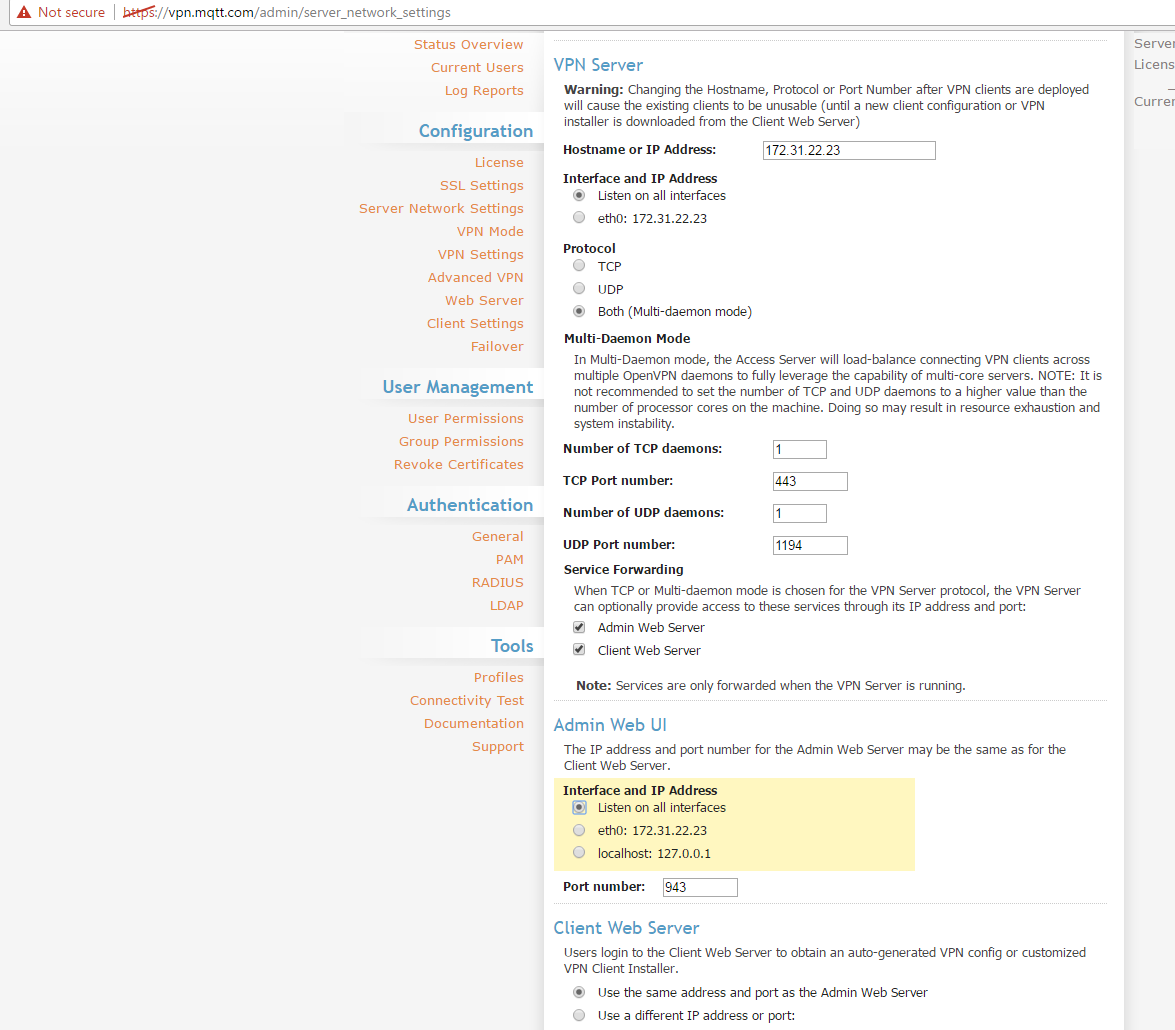
Login through the web UI and change the hostname to the domain name of the server. Also update the interface so it allows all connections (if not already set)
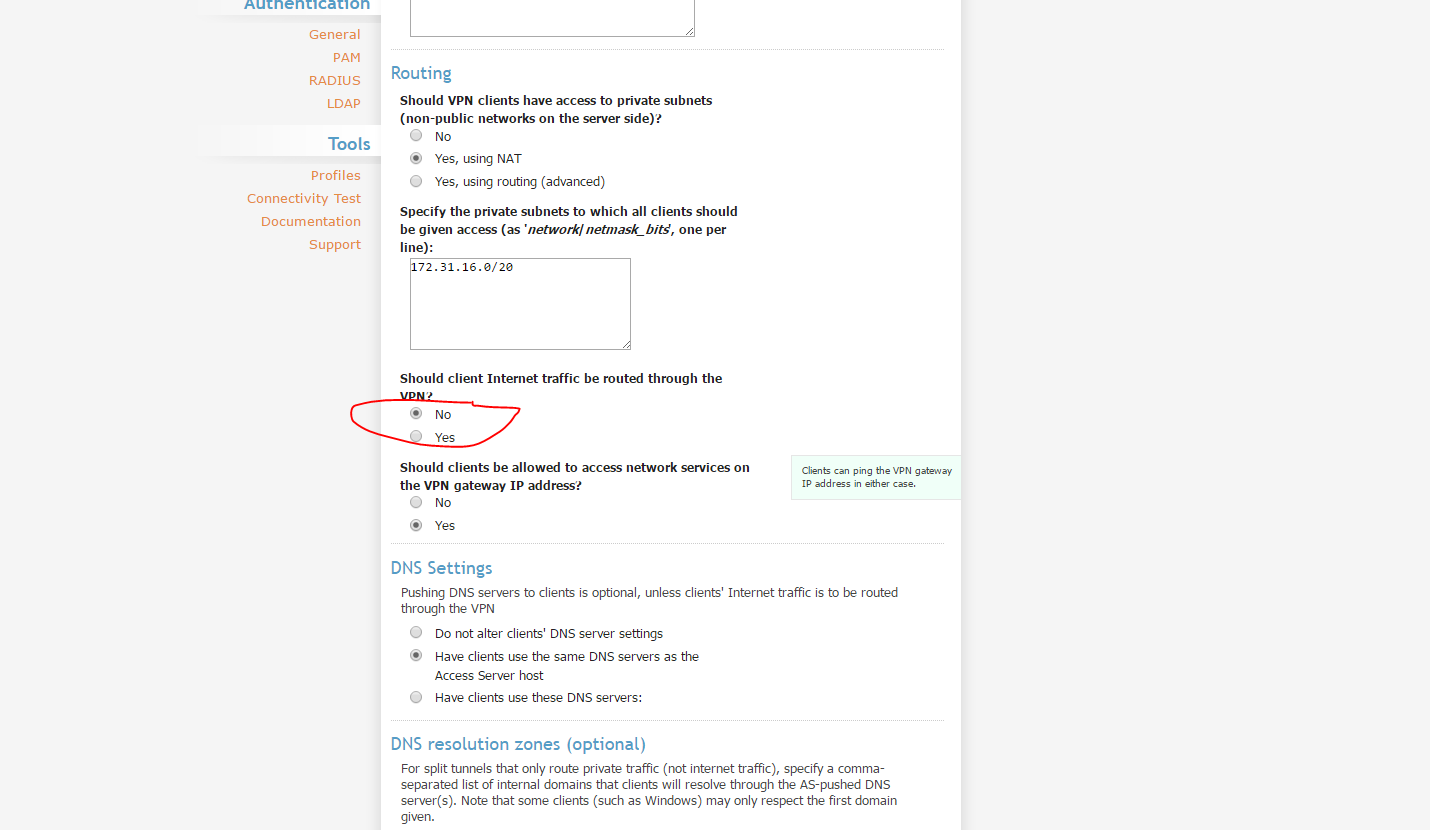
Don't Route Internet Traffic Through VPN
Creating Self-Signed Certificates (https://openvpn.net/index.php/open-source/documentation/howto.html#pki)
Generate the master Certificate Authority (CA) certificate & key
NOTE: MAKE SURE YOU RUN THE COMMAND LINE AS ADMINISTRATOR
In this section we will generate a master CA certificate/key, a server certificate/key, and certificates/keys for 3 separate clients.
For PKI management, we will use easy-rsa, a set of scripts which is bundled with OpenVPN 2.2.x and earlier. If you're using OpenVPN 2.3.x, you need to download easy-rsa separately from here.
If you are using Linux, BSD, or a unix-like OS, open a shell and cd to the easy-rsa subdirectory. If you installed OpenVPN from an RPM or DEB file, the easy-rsa directory can usually be found in /usr/share/doc/packages/openvpn or /usr/share/doc/openvpn (it's best to copy this directory to another location such as /etc/openvpn, before any edits, so that future OpenVPN package upgrades won't overwrite your modifications). If you installed from a .tar.gz file, the easy-rsa directory will be in the top level directory of the expanded source tree.
If you are using Windows, open up a Command Prompt window and cd to \Program Files\OpenVPN\easy-rsa. Run the following batch file to copy configuration files into place (this will overwrite any preexisting vars.bat and openssl.cnf files):
init-config
Now edit the vars file (called vars.bat on Windows) and set the KEY_COUNTRY, KEY_PROVINCE, KEY_CITY, KEY_ORG, and KEY_EMAIL parameters. Don't leave any of these parameters blank.
Next, initialize the PKI. On Linux/BSD/Unix:
. ./vars
./clean-all
./build-ca
On Windows:
vars
clean-all
build-ca
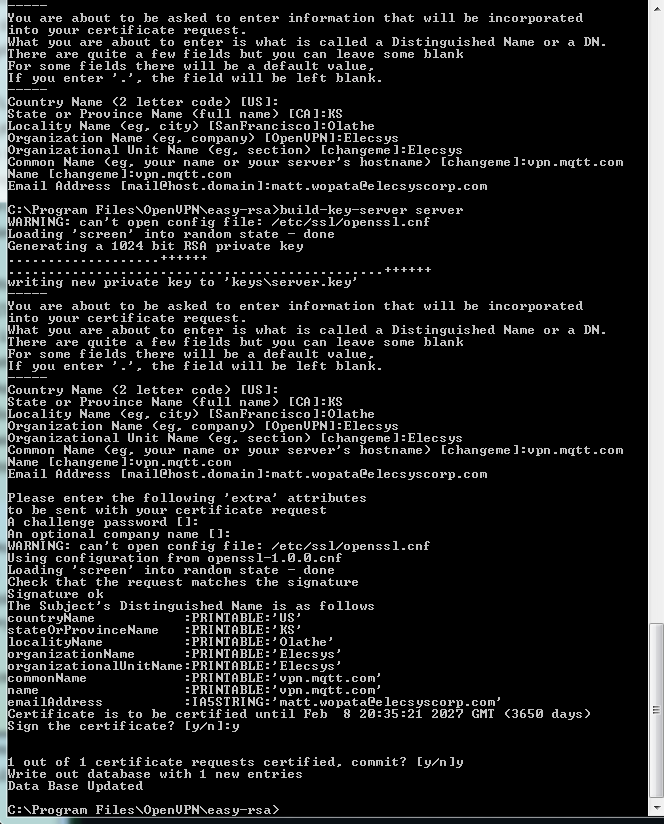
The final command (build-ca) will build the certificate authority (CA) certificate and key by invoking the interactive openssl command:
ai:easy-rsa # ./build-ca
Generating a 1024 bit RSA private key
............++++++
...........++++++
writing new private key to 'ca.key'
-----
You are about to be asked to enter information that will be incorporated
into your certificate request.
What you are about to enter is what is called a Distinguished Name or a DN.
There are quite a few fields but you can leave some blank
For some fields there will be a default value,
If you enter '.', the field will be left blank.
-----
Country Name (2 letter code) [KG]:
State or Province Name (full name) [NA]:
Locality Name (eg, city) [BISHKEK]:
Organization Name (eg, company) [OpenVPN-TEST]:
Organizational Unit Name (eg, section) []:
Common Name (eg, your name or your server's hostname) []:OpenVPN-CA
Email Address [me@myhost.mydomain]:
Note that in the above sequence, most queried parameters were defaulted to the values set in the vars or vars.bat files. The only parameter which must be explicitly entered is the Common Name. In the example above, I used "OpenVPN-CA". Generate certificate & key for serverNext, we will generate a certificate and private key for the server. On Linux/BSD/Unix: ./build-key-server server On Windows: build-key-server server |
For "server", make sure you put the IP address of the server as indicated by the default certificate:
CA files will be found here: C:\Program Files\OpenVPN\easy-rsa\keys
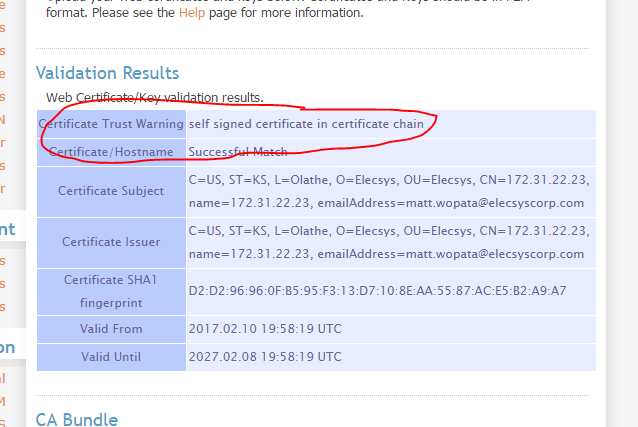
Upload them to the certificates section on the server
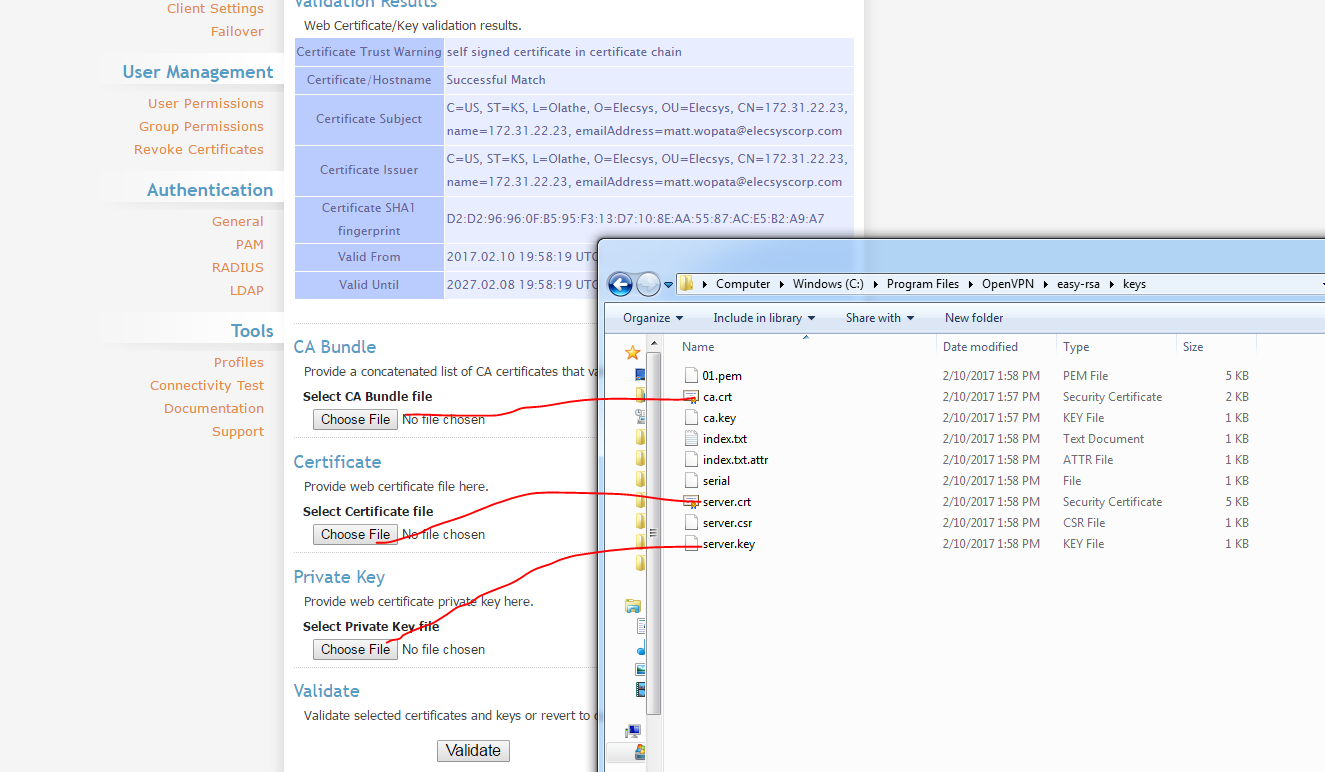
View Successful Match
Creating OpenVPN User and Configuration File for RediGate
Creating OpenVPN Configuration File for RediGate
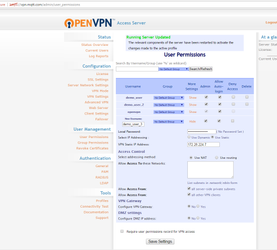
- Create a new user using the OpenVPN web interface
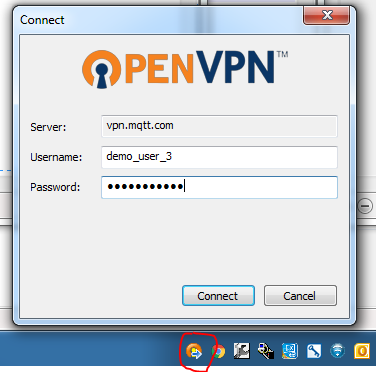
- Create a connection with those user's credentials using your PC's "VPN Connect App", however BE CAREFUL. You do not want to click through all the options because the next step requires copying and saving the text from one of the dialog boxes.
- Copy and paste the credentials generated by the "OpenVPN - Warning" into a text document, omitting the top line that reads "OpenVPN configuration file:"
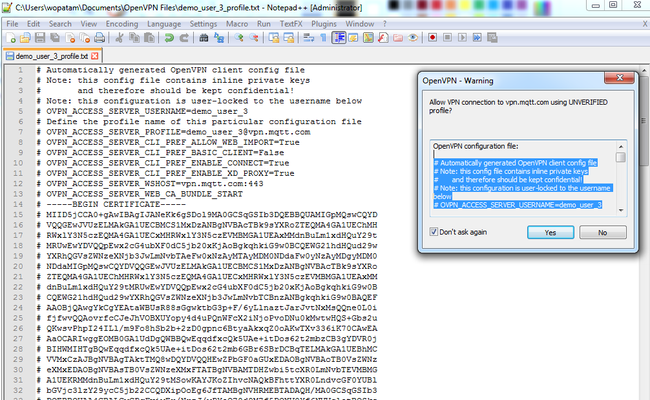
- Edit ~Line 58 of the the text document with the following so that the text reads "auth-user-pass /etc/openvpn/auth.txt"
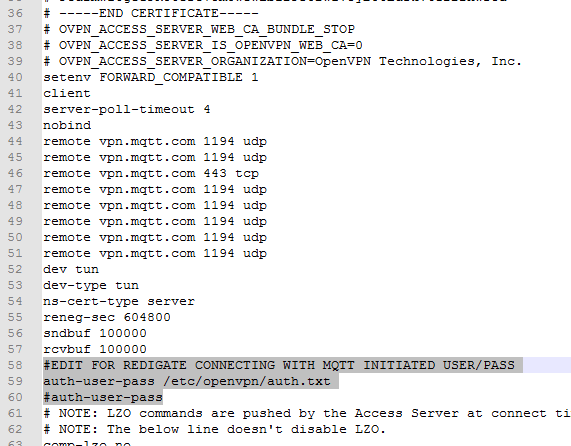
- NOTE: Lines 44 to 51 of your file should not contain "vpn.mqtt.com" – they should read the IP address or server name of your OpenVPN server
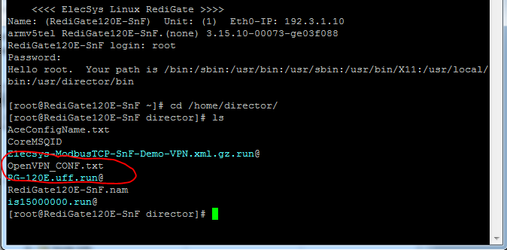
- Save the file as "OpenVPN_CONF.txt" and load the text file onto the RediGate
- Method 1 - Upload Additional Files using ACE
- Confirm tha tthe name of the OpenVPN configuration file to be loaded onto the RediGate is less than 32 characters in length
- Open the ACE configuration to be loaded onto the RediGate, and select the "Upload Additional Files" checkbox
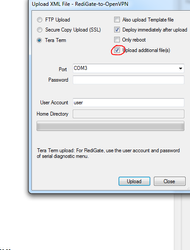
- Click "Upload" and browse to the OpenVPN_CONF.txt file you created in the previous steps
- Once the upload is complete, you should see the configuration file on the RediGate. The location of the configuration file will depend on the account used to upload the configuration/file:
- "user" account: /home/director
- "root" account: /home/director
- "Dirupld" account: /home/Dirupld
- Method 1 - Upload Additional Files using ACE
Updating Settings and Starting VPN via MQTT and Ignition
Update VPN Settings via MQTT
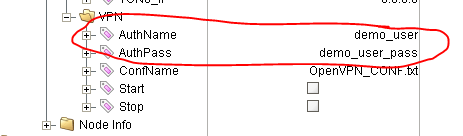
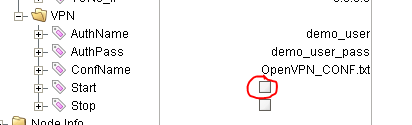
- Change the "AuthName" and "AuthPass" values to match those of the user whose configuration you uploaded
Confirm all settings are correct, and send a "1" value to the the "VPN.Start" tag to initiate the connection. For examples on how to send MQTT values to non-Ignition systems, see OpenVPN MQTT API Reference
Edit Default MQTT Values
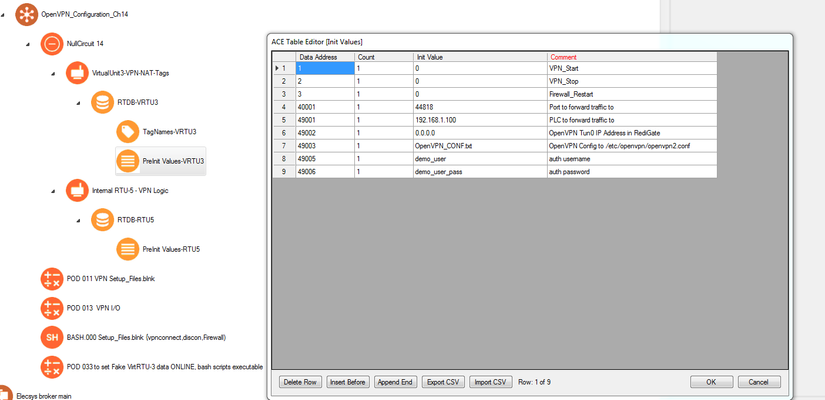
You can edit the default values for the AuthName, AuthPass, and OpenVPN_CONF.txt by changing the PreInitRTDB values under the "VirtualUnit3-VPN-NAT-Tags":
- When the "Start" tag is toggled, the RediGate will check the following folders for the filename specified in the OpenVPN_CONF.txt tag (which was set in the previous step), and use that filename as the OpenVPN configuration with the username/password credentials specified in the AuthName and AuthPass tags:
- /home/director
- /home/Dirupld
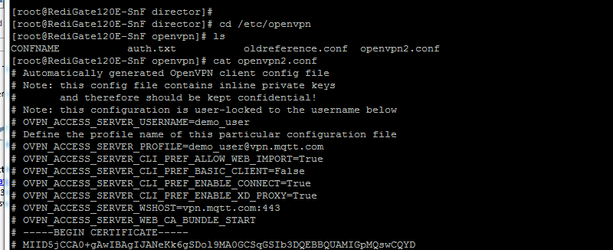
- The RediGate will then move the contents of that file into the file located in /etc/openvpn/openvpn2.conf for future use:
- When the "Start" tag is toggled, the RediGate will check the following folders for the filename specified in the OpenVPN_CONF.txt tag (which was set in the previous step), and use that filename as the OpenVPN configuration with the username/password credentials specified in the AuthName and AuthPass tags:
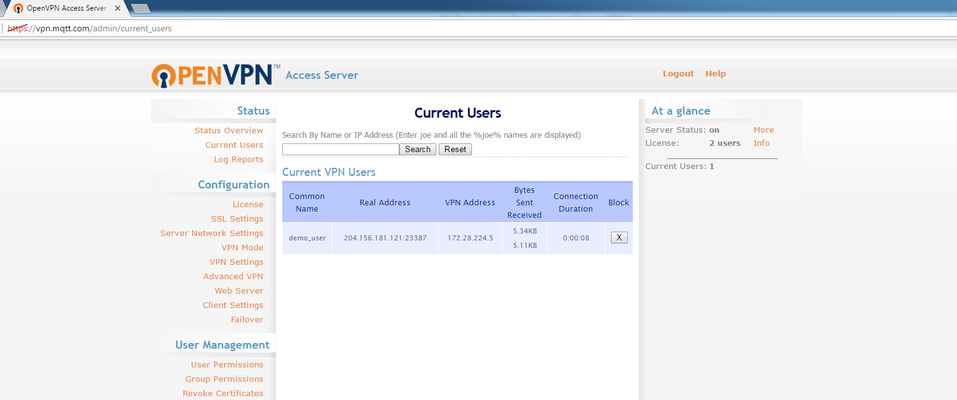
- Confirm that the VPN has started by viewing the client list on the OpenVPN server configuration page