RediGate 100 Series Getting Started Guide
- Jon Tandy
- Former user (Deleted)
- Former user (Deleted)

Product Information
Full information about other Elecsys products is available on our website at www.elecsyscorp.com and the RediGate Product Support page.
Product Support
Tel: +1-913-890-8905
Fax: +1-913-982-5766
Email: idc-support@elecsyscorp.com
Headquarters, Sales, Support & Manufacturing
Elecsys Corporation
846 N Mart-Way Court
Olathe, KS 66061
Tel: +1-913-647-0158
Fax: +1-913-982-5766
Email: info@elecsyscorp.com
While Elecsys may assist customers with their choice of products, the final choice of product for a specific application is entirely the responsibility of the buyer. Elecsys' entire liability with respect to its products or systems is defined in the Elecsys standard terms and conditions of sale.
Any example code is provided only to illustrate the use of Elecsys products. No warranty, either expressed or implied, is made regarding any example code provided by Elecsys and Elecsys shall incur no liability whatsoever arising from any use made of this code.
Disclaimers
The information in this manual is believed to be accurate at the time of publication. Elecsys Corporation assumes no responsibility for inaccuracies that may be contained in this document and makes no commitment to update or keep current the information contained in this manual. Elecsys Corporation assumes no responsibility for any infringements of patents or other rights of third parties that may result from its use. Elecsys Corporation reserves the right to make changes or improvements to this document and/or product at any time and without notice. While Elecsys may assist customers with their choice of products, the final choice of product for a specific application is entirely the responsibility of the buyer. Elecsys' entire liability with respect to its products or systems is defined in the Elecsys standard terms and conditions of sale.
Any example code is provided only to illustrate the use of Elecsys products. No warranty, either expressed or implied, is made regarding any example code provided by Elecsys and Elecsys shall incur no liability whatsoever arising from any use made of this code.
Electrostatic Discharge (ESD) Protection
These units contain devices that could be damaged by the discharge of static electricity. At all times, please observe industry standard ESD precautions when handling the unit.
 WARNING: DO NOT CONNECT OR DISCONNECT CABLES WHEN ENERGIZED, UNLESS POWER HAS BEEN REMOVED FROM THE EQUIPMENT OR THE AREA IS KNOWN TO BE FREE OF IGNITABLE CONCENTRATIONS OF FLAMMABLE SUBSTANCES.
© 2024 Elecsys Corporation
Table of Contents
Getting Started with Configurations
This section walks a first-time user through the steps of getting connected to the RediGate, creating an initial configuration, uploading the configuration, and logging into the user interface menu to observe its operation.
Starting the RediGate
If you are starting the RediGate for the first time, or if you don't know the Ethernet IP address, you will need to connect to the RediGate via the USB port on the front of the device.
If you have a RediGate with an ethernet port (110e or 120e), you should also connect the RediGate to the same Ethernet network as the configuration PC, or directly using a crossover Ethernet cable (you may need to configure the PC to a compatible IP address in this case).
Powering the RediGate
The Redigate will work with any 9.5-28V DC power supply connected to the supplied power cable. Apply power to the device prior to installing and testing the Silicon Labs USB Driver
Install Silicon Labs USB Driver
Download and install the latest USB Driver from the Software page at redigate.elecsyscorp.com
Make sure to install the correct version of driver for your operating system:
For Windows 64-bit, use CP210xVCPInstaller_x64.exe
For Windows 32-bit, use CP210xVCPInstaller_x86.exe
To verify your version of Windows, right-click on the System icon in the Start menu or Windows Explorer, or select System in the Control Panel:
Power on the RediGate, and connect a USB cable from the configuration computer to the console port on the front of the RediGate (USB type A male to Micro-USB type B male). The Windows operating system should recognize the port as a USB serial port.

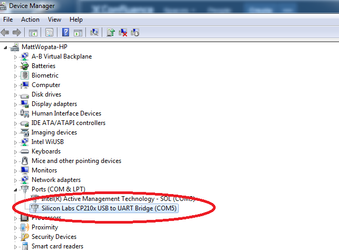
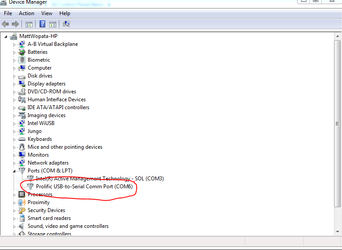
Open the Windows "Devices and Printers" window to confirm that the device appears as a "Silicon labs CP210x USB to UART Bridge," with a "COMx" port number designation, as shown in the following screen capture:

If the port is not recognized as a USB serial port, see if the device appears in the Windows Device Manager as an unknown device – this may indicate that the driver was not installed properly.
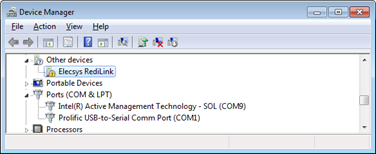
Also, try a different USB port on the computer, or try a different cable.
If you have a second RediGate, try plugging into its USB port.
It should not normally be required to reboot Windows, but you might try that as well.
Install the ACE Program
In order to configure the RediGate, you will need to install the ACE program. The basic instructions are outlined here, but see the ACE Operation Manual (https://ftp.elecsyscorp.com/RediGate/Manuals/ACE%20Operation%20Manual.pdf) for more complete instructions on installing and using the ACE program utilities.
Deprecated
NOTE: These are old instructions for a previous version of ACE (3.6.x). For the latest instructions, see: Installing ACE
Download the latest ACE Editor (3.6.x) software installation from http://redigate.elecsyscorp.com/software
Choose a version to download. There are two options: Online Install and Offline Install. As of 3.6.3.0, only the Offline Install is available.
The Online Install version can be used if your configuration PC is connected to the Internet. This version will check for updates each time it runs, and you will be prompted when there is an update available.
The Offline Install version must be used if your configuration PC does not have access to the Internet. This version will not check for updates, and you are responsible for downloading and updating the application when an update becomes available.Uninstall Previous Versions
If you have a previous version of ACE installed on your machine, you may need to uninstall that version prior to installing the current version of ACE Editor.
- You can install ACE Editor version 3.6.x on the same machine as a previously installed ACE Editor version 3.5.x or earlier, if desired.
- If you are updating ACE Editor 3.6.x from a previous 3.6.x, but from a different installation location (different folder, or Online/Offline difference), you must uninstall the existing version first.
Uninstalling and reinstalling the ACE Editor will not delete your existing Working Folder (configuration directory), including configuration and template files with one exception: If you uninstall ACE Editor that is version 3.0 through 3.5.x, the "DefaultTemplate.xml" file will be removed during the uninstall and replaced with the reinstall. If you wish to retain your existing DefaultTemplate.xml, either rename or back-up this file before uninstalling the program.
Newer versions of ACE Editor can use the same Working Folder (configuration directory) as earlier versions.
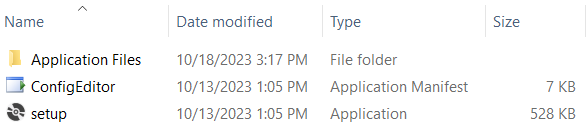
(Offline Install only) – Click the Offline Install link on the RediGate software site, and download the .zip file. This will be stored into your Downloads folder.
Create a folder (such as "C:\Temp"), and extract the files from the .zip file into the folder. If you plan for multiple users to install ACE Editor in a shared working environment, you can extract the files to a common network folder accessible to all users.Temporary Install Location
Note: When performing the Offline Install to upgrade an already-installed ACE Editor, you must use the same folder to install the update from which it was installed originally. If not, you will get an error and have to uninstall the old version and reinstall the new.
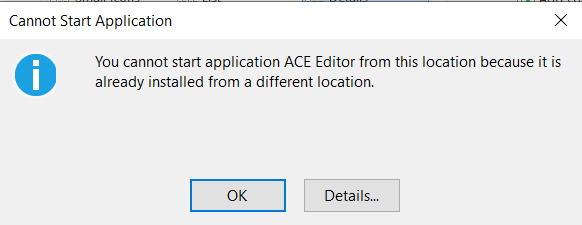

- (Offline Install only) – Run the setup or setup.exe application to install the ACE Editor.

- (Online Install only) – Click the Online Install link on the RediGate software site. This will download the ConfigEditor.application file and store it to your Downloads folder.
Open the ConfigEditor.application file. Prompts may differ depending on your Web browser – a typical example is shown below.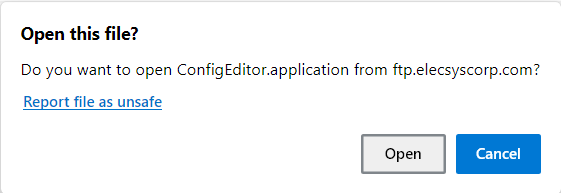
- Follow the prompts to continue the installation.
Click the Install button.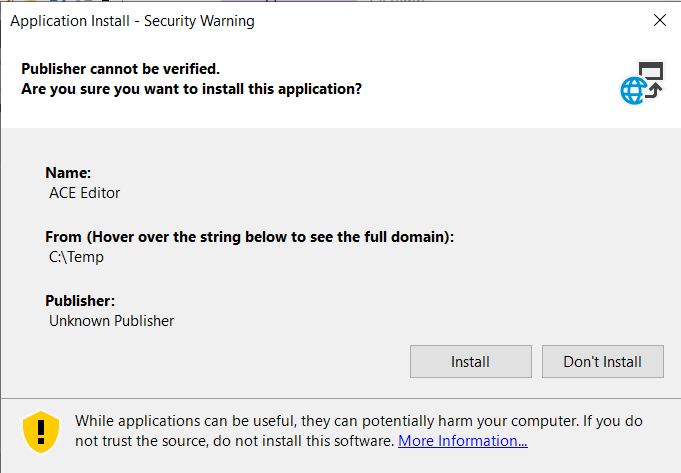
Click "More info" to reveal the app information, and click the "Run anyway" button.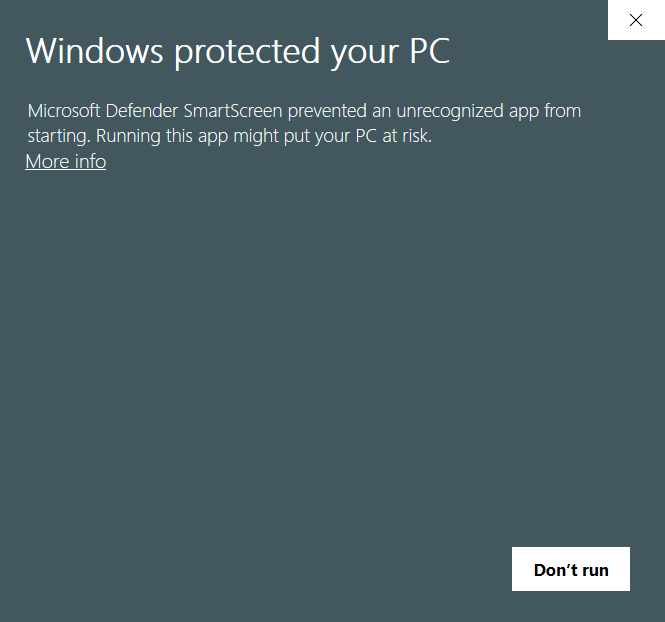
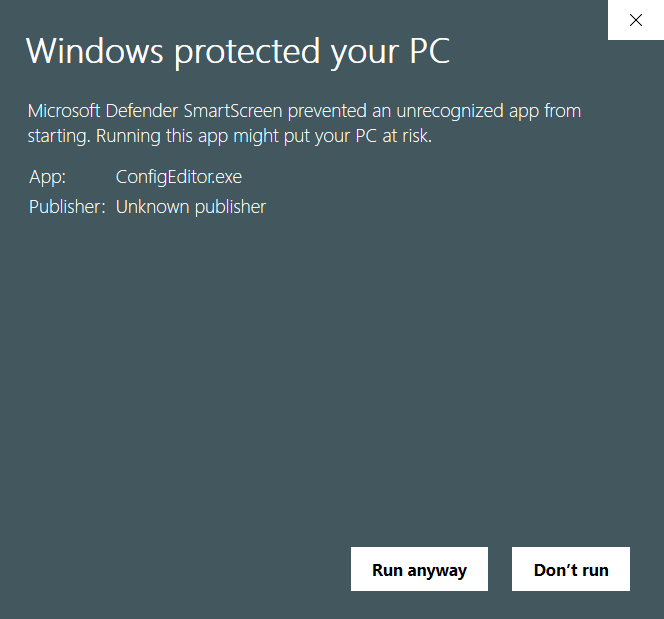
- The ACE Editor will open immediately, if the installation was successful.
Whenever ACE Editor is opened, it will install the following files, if they don't already exist:
* Program icons and TeraTerm application into a private user application directory (such as %LOCALAPPDATA%\Elecsys\ACE).
* DefaultTemplate.xml file into the current Working Folder (configuration directory, such as Documents\Elecsys\ACE).
To install the program icons when prompted, select Icons or Icons.zip, and click Open.
OldIcons.zip is a set of older icons used by legacy customers.
(Source install directory for the icons is, for example, %LOCALAPPDATA%\Apps\2.0\0K3CR1Y1.46N\W2JLTGBR.D31\conf..tion_ea1bfc80a8729bec_0003.0006_710bfa536f49dce9).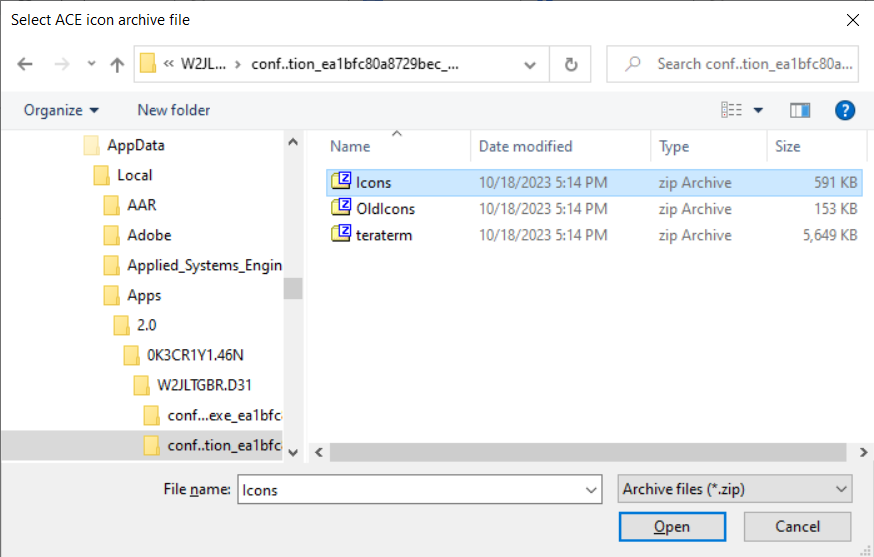
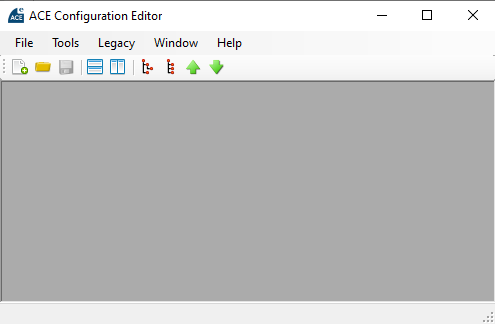
- The ACE Editor will open to a blank screen. Now you are ready to open, create, or modify your XML configuration files.
Download Latest Default Configuration
- Determine the model number of your RediGate by locating the part number on the back of the device
- RediGate model number includes RG-1xx for 100 series or RG-4xx for 400 series.

- RediGate model number includes RG-1xx for 100 series or RG-4xx for 400 series.
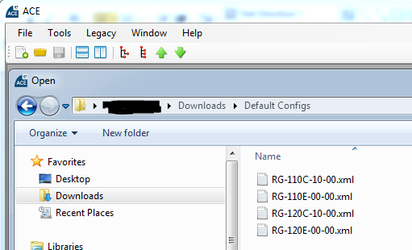
Visit http://redigate.elecsyscorp.com/software and download the latest Default Configuration for your particular model number.
You will need to extract the .xml file from the .zip file you downloaded from the website. By default, ACE stores configuration files in the Documents\Elecsys\ACE\CFG folder, but you can store the configuration in any file location accessible by the ACE program.- Open the extracted default configuration with ACE
Upload Configuration to RediGate
Upload via Micro USB port (RediGate 100 series only)
- If you have not done so already
- Install the Silicon Labs USB Driver and determine the USB port number assigned to it
- Apply power to the RediGate
- Make sure that no other serial program is currently using this USB port; otherwise, the file transfer will fail.
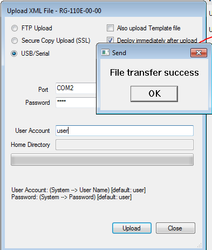
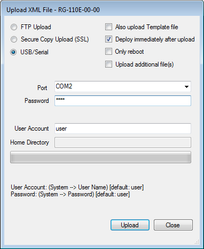
In the "Upload XML File" dialog, select the "USB/Serial" option and set the Port to match your USB port number.
Enter the following information on the "Upload XML to Device..." prompt.
Password: (the default password is 'user')
- User Account: (the default username is 'user')
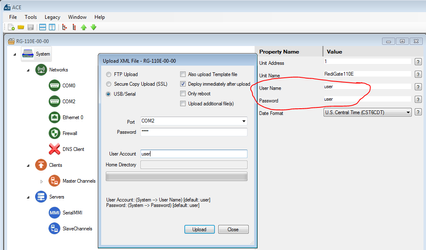
- Once these options have been configured, click the Upload button to transfer the configuration to the RediGate. You will need to wait for several seconds before the file transfer begins. Click "OK" when the "File transfer success" dialog appears.
If Open, Exit Putty Before Upload
If you have PuTTY open or any other serial connection to the device, you will need to close that connection before uploading the configuration.
Diagnostics Menu
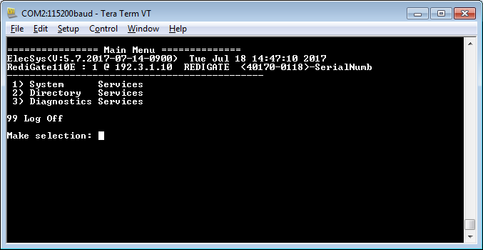
You can connect to the RediGate diagnostics menu with Tera Term using the ACE program. (You can also use the PuTTY program for this – see Setting Up Putty for USB Connection).
The Diagnostics menu via Tera Term or Putty provides advanced troubleshooting features. The RediGate Diagnostics Manual provides an in-depth guide on how to use the RediGate menu for troubleshooting and diagnostics.
Use ACE to Connect to Device
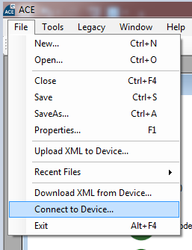
- In the ACE Configuration Editor, select File | Connect to Device.
- If you are using an RS-232 (RediGate 400 series)) or USB serial (RediGate 100 series) port, select the "USB/Serial" toggle button.
- If you have already set the IP address in the RediGate, select "Secure Shell (SSH)" to connect over the network.
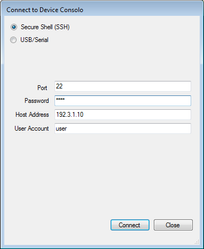
- For IP connections, enter the IP address in the "Host Address" field. The "Port" will typically be 22.
- For IP connections, enter the IP address in the "Host Address" field. The "Port" will typically be 22.
Enter login credentials. This should be the User Name and Password currently configured in the RediGate, as shown in the "System" object of the ACE configuration. By default, the username/password for general access is user/user. Please refer to your RediGate configuration to determine the correct username/password combination:

- When you have successfully connected, you should see the following screen:
Host Configuration
The "Host" port on your RediGate acts as the connection to the internet or internal network where the data from your field device will be sent. RediGate 110c and 120c models have cellular host connections, and RediGate 110e and 120e have ethernet host connections.
Ethernet Host Configuration
- To set the Ethernet properties, click on the "Ethernet 0" object
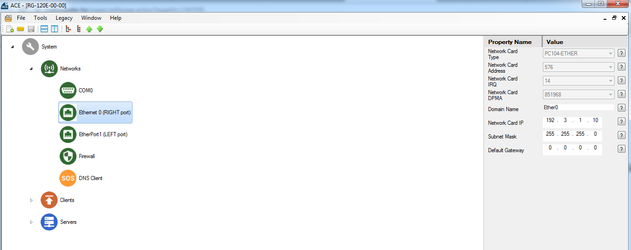
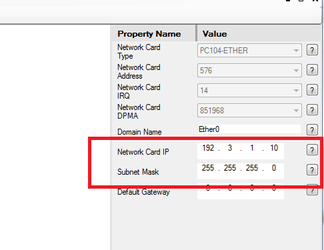
Set the Network Card IP, Subnet Mask, and Default Gateway appropriately for the network that you are using with the RediGate, leaving the other options default as shown below
DHCP
If you would like your Ethernet port to obtain its address via DHCP, enter 0.0.0.0 for the Network Card IP, Subnet Mask, and Default Gateway
- Save your settings and upload the configuration to your device
Cellular Host Configuration (CAT-M1, GSM) – SIM card installation
For CAT-M1 and GSM models, the RediGate 100 series products use standard (also known as "mini") SIM cards. The steps below show how to install the SIM card:
- Remove power and all connectors from the front panel. Remove the two mounting screws from either side of the front faceplate
- Gently slide the board out of its enclosure to expose the SIM card slot
- Fully insert the SIM card into the SIM card slot, with the metal contacts facing down and the angled edge facing out
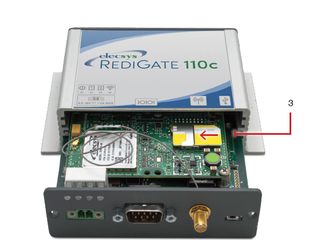
- Gently slide the board back into its housing and carefully replace the two mounting screws to avoid over-tightening. Replace all front panel connectors.
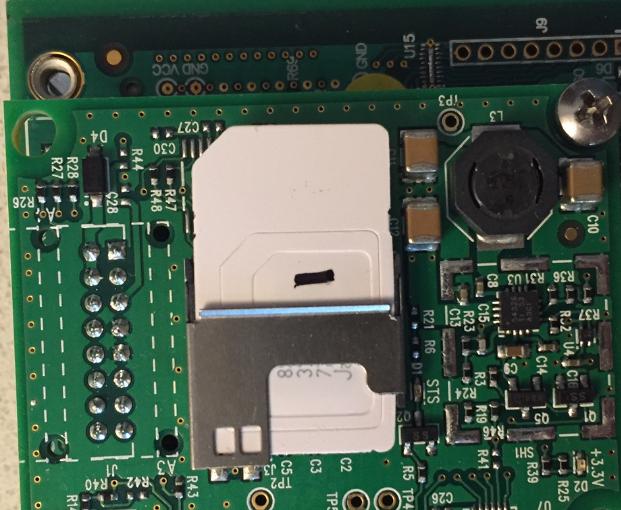
- Example of AT&T's IoT Sim card installed in a RediGate (note the three embedded SIM sizes: Mini, Micro, and Nano):
The main action required for configuring a CAT-M1 or GSM/HSPA RediGate is to set the APN, which is done under the "CellModem" object in your ACE configuration:
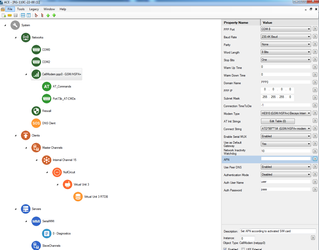
Some common APN's are:
- i2gold (AT&T public static)
- m2m.com.attz (AT&T IoT sim)
Once you set your APN, you should save you configuration and upload it to the RediGate device.
Security Note
If your RediGate has a public static IP address, you will want to immediately take extra security precautions to prevent unauthorized access attempts. Please review our Unauthorized Access on Public Static IP Addresses document to insure that your RediGate is properly protected.
Cellular Host Configuration (CDMA–Verizon)
In order to connect your device to a CDMA/EVDO network, you will need to know the MEID number (no SIM card is used). If you cannot locate MEID on the RediGate itself, you can recover it by connecting over putty.
- SSH into your RediGate using Putty
- Navigating to the "Cell Modem Diags" section by entering the following commands
- 1 - (System Services)
- 15 - (Cell Modem Diags"
- 73 - (Diag AT Cmds
- These commands will take you to the following screen, where you will be able to retrieve the MEID of your cellular RediGate device.
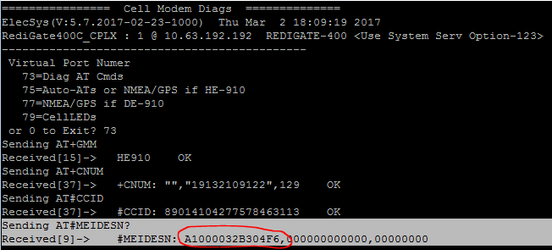
- Once you have your MEID, you can contact your provider and activate the RediGate.
Security Note
If your RediGate has a public static IP address, you will want to immediately take extra security precautions to prevent unauthorized access attempts. Please review our Unauthorized Access on Public Static IP Addresses document to insure that your RediGate is properly protected.
Testing Connectivity – Ping Utility
The easiest way to test RediGate network connectivity is by using the ping tool built-in to the RediGate diagnostics:
- Connect to the RediGate using Putty
- Enter the following commands
- 3 – Diagnostics Services
- 14 – Ping Service
- (IP address or domain of Host destination — 8.8.8.8 or google.com for example for internet connected devices)
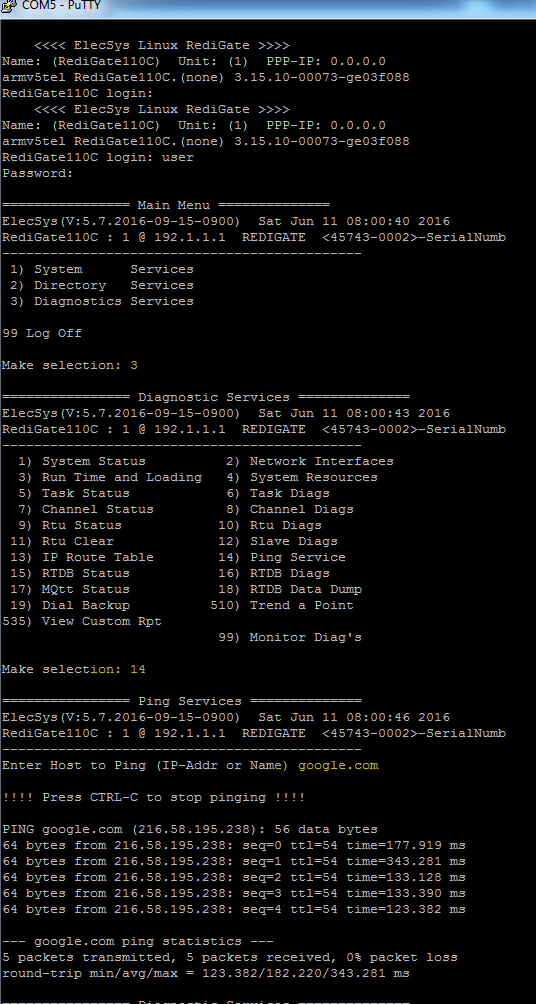
- If you see a reply from the IP address you pinged, you are connected and ready to send data from your field device to your host platform
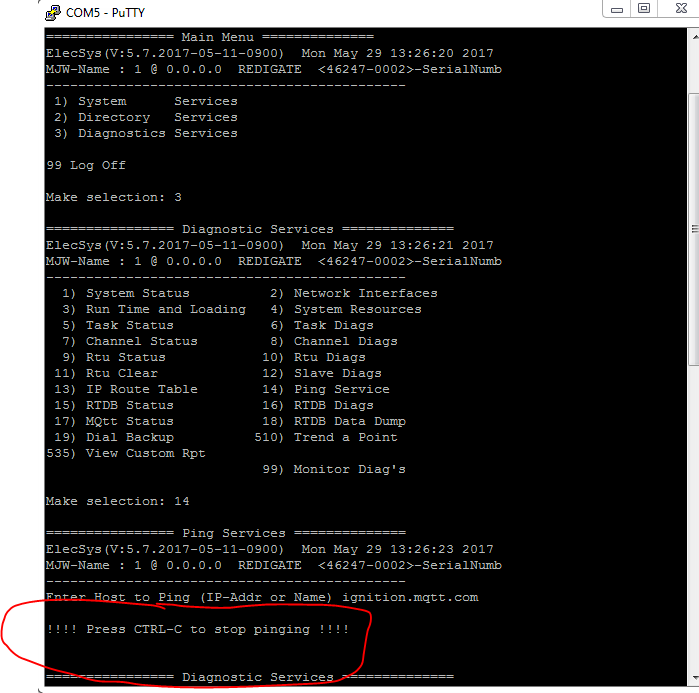
- If you do not see a reply and/or your RediGate jumps straight into the "Diagnostic Services menu", your RediGate does not have a path to website or end device you are trying to ping
- Response from RediGate that does not have valid path to "ignition.mqtt.com":
- Response from RediGate that does not have valid path to "ignition.mqtt.com":
Downloading and Installing Software Updates
We are constantly adding new protocols, host platforms, and features to the RediGate platform, so it is a good idea to check and make sure your RediGate software is up-to-date.
- Download the "Latest Update Tarball" for your RediGate 100 Series or 400 Series device from the Software page.
- If you wish to validate the SHA checksum of the downloaded file, see the Change Log documents at the above link.
- Open up your device's configuration using ACE
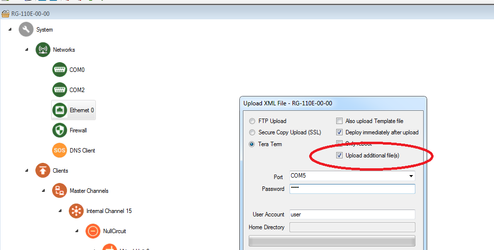
Select "File → Upload XML to Device", and make sure the "Upload additional file(s)" box is checked
Do not change tar filename
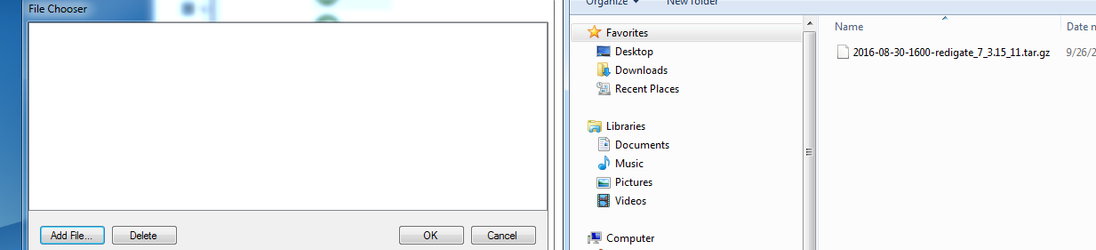
Sometimes a Web browser may change the filename during download. In order for the .tar.gz to be properly installed, you must upload the file with its original filename. Uploading a file with a space in it (such as "2017-01-03-1400-RegiGate_400_7_ZEUS_3.12_07█(1).tar.gz" ) will prevent the RediGate from properly installing the update, and may cause issues with future updates.
Also, do not unzip and upload the contents of the ".tar.gz" file; upload the original .tar.gz file with its full name and file extension.
- Click "Upload", "Add File", and then select the downloaded tar.gz file
After the upload, you device will reset and contain the latest firmware
Confirm Software Version
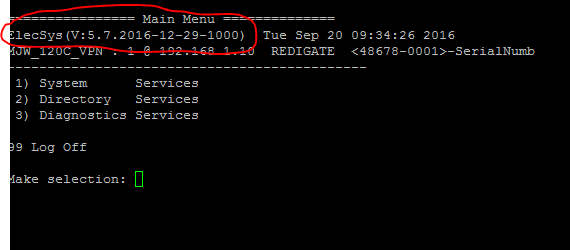
You can confirm the version of software on your RediGate by logging into Putty. The screenshot below shows a RediGate with V:5.7.2016-12-29-1000:
Setting the RediGate's System Clock
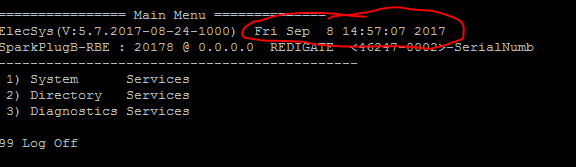
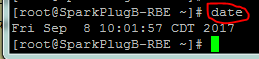
A number of RediGate features (TLS and Store and Forward, for example) depend on the RediGate having an accurate system clock. Follow the steps below to check and set the system time on your RediGate:
Checking the RediGate System Clock
There are multiple ways to check the system time on the RediGate:
- Login to the RediGate MMI and view the time in the banner:
- Login as the "root" user and run the "date" command:
Setting the RediGate System Clock
Option 1: Use the MMI to manually set the clock: RediGate Diagnostics Manual#2-SetClock
Option 2: If you have an internet connected RediGate, add an NTP object to your system configuration to sync the clock with a central server: RediGate Diagnostics Manual#2-SetClock
Where Do I Go From Here?
Once you have read and completed the steps in this Getting Started Guide, you can go on to configure your RediGate according to the needs of the system. There are a number of example configurations and tutorials (see Example Configurations) that walk you through connecting your RediGate to common field devices (such as Modbus) and host platforms (such as Ignition and IBM Bluemix/Watson).
The RediGate documentation consists of a set of manuals covering the hardware, configuration, diagnostics, protocols, and programming of the RediGate products. The component manuals are described below, and most of them are available on the http://redigate.elecsyscorp.com/manuals website.
Getting Started Guide | Gives a product overview and instructions to the first-time user to get started using the RediGate. |
RediGate Hardware Manuals | Contains specifications, jumper settings, and connection diagrams for the RediGate's standard and optional hardware components. |
ACE Operation Manual | Contains installation and user instructions for the Advanced Configuration Environment software, which is used to configure the RediGate. |
Configuration Manual | Gives detail on the standard configuration options of the RediGate product. |
Diagnostics Manual | Describes the RediGate's diagnostic capabilities and user interface. |
POD Programming Manual | Provides instructions on using POD programming features in the RediGate configuration. |
Protocol Manuals | Individual protocol manuals describe the configuration settings and usage information for several of the master or slave communication protocols supported by the RediGate. |
If you are using the Elecsys HCP2 or OPC Appliance, refer to the separate product documentation for those software applications.