OpenVPN Configuration
- Former user (Deleted)
- Former user (Deleted)
Introduction
In this tutorial, we will be demonstrating connectivity from a RediGate 120C to an OpenVPN server.
Pre-Requisites
- A RediGate 100 or 400 series device with internet connectivity
- Completion of the Getting Started Guide for your respective RediGate device
- Successful completion of one of our IIoT Platform Quick Starts. In this example, we will be showing screenshots from the RediGate to Inductive Automation Ignition--MQ-RBE quick start.
- An OpenVPN server that is accessible to the RediGate device (see Setting up AWS OpenVPN Server for an example of setting up an OpenVPN AMI on Amazon Web Services).
Setting up Your RediGate
Install OpenVPN on your RediGate
- Download and install the OpenVPN.star file. The file can be downloaded from http://redigate.elecsyscorp.com/examples/
- Obtain the required .star file from Elecsys. In this example, we will be loading the OpenVPN software .star file
- Open ACE, and select the configuration that you wish to have loaded on the RediGate. Choose "File → Upload XML to Device", and check the "Upload Additional Files" checkbox
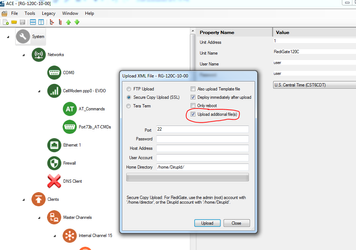
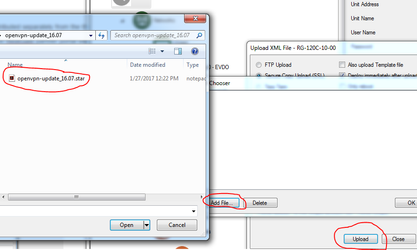
- Click "Upload" (using the correct SSL or Serial settings) and browse to the .star file you downloaded from the RediGate support site. NOTE: You will have to extract the .star file from the .zip downloaded from the site
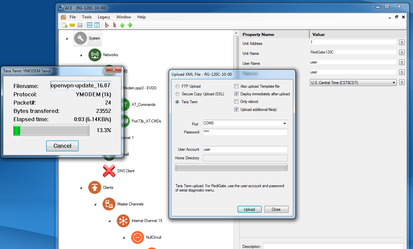
- You will see a dialog box showing the progress of the .star file transfer:
Once you have successfully loaded the .star file on the RediGate, using the root user credentials in putty, you should be able to run the command “openvpn --version” and see a Sep 13 2016 build of OpenVPN:

Update Configuration with OpenVPN Settings
- Download the "RediGate-to-OpenVPN-V2.zip" file from the http://redigate.elecsyscorp.com/examples website
- This .zip contains an example RediGate-to-OpenVPN-V2.xml ACE configuration and a couple of example OpenVPN configurations for your reference
- Copy and paste the "VPN_Configuration_Ch14" object from the RediGate-to-OpenVPN-V2.xml configuration into your configuration

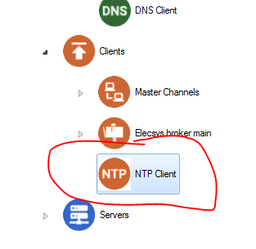
- If your RediGate has access to the public internet, copy and paste the "NTP Client" from the RediGate-to-OpenVPN-V2 configuration into your configuration. If not, you will need to manually set the date/time of the RediGate in order for the timestamps on the generated certificates to work
Copy and paste the "Firewall" object from the RediGate-to-OpenVPN configuration into your configuration:
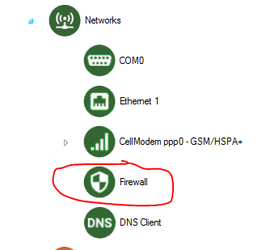
Delete or Edit Existing Firewall
Each configuration can only have 1 firewall, so if you already have a firewall object, you will need to delete the existing one or edit the "Port Management" and "Custom IPTABLES" objects to match that of the RediGate-to-OpenVPN firewall configuration
- Upload configuration and confirm that the VPN tags are being published to your broker. The example below shows a screenshot of the tags published to Inductive Automation's Ignition SCADA:
Creating OpenVPN User and Configuration File for RediGate
Creating OpenVPN Configuration File for RediGate
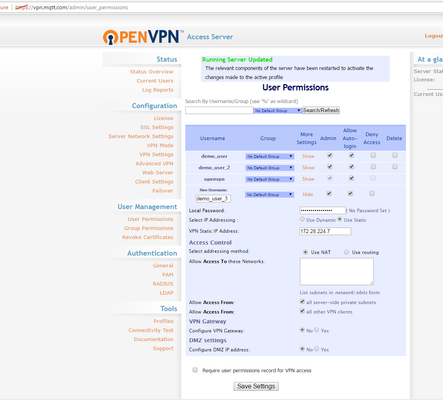
- Create a new user using the OpenVPN web interface. Enter a password in the Local Password field, and deploy the settings to the running server.
In this step, you will use the OpenVPN Connect client to connect once from your PC to the RediGate account, and in the process obtain the user credential file.
Be careful to follow the instructions below exactly, to make sure you retain the ability to copy/paste the text as expected.
Create a connection using OpenVPN Connect with the RediGate user credentials.
For this demo, use the Server as vpn.mqtt.com (but in actual application, you will need to use your own server).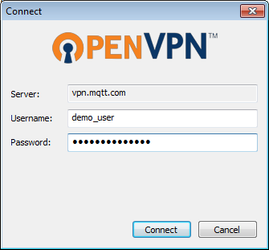
- The first time you connect to the server, you will receive an "UNTRUSTED SSL certificate" warning.
You can leave the "Don't ask again" box checked for this step if you wish, and click Yes.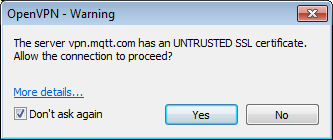
- But on the next dialog, with the "Allow VPN connection to vpn.mqtt.com UNVERIFIED profile?" warning, DO NOT leave the box checked next to "Don't ask again."
UNCHECK the box, or else you will be prevented from using this dialog in the future to copy the credentials that you need.
- Click the "More details..." link to view the certificate information for this connection.
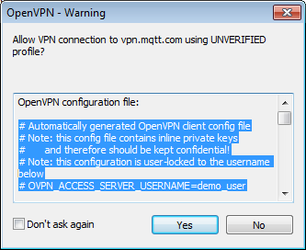
- Select all of the text inside the textbox except for the first line, which reads "OpenVPN configuration file:"
- Open a text editor and paste the credentials copied from the "OpenVPN - Warning → UNVERIFIED profile" dialog (above).
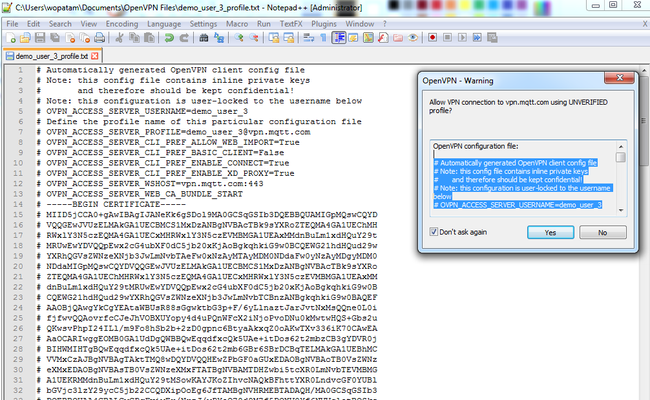
- Make the following edits to the text document:
- On approximately Line 58 of the the text document, edit the line with "
auth-user-pass" so that the line reads "auth-user-pass /etc/openvpn/auth.txt"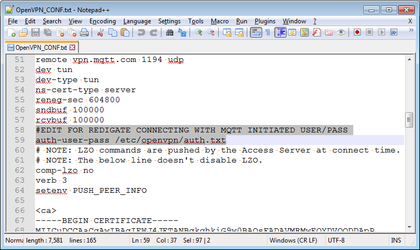
- On approximately Lines 44 to 51, if you are using your own OpenVPN server, change "
vpn.mqtt.com" to be the IP address or URL of your server.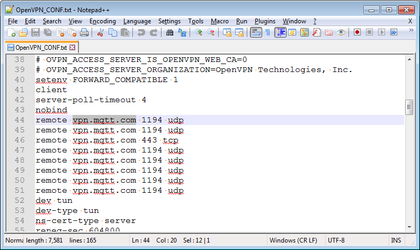
- On approximately Line 58 of the the text document, edit the line with "
- Save the text file as "OpenVPN_CONF.txt" and load the text file onto the RediGate using one of the methods below.
- Method 1 - Upload Additional Files using ACE
- Confirm that the name of the OpenVPN configuration file to be loaded onto the RediGate is less than 32 characters in length
- Open the ACE configuration to be loaded onto the RediGate, and select the "Upload Additional Files" checkbox
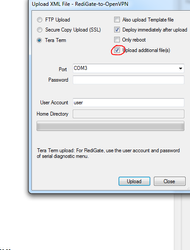
- Click "Upload" and browse to the OpenVPN_CONF.txt file you created in the previous steps
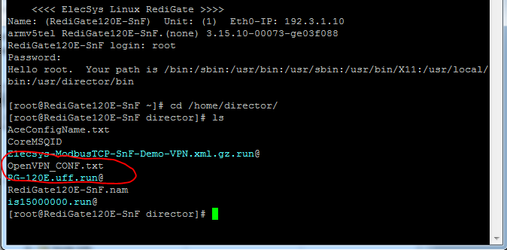
- Once the upload is complete, you should see the configuration file on the RediGate. The location of the configuration file will depend on the account used to upload the configuration/file:
- "user" account: /home/director
- "root" account: /home/director
- "Dirupld" account: /home/Dirupld
- Method 2 - You can use a different file transfer program to load the OpenVPN_CONF.txt file into the /home/director or /home/Dirupld folder on the RediGate.
- Method 1 - Upload Additional Files using ACE
Updating Settings and Starting VPN via MQTT and Ignition
Update VPN Settings via MQTT
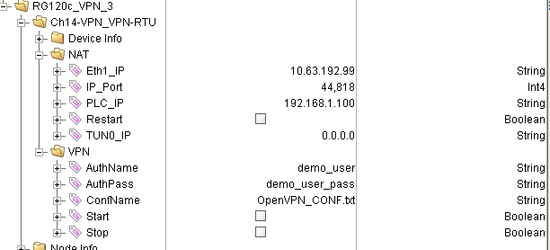
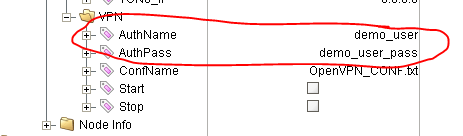
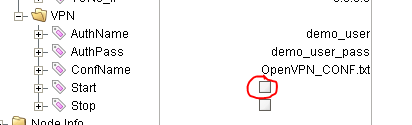
- Change the "AuthName" and "AuthPass" values to match those of the user whose configuration you uploaded
Confirm all settings are correct, and send a "1" value to the the "VPN.Start" tag to initiate the connection. For examples on how to send MQTT values to non-Ignition systems, see OpenVPN MQTT API Reference
Edit Default MQTT Values
You can edit the default values for the AuthName, AuthPass, and OpenVPN_CONF.txt by changing the PreInitRTDB values under the "VirtualUnit3-VPN-NAT-Tags":
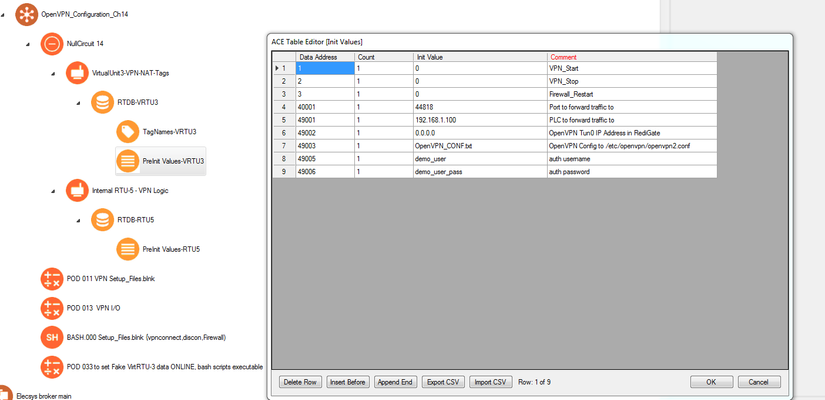
- When the "Start" tag is toggled, the RediGate will check the following folders for the filename specified in the OpenVPN_CONF.txt tag (which was set in the previous step), and use that filename as the OpenVPN configuration with the username/password credentials specified in the AuthName and AuthPass tags:
- /home/director
- /home/Dirupld
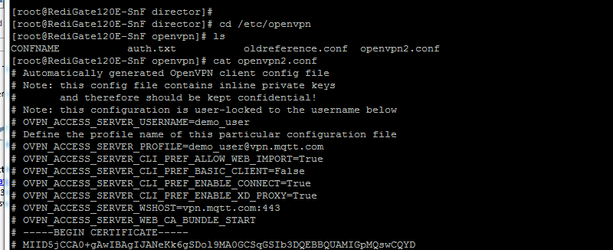
- The RediGate will then move the contents of that file into the file located in /etc/openvpn/openvpn2.conf for future use:
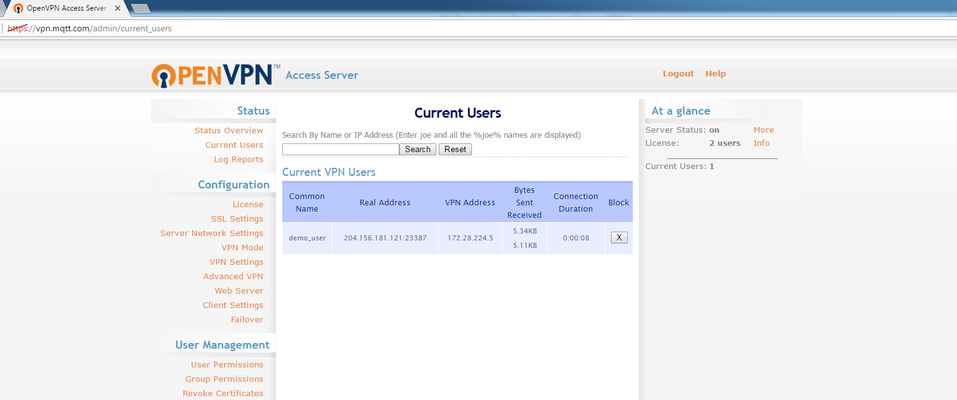
- Confirm that the VPN has started by viewing the client list on the OpenVPN server configuration page
- You may also confirm the VPN is established by viewing Diagnostics Menu option 2 ("Network Interfaces") and confirm that there is a "tun0" interface present. The VPN IP address of the RediGate will be shown under the "tun0" section.
- After this, you may use a different VPN user account (with an address in the same subnet) to connect your PC to the OpenVPN server.
Once connected, you should be able to Ping the RediGate and connect to its SSH port using PuTTY or TeraTerm, or transfer files from the PC using the SSH option in ACE.