RediGate Firewall Configuration
- Jon Tandy
- Former user (Deleted)
The RediGate uses a Linux operating system, with standard Linux tooling (iptables, etc.) available for firewall configuration.
This document describes a number of different recommendations and options for using the Firewall configuration, but is not intended to be a comprehensive source for security recommendations. Check with your corporate policies and/or additional online resources to ensure that adequate security is employed in the intended RediGate installation.
Contents
Basic Firewall and Security Information
ACE Configuration of Firewall
Many typical features of iptables networking are configurable through the standard options in the Firewall object in ACE. See RediGate Configuration Manual -- Firewall for details on the ACE configuration properties.
Port Usage in the RediGate
The RediGate by default uses TCP port 22 for SSH (secure shell) login server. This is set in the /etc/sshd_config file (not configurable through ACE).
TCP or UDP ports may be set up as listening sockets (servers), typically through enabled options in the ACE configuration program. These are site-specific configuration settings that might include, for instance:
- Terminal Server (TCP) or UDP Server - port number defined in ACE
- Modbus or DNP3 Network Slave - TCP port number defined in ACE
- HCP/HCP2 - TCP port number defined in ACE
- TLS Tunnels (typically a local listener for client mode, or public server in server mode) - TCP port number defined in ACE
- DHCP Server (child object under Ethernet) - UDP port 67
- BACnet Network Slave - UDP port number defined in ACE
- BACnet IP Discovery - UDP and TCP port numbers defined in ACE
- SMNP - port number defined in ACE
Additional processes may act as network clients, connecting outbound to network ports, typically through enabled options in the ACE configuration program. These are site-specific configuration settings that might include, for instance:
- MQTT Client (also Sparkplug B) - TCP port number defined in ACE
- Modbus, DNP3, Ethernet/IP, CSP, or most other Field Units under the Network Circuit - TCP port number defined in ACE
- DF1/PCCC - TCP port 44818
- BACnet master field unit - UDP port number defined in ACE
- TLS Tunnels (typically connect to local port in server mode or remote port in client mode) - TCP port number defined in ACE
- NTP Client - UDP port 123
- Terminal Client (TCP) or UDP Client - port number defined in ACE
- OpenVPN (typically configured through POD and VPN config files) - typically TCP port 443 and UDP port 1194
- DHCP Client - UDP port 67
- DNS Client - UDP port 53
- Syslog Client - UDP port 514
Block Access to Specific Ports
If your configuration includes any opening listening (server) ports on the IP network, you should include firewall rules to limit or block access to those ports from unwanted outside sources.
The Port Management table in the Firewall grants access to any client on a given network interface. If you want to be more selective in granting access to only some clients, see Limit Access to Specific Ports instead.
In the Firewall object, make sure that the "Input Policy" is set to "Drop All Input Packets".
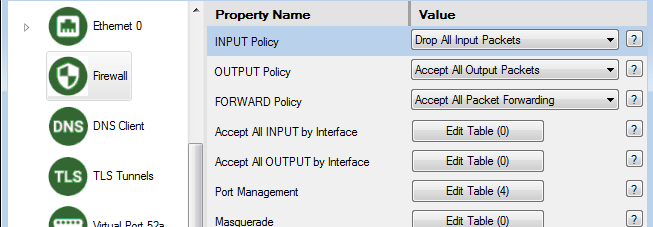
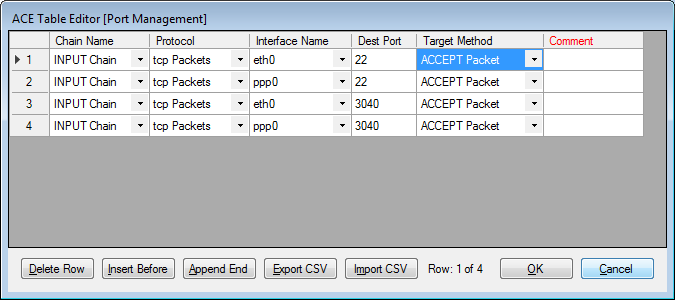
Then in Port Management, include only the server ports that you want to grant access, for every interface individually (eth0, eth1, ppp0, etc.). Make sure to include access to port 22 (SSH) on some interface if you want to be able to access the command line or user interface for system diagnostics.
Limit Access to Specific Ports
If you want to be more selective in granting access to server ports on a network to only some clients (such as by MAC address, source subnet or port, etc.), the Port Management table isn't capable of providing those options.
Instead, you will need to use the custom table portion of the Firewall object.
Make sure the "Input Policy" is set to "Drop All Input Packets". You MUST remove the ACCEPT entries from the "Port Management" table for any port ACCEPT rule that you wish to include in the custom table.
Then add one or more entries in the "Custom IPTABLES" table. In Custom IPTABLES, if a command line is longer than 80 characters, it must be broken into more than one row, with a tilde or backslash ( ~ or \ ) character as a line continuation character.
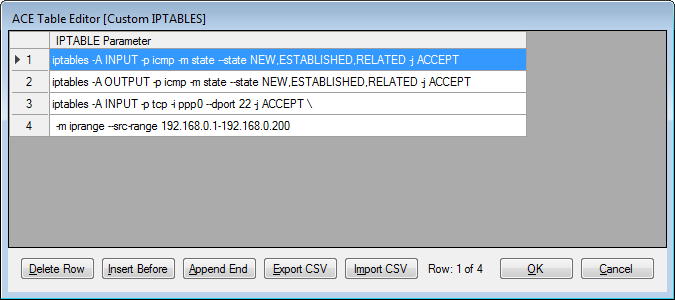
For example, the 3rd and 4th rows in the following Custom IPTABLES table allow access to SSH port 22 on the cellular port (ppp0), but only from the range of client addresses 192.168.0.1 to 192.168.0.200. All other hosts would be blocked on port 22. The last two table rows are a single command joined with the continuation character (backslash). The 1st and 2nd rows of the table allow ping commands inbound and outbound on any interface.
iptables -A INPUT -p icmp -m state --state NEW,ESTABLISHED,RELATED -j ACCEPT
iptables -A OUTPUT -p icmp -m state --state NEW,ESTABLISHED,RELATED -j ACCEPT
iptables -A INPUT -p tcp -i ppp0 --dport 22 -j ACCEPT \
-m iprange --src-range 192.168.0.1-192.168.0.200
Block Repeated Password Attempts
To hamper the efforts of hackers or bots using repeated login attempts, you can add a firewall rule that will lock out a user if they fail a login too many times in a row. Use the "Custom IPTABLES" option in the Firewall configuration to add several rows, such as in the following example:
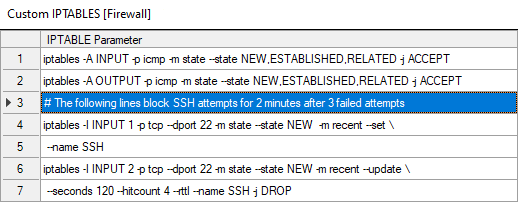
The backslash (\) indicates a continuation to the next row. The seconds (120) and hitcount (4) can be adjusted as needed (seconds=lockout time, hitcount=attempt# from the same IP to start blocking).
# The following lines block SSH attempts after 3 tries, for 2 minutes
iptables -I INPUT 1 -p tcp --dport 22 -m state --state NEW -m recent --set \
--name SSH
iptables -I INPUT 2 -p tcp --dport 22 -m state --state NEW -m recent --update \
--seconds 120 --hitcount 4 --rttl --name SSH -j DROP
Using the "-I INPUT 1" (and 2) chain option inserts these rules above any port 22 ACCEPT policies that may be set in the Port Management section of the Firewall configuration, so that the rule for failed login attempts from a blocked IP address takes precedence over the subsequent ACCEPT rule.
Change SSH Port Number
Another step that can be taken to limit access to unauthorized users from logging in to the RediGate is to change the default port (22) for SSH to a different, non-standard port.
The RediGate does not have a configuration property for the SSH port in ACE, but it can be changed from a 'root' level user. Below are the steps to change the SSH port number from 22 to 2222.
NOTE: This process may cause you to lose remote TCP connectivity to the RediGate. Make sure that you follow the instructions exactly, including the firewall rule for the new port.
You should test this procedure in a lab environment with backup connection over the local console serial port before trying it remotely with a field-installed unit, to ensure you aren't locked out.
- Log in to the RediGate with the 'root' account.
- Enter the following command, substituting the intended port number instead of "2222":
P=2222;sed -i 's/[#]*Port[ ]*/etc/sshd_config[0-9][0-9]*/Port '$P'/' - Check the change made to the configuration by entering the following command:
grep 2222 /etc/sshd_config - Add one or more new temporary firewall rules with the command, using your port number instead of "2222", and using the correct interface in place of "ppp0":
iptables -A INPUT -p tcp -i ppp0 --dport 2222 -j ACCEPT
AND/OR, you will ultimately need to configure a permanent, proper firewall rule setting to ACCEPT the new port number using the ACE Firewall object (see above). - Restart sshd with the following command (make sure to include the & at the end):
/etc/init.d/S50sshd restart &
All existing SSH sessions will be closed. Log back in using the new port number.