RediGate POD Programming Manual
- Jon Tandy
- Former user (Deleted)
- Jon Tandy (Deactivated)
- Former user (Deleted)

Product Information
Full information about other Elecsys products is available on our website at www.elecsyscorp.com and the RediGate Product Support page.
Product Support
Tel: +1-913-890-8905
Fax: +1-913-982-5766
Email: idc-support@elecsyscorp.com
Headquarters, Sales, Support & Manufacturing
Elecsys Corporation
846 N Mart-Way Court
Olathe, KS 66061
Tel: +1-913-647-0158
Fax: +1-913-982-5766
Email: info@elecsyscorp.com
While Elecsys may assist customers with their choice of products, the final choice of product for a specific application is entirely the responsibility of the buyer. Elecsys' entire liability with respect to its products or systems is defined in the Elecsys standard terms and conditions of sale.
Any example code is provided only to illustrate the use of Elecsys products. No warranty, either expressed or implied, is made regarding any example code provided by Elecsys and Elecsys shall incur no liability whatsoever arising from any use made of this code.
Disclaimers
The information in this manual is believed to be accurate at the time of publication. Elecsys Corporation assumes no responsibility for inaccuracies that may be contained in this document and makes no commitment to update or keep current the information contained in this manual. Elecsys Corporation assumes no responsibility for any infringements of patents or other rights of third parties that may result from its use. Elecsys Corporation reserves the right to make changes or improvements to this document and/or product at any time and without notice. While Elecsys may assist customers with their choice of products, the final choice of product for a specific application is entirely the responsibility of the buyer. Elecsys' entire liability with respect to its products or systems is defined in the Elecsys standard terms and conditions of sale.
Any example code is provided only to illustrate the use of Elecsys products. No warranty, either expressed or implied, is made regarding any example code provided by Elecsys and Elecsys shall incur no liability whatsoever arising from any use made of this code.
Electrostatic Discharge (ESD) Protection
These units contain devices that could be damaged by the discharge of static electricity. At all times, please observe industry standard ESD precautions when handling the unit.
 WARNING: DO NOT CONNECT OR DISCONNECT CABLES WHEN ENERGIZED, UNLESS POWER HAS BEEN REMOVED FROM THE EQUIPMENT OR THE AREA IS KNOWN TO BE FREE OF IGNITABLE CONCENTRATIONS OF FLAMMABLE SUBSTANCES.
© 2024 Elecsys Corporation
Table of Contents
Introduction
The RediGate is a multi-application remote data communications computer/data integration device. It provides a wide array of SCADA and other communication and logic processing functionality. In order to configure the operational characteristics of the RediGate, Elecsys provides the Advanced Configuration Environment (ACE) program.
The RediGate allows for programmable logic routines to be included in its ACE configuration, called PODs (for “Programming On Director”). This allows some reasonably complex operations to be performed during the RediGate’s operation, such as examining or changing contents of data registers, performing logical decisions or mathematical computations, publishing data, and a variety of other functions.
Unlike ISaGRAF, which requires a third-party software development environment and generates a reusable, multi-module logic program that is semi-autonomous from the RediGate configuration, the POD logic routines are small, individual programs built into each configuration and may be more easily customized for the needs of a specific device. Both ISaGRAF logic and POD routines may be used in the same RediGate, if desired. Refer to the RediGate Configuration Manual for more discussion on the differences between ISaGRAF and POD logic.
It is assumed that the user has already installed the ACE Editor and is familiar with the ACE configuration tools. Please refer to the ACE Operation Manual for more details on using ACE to configure basic RediGate features such as master or slave protocol communication.
POD Programming
Historically, the RediGate has supported the ISaGRAF programming environment for adding functional logic programs that provide a wide variety of powerful application development options. ISaGRAF provides a full-featured application development environment, allowing the RediGate to operate as a programmable logic controller (PLC) in addition to its built-in routing, protocol translator, and host data publishing capabilities.
However, some applications only require a small to moderate level of programmability, such as manipulating or making decisions on data stored in real-time databases (RTDBs). For these types of requirements, the RediGate now supports the POD (Programming On Director) capability. POD programming is similar in concept to Assembly Language programming, having a list of opcodes having one or more parameters.
There can be up to 9999 PODs per Internal Master Channel. The following sections describe how to program POD modules in the RediGate’s ACE configuration.
POD Configuration Structure
POD objects are executed by the Internal Master Channel, by calling an Internal Master Poll Table entry that references the POD definition. The Internal Master RTU object determines which POD will be executed and the Scan Table determines when it is called. More than one Field Unit in the Internal Channel can call the same POD.
To run a POD program, the following set of ACE objects need to be configured:
Internal Channel Configure Scan entry points to a Poll Record of an Internal Master field unit that’s configured to run a POD. The Scan Table entry is used like any other Scan Table entry (Unit Address and Poll Record point to the Internal Master Poll Table entry, and the Scan Period determines the frequency at which the POD will be executed, sequentially with other Scan Table entries in the list).
Null Circuit – Placeholder for Internal Master field unit
Internal Master – The Internal Master FieldUnit may contain other Poll Table entries for data transfers between RTDBs. One or more Poll Table entries may also be configured to point to a POD object, which will contain the programming instructions to be run. The normal Source/Destination fields of the Internal Master Poll Table have special uses when calling a POD program.
The Poll Table entry for a POD routine should contain:
- Src Chan – The Source Channel column for a POD poll entry MUST be any valid Master Channel in the RediGate configuration. Otherwise, the Src Chan, Src RTU, Src Data, and Dest Data parameters are not used in the Poll Table entry and may typically be set to 0. However, these columns may be used to pass important information into the POD. There is a POD function ("GET COLUMN FROM POLL RECORD") which can read values from these fields of the Poll Table row that called the POD.
- Src RTU – Unused for POD, but can be used for a configurable parameter (see note for “Src Chan”, above).
- Src Data – Unused for POD, but can be used for a configurable parameter (see note for “Src Chan”, above).
- Src Type – Select the “Run POD” option to use this poll record to call a POD function.
- Src Count – This must be set to the instance number of the POD object in the ACE configuration.
- Dest Data – Unused for POD, but can be used for a configurable parameter (see note for “Src Chan”, above).
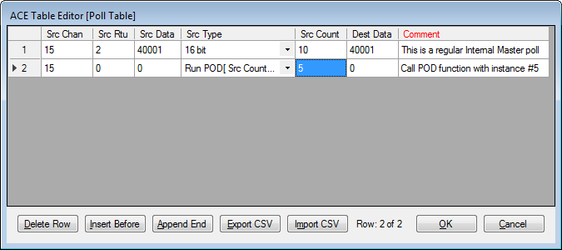
The screen capture below shows an Internal Master unit with a regular poll in Poll Record 1 and a call to a POD function in Poll Record 2. Both polls would need to be scanned by the Internal Channel in order to operate, and a POD object with instance number 5 would also need to be configured with one or more program steps.
RTDB – All FieldUnits require an RTDB definition. The POD is associated with the RTDB for whichever instance of the Internal Master FieldUnit that triggered it. Programming instructions act on the RTDB registers associated with that Internal Master FieldUnit.
POD – Include one or more POD object with programming logic instructions. Configuration of the POD object and the available instruction types are described in the remainder of this manual.
POD programs may use RTDB registers for storing or using data during program execution. There is also a Scratchpad area containing 40 elements (numbered -1 to -40). The Scratchpad elements may use any of the following three data types:
- 32-Bit INTEGER. These are used for BOOLEAN (Zero=False, Non-Zero=True), CHAR, SHORT integer, and LONG integer data.
- 32-Bit REAL (Floating Point)
- 256-Byte STRING
When the RediGate restarts, the values in Scratchpad areas are all set to zero/empty and the type is set to INTEGER. Scratchpad elements are global to a Channel (shared in common among all PODs and devices on a Channel), but each Channel has its own set of numeric Scratchpad elements (-1 to -40). An element in the Scratchpad can have its value and type changed each time a POD program writes to it. Once written to, the element retains its value and type (INTEGER, REAL or STRING) until the next write, even between successive executions of different PODs.
For example, writing a REAL value (such as 3.14159) to element ‘-5’ makes that element into a REAL type, and the value can be accessed as the same. Later, a STRING value (such as “Hello, World”) can be written to element “-5”, which changes the element’s type to STRING. The next read of element ‘-5’ will return “Hello, World”. When POD programs need to use intermediate values in calculations, it is much faster to read or write Scratchpad elements than the read or write RTDB registers.
The POD maintains a row execution counter which is used to prevent infinite loops. If the POD Interpreter does not return to the normal Internal Master Scan Table within this limit, then the POD Interpreter routine is aborted.
POD Object
The POD object holds one set of programming instructions to be called by the Scan Table based on the Scan Period.
| Attributes | Function |
|---|---|
| Object Type | DirectorPod |
| Parent(s) | System → Clients → Master Channels → Internal Channel |
| Instance | Must be between 0 and 9999. The instance number is the POD number in the Poll Table ("Src Count" column) used for running the program. |
| Properties | Values |
|---|---|
| Row Delay | Enter the amount of delay (in milliseconds) to insert after each instruction in the list of Instructions is executed. Entering 0 will allow the POD to run as fast as possible. Inserting non-zero a delay will help debug a POD by slowing it while viewing diagnostics and enables more diagnostic messages from the POD interpreter. |
| Max Instructions | Maximum number of instruction rows that can be executed per scan in the sequence of the POD program. This includes all instructions executed while inside a program loop. This parameter is designed to prevent the POD program getting into an infinite loop based on incorrect design of a POD program. Set this to 0 to disable loop testing. This might be used, for instance, with a POD routine that never needs to exit, or which loops through several hundreds of instruction lines. |
| Instructions | Click the Edit Table button to enter the sequence of instructions of each POD program. The POD program instructions are executed top to bottom each time the POD is triggered using a Scan Table entry in the Internal Master. Enter the data in the columns of the table. Source Addr – The Source Addr column either refers to the location of data in the Field Device RTDB, or values in one of the Scratchpad elements (-1 to -40). The type of data from the RTDB/Scratchpad sets the data type for the entire row to either INTEGER, REAL or STRING. (A Function can change the data type that will be saved to the Result Address). Some functions ignore the Source Addr parameter. Function – There are over 100 "Functions" available as POD programming instructions. Some functions only accept only one data type (Integer, Floating point, String), while others can accept two or all three data types. See POD Function List for a complete description of the available programming instructions. Operand Type and Operand – The Operand Type column determines how to interpret the 11-character string contained in the "Operand" entry. The Operand is normally used by the simpler functions (+,-,*,/, AND, OR, XOR, etc). Some Functions ignore the "Operand".
Result Addr – The Result Addr column can be either a register address in the RTDB of the Internal Master field unit, or one of the Scratchpad elements (-1 to -40). See Rules for Using the Result Addr for rules on how the Function output will be converted based on the destination type. Cast Result As – The Cast Result As column determines the output type of data, when the Function operates on a numeric value. The data type (Boolean, UINT32, FLOAT, STRING-32, etc.) must match the data type configured for the Result Addr register in the RTDB. |
The following sections below describe some additional help in programming with PODs, the Functions used in the POD programming instructions, and some application examples using PODs.
Rules for Using the Result Addr
Here are some rules for the Result Addr parameter of the POD Instruction list, when storing a value.
- Saving result to Scratchpad elements [-1 to -40].
- When the Cast Result as is BOOLEAN, CHAR, SINT16, or SINT32 – The Scratchpad data is stored as INTEGER. If the original value was REAL, then the value is truncated at the decimal point before being stored. If the original data was STRING, then the atoi() function (Alpha to Integer) converts the string to an integer.
- When the Cast Result as is REAL32 – The Scratchpad data is stored as REAL. If the original value was INTEGER, then the value is converted to a REAL. If the original value is a STRING, then the atof() function will convert the string to a floating point value.
- When the Cast Result as is STRING-32 or STRING-256 – The Scratchpad data is stored as STRING. If the original value was INTEGER, then the “%d” C format is used to convert the integer to a string. If the original value was REAL, then the “%g” C format is used to convert the floating value to a string.
- Saving result to RTDB registers of the following types using INTEGER functions.
- Boolean register: Non-zero INTEGER stored as True, Zero stored as False.
- UINT8 register: Least Significant Byte of INTEGER stored in register.
- SINT16/UINT16 register: Least Significant Word of INTEGER stored in register.
- SINT32/UINT32 register: Entire INTEGER result will be stored.
- REAL32 register: INTEGER result will be converted to floating point and stored.
- STRING-32/256 registers: INTEGER result stored as formatted string.
- Saving result to RTDB registers of the following types from REAL functions.
- Boolean register: Non-zero value stored as True, Zero stored as False.
- UINT8 register: Least Significant Byte of the REAL value after it has been truncated to an Integer.
- SINT16/UINT16 register: Least Significant Word of the REAL value after it has been truncated to an Integer.
- SINT32/UINT32 register: REAL value will be truncated to an Integer and stored.
- REAL32 register: REAL value stored directly.
- STRING-32/256 registers: REAL result will be formatted using the “%g” C format.
- Saving result to RTDB registers of the following types from STRING functions.
- Boolean register: Non-zero STRING stored as True, Zero stored as False.
- UINT8 register: Up to 256 registers will receive one corresponding byte from the STRING.
- SINT16/UINT16 register: Up to 128 registers will receive two corresponding bytes from the STRING, with the first ASCII character in the least-significant byte.
- SINT32/UINT32 register: Up to 64 registers will receive four corresponding bytes from the STRING with the first ASCII character in the least-significant byte.
- STRING-32 register: First 32 characters of the STRING will be stored, the remainder will be truncated.
- STRING-256 register: Entire STRING will be stored.
POD Editing Tips
The following tips will be helpful suggestions when creating the POD Instruction list.
- Create a row with the Function set to **COMMENT**, with zeroes in all of the numeric columns, and “...” in the Operand Type column. Then select this row and press the “Insert Before...” button dozens of times to create dozens of new identical rows. Then modify these rows to write the POD routine.
- If you know the first few letters of the ‘Function’ then move the cursor to that column and type a few characters and then press ALT-DOWN-ARROW. This will highlight the first matching entry from the list of 100+ Functions. If the exact Function that you want was highlighted, then you either need to LEFT CLICK on the entry or use DOWN ARROW followed by an UP ARROW and then press the ENTER key.
- Labels may be easier to read by starting them with two hyphens (--) and then up to 9 more characters, entered in the Operand column. This label is used in the GOTO LABEL for ‘FOR LOOP’ Functions. Labels are case sensitive.
- Integer values in the Operand column can start with a lower case ‘x’ to indicate the value is in hexadecimal. For example, 255 and x0ff are the same integer value.
POD Programming Tips
Here are some additional tips for programming techniques in writing POD program routines.
- Use the DiagLog function to view intermediate values or determine flow of routine.
- When designing a program, you can use RTDB registers to store the function's intermediate calculations/results, which will slow the execution speed, but allow you to more easily access the values to troubleshoot problems. Later, you can increase execution speed and reduce use of RTDB registers by converting the program to use ScratchPad elements for storing the intermediate results, if you choose.
- A quick technique to pass a couple of configuration parameters to a POD routine is to use the Internal RTU’s Poll Table ‘Src Data’ column or ‘Dest Data’ which are not required for normal POD execution. The ‘GET COLUMN FROM POLL RECORD’ function will use a ‘2’ for ‘Src Data’ and ‘5’ for ‘Dest Data’.
- The ‘DUMP SCRATCHPADS’ Function will dump the contents of all of the elements to the file /tmp/director/S_PADpp.rr.txt where ‘pp’ is the POD Index and ‘rr’ is Row Number used making the call.
- A technique to implement an expiration timer is to call either the CENTI-SEC CLOCK or GET TIME functions and save the results to a 32 bit integer. Then add the number of 1/100s of seconds to the CENTI-SEC CLOCK value or whole seconds to the GET TIME value. Then compare the current CENTI-SEC CLOCK or GET TIME values to determine if a timer has expired.
- It is handy to use the ‘PreInitRTDB.ODF’ object to setup groups of configuration parameters for functions such as MODBUS WRITE, COPY BLOCK, HTTPPOST or any other function that uses the Operand value as a reference to a start of a block of configuration parameters. Also use PreInitRTDB to setup longer strings (31 chars at a time) versus the 11 at a time max in the ‘Operand’ column.
- String SEARCH and REPLACE can be implemented using the BIT_OR/XOR with BIT_AND functions. The ‘Source Addr’ data string is searched for all occurrences of Operand Strings and replaced with “<~Or?>” string(s) using the BIT_OR Function. Then you will call the BIT_AND which will search the ‘Source Addr’ data string for “<~Or?>” and replace all matches with the Operand String. The BIT_XOR will only search for the first occurrence of Operand String.
- If you have some knowledge of writing Linux shell scripts then you can use SYSTEM CALL to echo text to an output file in /tmp/director/ and then call the script. You should output the results of shell scripts to something like /tmp/director/ResultXX.txt. You can use the OPEN_TEXT, FIND_TEXT, etc., to read the contents of these result files.
- How to use XML functionality. If you need to work with XML formatted string data, you can use the following techniques.
- Open XML text file with TEXT OPEN function call. This reads the file into an allocated memory buffer. Parent Sections must begin as <ThisParent> and terminate with </ThisParent>. Child Sub-sections must begin with <ThisChild> and terminate with </ThisChild>.
- Get the count of Parent sections to read with XML GET COUNT. Set String-0 to the Parent/Major section name with a NULL string in String-1 and String-2. String-1 would normally be Parent Section name so setting it null indicates that there is not a Parent Section. A technique to place nulls into strings is to call INTEGER to ASCII with Constant 0 in Operand. The Major section name should be something like… <remote …or… <channel …as long as it begins with a Greater-than symbol.
- Get the count of Child/sub-sections in current Parent/major section with String-0 as the Child/Sub-section name, String-1 as Parent Section name, and String-2,3 set to null.
- Read the attributes of the Current Parent with XML GET FIELD using String-0 as Parent Name, String-1 set NULL (No parent of this field) and String-[2-9] as Attributes retrieved for this Parent. Strings[2-9] should be look like… address= …or… interface= …etc. The ‘Result Address’ for the XML GET FIELD function is actually used as a starting address of STRING-32 for values of associated Attributes found in Parent. Each Value String will have original Attribute string requested. Remove the original Attribute string (address=) with STRING TRAILER and associated Attribute for Value without attribute. Double quotes that can be removed with ‘- Subtract’, STRING as is, “ which will removed all double quotes. Lastly STRING VALUE can convert the ASCII Value string into an Integer.
- Read attributes of each Child/Sub-section (String-0) with String-1 containing the Section’s Parent name. Strings[2-12] are the Attributes to be searched for this child. You can request more Attributes than might be found in the Child’s sub-section. Attributes can be like… lowlimit value= …or… normalstate value= …or… maximum delta= . The Attributes can be continuations of elements in the Child Declaration header or as their own <attrib=”content” /> entries before the </ThisChild> marker. Once the XML GET FIELD reads a Sub-section set of attributes it eliminates the marker starting this Child’s Sub-section. This prevents searching and finding this Child a second time.
- After getting the field data for the last Child under the current parent you must call XML NEXT FIELD to eliminate this section’s Parent Marker so that the next Parent will be processed.
POD Programming Examples
This section gives some examples of POD programs to illustrate the POD programming methods. The sample ACE configurations for the programs illustrated here can be downloaded from https://ftp.elecsyscorp.com/ACE/PODDemoConfigurations.zip
See the RediGate Configuration Manual for a more complete explanation of the configuration properties of the individual ACE objects. This section will primarily focus on explaining how the POD logic works, with only minimal discussion on the other parts of the configuration.
Unlatch Relays Example
This example shows how to use a POD to monitor one or more digital registers for a transition from False to True. After the signal becomes true, a configurable timer is started. Once the timer expires, the POD clears the digital register back to a zero.
The background of this example is that a host system writes a Trip signal to the RediGate, which may be read or used by other processes. But the host only sets the Trip value to True and doesn’t clear it, requiring the RediGate to clear the point itself.
UnlatchRelays-PODdemo ACE Configuration
Open the example configuration in the ACE editor.
For purposes of this example, the data coming from a host system is simulated by writing into Virtual RTU 4 using a Custom Report. The Internal Master RTU 5, along with the POD 99, demonstrate the POD programming logic to read and clear the input data points after they are tripped.
This section provides an overview of the parts of the configuration that will be important for understanding this demo.
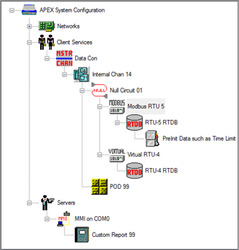
- Virtual RTU 4 – Provides RTDB data location, simulating data that would be coming from the host computer. Registers 1, 3, and 9 are the digital points being written into with Trip signals and cleared by the POD logic.
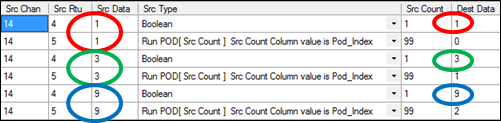
- Internal Master RTU 5 – The Internal Master RTU reads the data internally from RTU 4 into its own RTDB, then runs the POD logic for each of the monitored points (1, 3, and 9). The Internal Master’s Poll Table uses two rows per point to be monitored for Trip values. In each pair of registers, the first row copies the point value from the source RTDB (channel 14, RTU 4) to the Internal Master (RTU 5). The point number in the source and destination databases are the same, and the same number must also be used in the 2nd row of each pair for the Src Data column (this is read by the POD function).
Internal Channel 14 – The Internal Channel contains the Virtual and Internal Master RTUs, and its Scan Table continuously scans the six poll records of RTU 5.
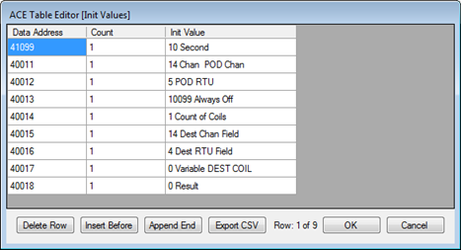
- PreInit Data (RTU 5) – The Pre-Initialized Data object stores some default values into the RTU 5 database on startup of the RediGate. These values will be explained in more detail in a later section. The most important of these points is the first, register 41099. This is set to a value of 10, which is the number of seconds for the timer.
- POD – The POD program exists as a child object under the Internal Channel (arbrarily set to instance #99 in this example). The details of each step in the POD logic will be explained in more detail in a later section.
- Custom Report – A Custom Report is used to give an easy user interface for entering simulated data and seeing the results of the POD activity.
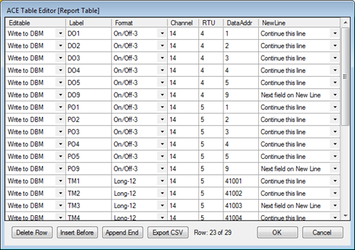
Using the UnlatchRelays Example
If necessary, modify the Ethernet address in the example and download the configuration to a RediGate. After restarting with this configuration, log in to the RediGate’s user menu and go to the Diagnostics menu. Select option 535, View Custom Reports.
Enter ‘99’ for the custom report number, and ‘1’ for the refresh rate. In the custom report, the “DO1”, “DO3”, and/or “DO9” entries will be written to a value of 1 to simulate incoming data from a host system. Once any of these signals goes to ‘ON’, the “PO1”, “PO3”, and/or “PO9” will also be set to ‘ON’. These are registers in the Internal Master RTU 5 used to keep track of the current state of the input. After 10 seconds, both of these values will be reset to ‘OFF’ by the POD logic.
With the Custom Report pointer on the DO1 value, enter ‘C’ to change a value. Enter a value of ‘1’ for DO1, then Enter again to return to the Custom Report screen. The “DO1” and “PO1” should be ‘ON’ for about 10 seconds, then both switch back to ‘OFF’. The same can be done with “DO3” and “DO9”, but changing “DO2”, “DO4”, or “DO5” will not have the same effect, because the configuration is not set up to monitor those points.
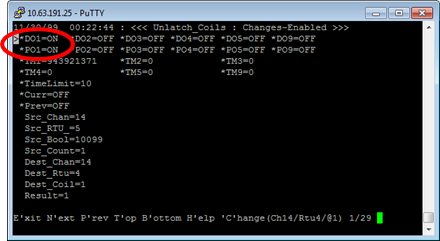
Understanding the UnlatchRelays POD Logic
This section gives a detailed explanation of the POD program for the UnlatchRelays example. For more general information about each instruction type in the POD program, see the POD Function List.
Open the Instructions table for the POD in the example program. The following paragraphs describe what each instruction does.
Row | Source Addr | Function | Operand Type | Operand | Result Addr | Cast Result As |
1 | 0 | ** COMMENT ** ... 11 Chars in Operand. Not a LABEL (Src and Result Ignored) | STRING as is (Eleven Characters) | ..SETUP | 0 | SINT32 |
This instruction is just a comment. Comments are used throughout the POD to provide a brief description of what follows (“SETUP”), but also to break up the POD into sections as a visual aid when analyzing the program’s function.
2 | 0 | ASSIGN Operand to Result (Ignore Source Addr) | Constant (Integer or Floating Point) | 0 OFF | -30 | SINT32 |
3 | 0 | ASSIGN Operand to Result (Ignore Source Addr) | Constant (Integer or Floating Point) | 1 ON | -31 | SINT32 |
These rows define the POD’s Scratchpad registers [-30] and [-31] to be constant values of 0 and 1, respectively (everything after the space is ignored and treated as a comment). The ASSIGN function assigns the constant value contained in the Operand column to the Scratchpad register given in the Result Addr column.
4 | -40 | GET COLUMN FROM POLL RECORD Src=Ignored : Operand=> 0=SrcChn 1=SrcRtu 2=SrcAdr | Constant (Integer or Floating Point) | 2 Coil Adr | -32 | SINT32 |
5 | -40 | GET COLUMN FROM POLL RECORD Src=Ignored : Operand=> 0=SrcChn 1=SrcRtu 2=SrcAdr | Constant (Integer or Floating Point) | 5 GrpIndx | -33 | SINT32 |
These rows get a value from the Poll Record of the Internal Master of RTU 5. This instruction refers to the Poll Table record that called this execution of the POD function. The Operand column contains a constant pointing to the column (starting from 0). For example, the 4th row in the Poll Table has the following entries:
Src Chan | Src Rtu | Src Data | Src Type | Src Count | Dest Data |
14 | 5 | 3 | Run POD | 99 | 1 |
The two POD rows read column 2 (Src Data) into Scratchpad register [-32], and column 5 (Dest Data) into Scratchpad register [-33]. These values represent the RTDB register number of the point to be examined, and the POD’s index number for this point, respectively. The index number is a consecutive number starting from 0, used to keep track of each point and their timers individually.
Row | Source Addr | Function | Operand Type | Operand | Result Addr | Cast Result As | ||
| 6 | -33 | + ADD Operand (Append Strings) | Constant (Integer or Floating Point) | 41001 | -34 | SINT32 | ||
This row adds the value in Scratchpad [-33] (index number) to the constant 41001, and stores the result into Scratchpad [-34]. This will be the register holding the timestamp for each point whenever the Trip value occurs. Registers 41001 through 410xx are required to exist in the RTU 5 database, depending on the highest index number used.
7 | -32 | INDEXed GET : SourceAddr value is RegAddr used as SrcData=> ResultAdr : Operand Ignored | Constant (Integer or Floating Point) | 0 Current | 10097 | SINT32 |
This row does an Indexed Get (indirect read of an RTDB register). The value in Scratchpad [-32] contains a number of the RTDB register of the data point. The value stored in that register is read into register 10097 in the Internal Master. Note that this the Internal Master Poll table must have already polled the data from its original location into the RTU 5 database before this function is called. As an example, the 3rd row in the Poll Table reads register 3 (Channel 14, Unit 4) into RTU 5 at register 3. This is the “Current” value of the point.
Src Chan | Src Rtu | Src Data | Src Type | Src Count | Dest Data |
14 | 4 | 3 | Boolean | 1 | 3 |
8 | -32 | + ADD Operand (Append Strings) | Constant (Integer or Floating Point) | 10000 Last | -35 | SINT32 |
9 | -35 | INDEXed GET : SourceAddr value is RegAddr used as SrcData=> ResultAdr : Operand Ignored | Constant (Integer or Floating Point) | 0 Prev | 10098 | SINT32 |
These rows add 10000 to the Scratchpad [-32] and stores the result into Scratchpad [-35]. This will create a value pointing to a 100xx register in RTU 5. Then an Indexed Get takes the value from the 100xx register snd stores it into register 10098. This is the “Previous” value of the point. The Current and Previous values of the point will be compared below.
10 | 0 | ** COMMENT ** ... 11 Chars in Operand. Not a LABEL (Src and Result Ignored) | STRING as is (Eleven Characters) | ... | 0 | SINT32 |
11 | 0 | ** COMMENT ** ... 11 Chars in Operand. Not a LABEL (Src and Result Ignored) | STRING as is (Eleven Characters) | ..COMPARE | 0 | SINT32 |
12 | 10097 | == EQUAL TO Operand? (Including String Compare) | Constant (Integer or Floating Point) | 0 OFF | -36 | SINT32 |
13 | -36 | EXIT Stop this POD processing Src=Enable | STRING as is (Eleven Characters) | DONE | -40 | SINT32 |
Row 12 performs a comparison between register 10097 (Current) and the constant of 0 in the Operand column. The result is stored into Scratchpad [-36], which is checked in the next row – a True indicates that register 10097=0 (current value of register is not tripped), which triggers the EXIT function in the POD, returning control back to the Internal Master Channel. No further instructions are run on this execution of the POD.
Row | Source Addr | Function | Operand Type | Operand | Result Addr | Cast Result As | ||
| 14 | 0 | ** COMMENT ** ... 11 Chars in Operand. Not a LABEL (Src and Result Ignored) | RTDB Address (or Scratch-Pad[-1 to -40]) | ... | 0 | SINT32 | ||
| 15 | 10098 | GOTO LABEL if Src is TRUE/Non-Zero, Operand="Matching Label" | STRING as is (Eleven Characters) | --CHKLIMIT | -40 | SINT32 | ||
Row 15 checks register 10098, and if true (previous value of coil is ON), jump to the POD instruction with the label “--CHKLIMIT” (Row 24). When the original coil is first set to ON, this GOTO statement doesn’t occur, but does happen on subsequent executions of the POD, until the timer expires.
Rows 16 through 22 are only executed when the point value goes from OFF to ON.
16 | 0 | ** COMMENT ** ... 11 Chars in Operand. Not a LABEL (Src and Result Ignored) | RTDB Address (or Scratch-Pad[-1 to -40]) | ... | 0 | SINT32 |
17 | 10097 | INDEXed SAVE : Src=Data2Save, Opernd=AddressOfSave, Result=Overidden by Operand | RTDB Address (or Scratch-Pad[-1 to -40]) | -35 SavCoil | -40 | SINT32 |
Row 17 does an Indexed Save (indirect write), storing the value contained in 10097 (Current value) into the 100xx register stored in Scratchpad [-35] (Previous value – see Rows 8 and 9).
18 | 0 | ** COMMENT ** ... 11 Chars in Operand. Not a LABEL (Src and Result Ignored) | RTDB Address (or Scratch-Pad[-1 to -40]) | ... | 0 | SINT32 |
19 | -40 | GET TIME Src/Oprnd=Ignored Result> INT16[0-6]=YYYY,MM,DD,HH,MM,SS,ms INT32=1970+Secs STRING=YYYYMMDD-HHmmSS.ds | Constant (Integer or Floating Point) | 0 Seconds | -37 | SINT32 |
20 | -37 | + ADD Operand (Append Strings) | RTDB Address (or Scratch-Pad[-1 to -40]) | 41099 | -37 | SINT32 |
21 | -33 | + ADD Operand (Append Strings) | Constant (Integer or Floating Point) | 41001 | -36 | SINT32 |
22 | -37 | INDEXed SAVE : Src=Data2Save, Opernd=AddressOfSave, Result=Overidden by Operand | RTDB Address (or Scratch-Pad[-1 to -40]) | -36 | -40 | SINT32 |
The next several rows get the current date/time from the RediGate system into Scratchpad [-37], add to this number the configurable time delay (register 41099). Then, Scratchpad [-33] (index) is added to the constant 41001, and stored into Scratchpad [-36]. Finally, the augmented date/timestamp from Scratchpad [-37] is saved into the 410xx register (from Scratchpad [36]). These 410xx registers hold the date/timestamps for each data point being monitored and represent the date/timestamp when each point will be cleared back to OFF. Enough 410xx registers must be configured in the RTU 5 database for the number of points being monitored.
| Row | Source Addr | Function | Operand Type | Operand | Result Addr | Cast Result As |
| 23 | 0 | ** COMMENT ** ... 11 Chars in Operand. Not a LABEL (Src and Result Ignored) | STRING as is (Eleven Characters) | ..... | 0 | SINT32 |
| 24 | 0 | LABEL ONLY in Operand as a STRING (Src and Result ignored) | STRING as is (Eleven Characters) | --CHKLIMIT | 0 | STRING-32 |
| 25 | -34 | INDEXed GET : SourceAddr value is RegAddr used as SrcData=> ResultAdr : Operand Ignored | Constant (Integer or Floating Point) | 0 GetLimit | -37 | SINT32 |
| 26 | -40 | GET TIME Src/Oprnd=Ignored Result> INT16[0-6]=YYYY,MM,DD,HH,MM,SS,ms INT32=1970+Secs STRING=YYYYMMDD-HHmmSS.ds | Constant (Integer or Floating Point) | 0 Seconds | -38 | SINT32 |
| 27 | -38 | < LESS THAN Operand? (Including String Compare) | RTDB Address (or Scratch-Pad[-1 to -40]) | -37 Limit | -39 | SINT32 |
| 28 | -39 | EXIT Stop this POD processing Src=Enable | Constant (Integer or Floating Point) | 0 EXIT | -40 | SINT32 |
Rows 24 through 28 compare the current date/time with the augmented date/time for this point, and exit the POD if the time hasn’t yet exceeded the configured delay timer. Row 24 is the label “--CHKLIMIT”, used in a previous GOTO statement. Row 25 does an Indexed Get from the register contained in Scratchpad [-34] (410xx register) and stores the augmented date/timestamp into Scratchpad [-37]. Row 26 gets the current date/time from the RediGate and stores into Scratchpad [-38], then a comparison is made whether current time is less than the stored timestamp. If so (Scratchpad [-39] is True), then exit the POD.
29 | 0 | ** COMMENT ** ... 11 Chars in Operand. Not a LABEL (Src and Result Ignored) | STRING as is (Eleven Characters) | ..... | 0 | SINT32 |
30 | 0 | ** COMMENT ** ... 11 Chars in Operand. Not a LABEL (Src and Result Ignored) | STRING as is (Eleven Characters) | ..CLR_BITS | 0 | SINT32 |
31 | -30 | INDEXed SAVE : Src=Data2Save, Opernd=AddressOfSave, Result=Overidden by Operand | RTDB Address (or Scratch-Pad[-1 to -40]) | -32 Src | -40 | SINT32 |
32 | -30 | INDEXed SAVE : Src=Data2Save, Opernd=AddressOfSave, Result=Overidden by Operand | RTDB Address (or Scratch-Pad[-1 to -40]) | -35 ClrPrev | -40 | SINT32 |
If the timestamp has exceeded the trigger time plus the delay time, the digital points are cleared back to False. Row 31 does an Indexed Save from Scratchpad [-30] (constant 0) into the register contained in Scratchpad [-32] (“Current” copy of point value in RTU 5, 000xx register), and also into the register contained in Scratchpad [-35] (“Previous” copy of point value in RTU 5, 100xx register).
33 | 0 | ** COMMENT ** ... 11 Chars in Operand. Not a LABEL (Src and Result Ignored) | STRING as is (Eleven Characters) | ..... | 0 | SINT32 |
34 | 0 | ASSIGN Operand to Result (Ignore Source Addr) | RTDB Address (or Scratch-Pad[-1 to -40]) | -32 CoilAdr | 40017 | SINT32 |
35 | -31 | COPY_DATA_BLOCK Src=Enable, OprndCnst=> Rg[0]=Chn 1=Rtu 2=Rtdb 3=Cnt 4=Chn 5=Rtu 6=DstRtdb | Constant (Integer or Floating Point) | 40011 Cfgs | 40018 | SINT32 |
Finally, Row 34 assigns the value in Scratchpad [-32] (000xx) into register 40017. This value is then used by the COPY DATA BLOCK routine. Scratchpad [-31] (always ON) triggers the copy, and registers 40011-40017 in RTU 5 (starting register indicated by Operand column) contain parameters telling what registers will be copied. These values in 40011-40017 were initialized using the Pre-Init RTDB object. The purpose of these registers is as follows:
Register | Value | Purpose |
40011 | 14 | Channel of POD unit |
40012 | 5 | RTU address of POD unit |
40013 | 10099 | Source register, always False |
40014 | 1 | Count of registers to copy |
40015 | 14 | Channel of original RTDB containing data |
40016 | 4 | RTU address of original RTDB |
40017 | 000xx | Destination register for COPY block. This is updated by the POD before it clears the original data point back to False, allowing the POD to dynamically write into a configurable desination. |
POD Function List
The following sections describe the operation of the Functions used in the POD instruction list. There are over 100 "Functions" available. Some functions only accept Integer or Floating point or String data while others can accept two or all three data types.
- Function Reference Chart gives a categorized cross-reference of functions based on function type.
- Commonly Used Functions describes many of the most essential functions.
- Other Functions describes the remainder of the function list in alphabetical order.
Function Reference Chart
Below is a listing of POD functions that are categorized according to function type and cross-referenced to the sections describing how to use them. All reference to “registers” can include RTDB register locations or Scratchpad variables.
Mathematical Functions
Function | Description | # |
ABSOLUTE VALUE | Take absolute value of a number. | 98 |
ADD | Add two numbers, or concatenate strings. | 3 |
ARCCOS(x) | Find the arccosine of a number. | 88 |
ARCSIN(x) | Find the arcsine of a number. | 89 |
ARCTAN(x) | Find the arctangent of a number. | 90 |
COSINE(x) | Find the cosine of a number. | 85 |
DIVIDE BY | Divide two numbers. | 6 |
EXP(x) | Calculate exponential (ex) value. | 84 |
LOG(x) | Calculate natural logarithmic (ln(x)) value | 83 |
MODULO DIVIDE | Divide two numbers and return fractional portion. | 7 |
MULTIPLY | Multiply two numbers. | 5 |
POWer (x^y) | Perform a power (xy) calculation. | 82 |
RANDOM | Generate a random number. | 81 |
SINE(x) | Find the sine of a number. | 86 |
SQUARE ROOT | Calculate the square root of a number. | 13 |
SUBTRACT | Subtract two numbers. | 4 |
TANG(x) | Find the tangent of a number. | 87 |
Comparison functions
Function | Description | # |
EQUAL TO | Return True if number or string is equal to another. | 2 |
GREATER THAN | Return True if number is greater than another. | 0 |
LESS THAN | Return True if number is less than another. | 1 |
NOT EQUAL TO | Returns True if numbers or strings are not equal. | 93 |
Logical/Boolean functions
Function | Description | # |
BIT-AND | Bit-wise AND two numbers, or replace all occurrences in string. | 8 |
BIT-OR | Bit-wise OR two numbers, or replace all occurrences in string. | 9 |
BIT-XOR | Bit-wise XOR two numbers, or replace all occurrences in string. | 10 |
INVERT | Invert Boolean value, or bits in word, or 1.0/real number, or reverse order of a string. | 14 |
String processing functions
Several of the other functions act as special case operations when operating on string values.
Function | Description | # |
ADD | Concatenate strings. | 3 |
ASSIGN | Set a value into a register. | 41 |
BIT-AND | Replace all occurrences of "<~Or?>" in string (use with BIT-OR or BIT-XOR). | 8 |
BIT-OR | Replace all occurrences in string with the text "<~Or?>". | 9 |
BIT-PACK | Take ASCII bytes from an integer and concatenate into an ASCII string. | 54 |
BIT-XOR | Replace first occurrence in string with the text "<~Or?>". | 10 |
DIVIDE BY | Return first byte of string. | 6 |
EQUAL TO | Return True string is equal to another. | 2 |
FORMAT | Store a value into a string using a defined number format. | 17 |
GREATER THAN | Return True if string is greater than another. | 0 |
INTEGER to ASCII BYTE | Convert integer value to printable ASCII representation. | 76 |
INVERT | Reverse order of a string. | 14 |
LESS THAN | Return True if string is less than another. | 1 |
MULTIPLY | Replace all occurrences in a string. | 5 |
NOT EQUAL TO | Returns True if strings are not equal. | 93 |
STRING DROP PART | Drop a number of bytes from start or end of a string. | 97 |
STRING GET PART | Keep only a number of bytes from start or end of a string. | 96 |
STRING HEADER | Return bytes preceding a matching delimiter. | 63 |
STRING LENGTH | Return length of a string. | 67 |
STRING TO LOWER | Convert string to lowercase. | 95 |
STRING TO UPPER | Convert string to uppercase. | 94 |
STRING TRAILER | Return bytes following a matching delimiter. | 64 |
STRING VALUE | Convert string to a numeric value. | 35 |
SUBTRACT | Eliminate one string from another. | 4 |
Program control
Function | Description | # |
COMMENT | Add a comment or a row separator for readability. | 47 |
DELAY | Sleep for a number of milliseconds. | 16 |
EXIT | Exit from POD processing on true/non-zero. | 58 |
FOR_LOOP | ‘For’ loop for program iteration. | 99 |
GO_SUB_POD | Call another POD program as a subroutine. | 60 |
GOTO LABEL | Jump to another labeled POD program step on true/non-zero. | 12 |
JUMP RELATIVE | Jump to another POD program step relative to the current step. | 11 |
LABEL ONLY | Label a step to be used for a GOTO. | 26 |
NOT EXIT | Exit from POD processing on false/zero. | 124 |
NOT GOTO LABEL | Jump to another labeled POD program step on false/zero. | 123 |
REPEAT UNTIL | Repeat loop of program iteration, similar to FOR_LOOP | 126 |
RETURN | Return from a subroutine. | 59 |
RUN POD(nnn) | Run another POD program without returning to current. | 28 |
Set or get registers, data conversion
Function | Description | # |
ASSIGN | Set a value into a register. | 41 |
BIT-PACK | Pack Booleans into an integer register, or ASCII bytes from an integer and concatenate into an ASCII string. | 54 |
BIT-UNPACK | Unpack bits of an integer register into Booleans. | 53 |
COPY_DATA_ BLOCK | Copy block of registers from one RTDB to another. | 15 |
EDGE DETECT | Detect rising or falling edge of a register. | 118 |
FORCE REGs to VALUE | Force block of registers to a set value. | 125 |
INDEXed GET | Indirect read from an RTDB register. | 36 |
INDEXed SAVE | Indirect write to an RTDB register. | 91 |
LONG to REAL | Convert long integer to REAL32 (floating point) number. | 70 |
PACK TIME | Pack date/time from 6 registers into long integer seconds. | 100 |
QUALITY ASSIGNMENT | Set the ONLINE/offline quality flag for a register. | 128 |
REAL to LONG | Convert REAL32 (floating point) number to long integer. | 71 |
REVERSE [1,2,4] BYTE WORD | Reverse bytes of integer value. | 106 |
ZERO Scratchpad Elements | Reset all 40 Scratchpad registers back to zero or NULL strings. | 25 |
RediGate system access
Function | Description | # |
CENTI-SEC CLOCK | Returns the current system time in 1/100ths of a second. | 92 |
CHANNEL CONTROL | Enable or disable a RediGate master channel. | 121 |
DIAGLOG | Enter a message in the RediGate’s diagnostic log. | 27 |
FORCE POD RTU STATUS | Set the status of the Internal Master POD RTU. | 104 |
GET CHANNEL NAME | Return Master Channel name from RediGate configuration. | 127 |
GET COLUMN FROM POLL RECORD | Get a value from the Poll Table record that called this POD routine, allows values to be passed into the POD. | 103 |
| GET RTU STATUS | Get the status of a FieldUnit | 108 |
GET TIME | Get current RediGate system time. | 65 |
MY RTU ADDRESS | Get RTU address of Internal Master RTU running the POD. | 75 |
RTU NAME | Return RTU name from Director configuration. | 30 |
SET RTU STATUS | Set the communication status of an RTU in the RediGate. | 101 |
SYSTEM COMMAND | Issue a system call to a shell script or command line function. | 20 |
| UNIT NAME | Return Linux system name (set in configuration). | 29 |
I/O board functions
Function | Description | # |
PC-104 DS-DMM-16-AT | Access I/O on the PC/104 DS-DMM-16-AT board. | 115 |
PC-104 IN-8 | Read digital I/O on the PC/104 IN-8 board. | 48 |
PC-104 IN-16 | Read digital I/O on the AIM104-IN16 board. | 49 |
PC-104 MULTI-IO-16se | Read I/O on the AIM104-MULTI/IO board (16 single-ended analogs). | 52 |
PC-104 MULTI-IO-8-DIFF | Read I/O from the AIM104-MULTI/IO I/O board (8 differential analogs). | 107 |
PC-104 OUT-8 | Write outputs to the AIM104-RELAY8/IN8 relay outputs. | 50 |
PC-104 OUT-16 | Write outputs to the AIM104-OUT16 digital outputs. | 51 |
PC-104 TS-ADC16 | Access I/O from the PC/104 TS-ADC16 board. | 113 |
File access functions
Function | Description | # |
ARCREAD | Read an archive file in the filesystem. | 37 |
ARCWRITE | Write to an archive file in the filesystem. | 38 |
ARCZERO | Set of block of registers in a file to zero. | 39 |
ARCCHKSUM | Calculate a 16-bit checksum of a section of an archive file. | 40 |
DATA LOGGER | Log data to a file in the filesystem. | 111 |
DUMP SCRATCHPADS | Store the value of Scratchpad registers to a file. | 105 |
TEXT FIND | Find a string in an open file buffer. | 32 |
TEXT FLUSH | Free allocated memory from open and read of file. | 33 |
TEXT OPEN | Open a file for reading. | 31 |
TEXT READ | Read bytes from a file. | 69 |
TEXT REMAINING | Return number of unread bytes in buffer. | 34 |
XML GET COUNT | Count number of named elements in XML file. | 72 |
XML GET FIELD | Read one or more attribute/values from element in XML file. | 73 |
XML NEXT FIELD | Read next attribute/value from element in XML file. | 74 |
Communication functions
Function | Description | # |
ASYNC-IN | Read data on an acscomm serial port. | 23 |
ASYNC-OUT | Send data to an acscomm serial port. | 22 |
CHECK HTTPPOST | Check the response of an HTTPPOST function. | 68 |
DB9-READ | Read CTS and DCD signals from serial port. | 56 |
DB9-WRITE | Write RTS and DTR signals to serial port. | 57 |
HTTPPOST | Send a POST message to an HTTP server. | 19 |
MODBUS WRITE | Send a Modbus write communication command. | 24 |
MQtt SEND CMD | Publish a message using MQTT protocol. | 120 |
PARSE MQtt RBE | Parse an MQTT RBE message. | 119 |
PUBCONN | Return connection status with MQTT broker. | 42 |
PUBHOST | Return index of which MQTT broker we are connected to. | 46 |
PUBNUMQ | Return number of pending MQTT messages to be delivered. | 43 |
PUBLISH | Publish an MQTT message to a broker. | 18 |
PUBQUERY | Check state of a message on the MQTT queue. | 44 |
PUBWALK | Force MQTT client to connect to each broker in its host list. | 45 |
SEGRECV | Receive bytes on a serial port and pack them into a consecutive RTDB registers. | 55 |
SEGSEND | Send bytes from consecutive RTDB registers to a serial port. | 21 |
SEND BIRTH/DEATH CERTIFICATE | Send MQTT birth certificate or death certificate. | 102 |
SUBSCRIBE TO TOPIC | Issue MQTT subscription for a data topic. | 116 |
SUBSCRIBED RECV’d DATA | Receives raw MQtt packet payloads directly into RTDB registers. | 117 |
TTYsIN | Read data on a ttyS serial port. | |
TTYsOUT | Send data to a ttyS serial port. | 62 |
Specialty functions
Function | Description | # |
AGA3_1982 | Perform AGA3 gas flow calculation. | 79 |
DNP_CRC | Calculate the CRC of a DNP3 message. | 122 |
DNP_LOG | Create an event in an RTDB event buffer, can be retrieved by DNP3 (or other protocols that support events). | 80 |
DNP_PULSE_AT_ RTDB | Remap DNP3 pulse command parameters into integer RTDB registers. | 114 |
NX_19_Fpv | Perform NX-19 supercompressibility gas calculation. | 78 |
PID-LOOP | Perform a PID loop calculation. | 77 |
PULSE FACTOR | Integrate pulse counter with a K factor divisor. | 110 |
SCRAMBLE | Scramble (encrypt) or unscramble (unencrypt) a hex string. | 66 |
TABLE-23B | Calculate Table-23B relative density correction. | 112 |
Commonly Used Functions
The following functions are among the most commonly used POD instructions.
+ ADD Operand (Append Strings)
Returns result of adding "Source Addr" data to Operand data. Strings are concatenated.
- SUBTRACT Operand (Remove Operand String occurrences from Source String)
Returns result of subtracting "Source Addr" data by the Operand data.
If Source Data is String Data then....
If Operand of Type STRING exists in Source String then it is eliminated from Source.
If Operand of Type CONSTANT then the first '+N' (Positive Constant value) bytes are eliminated from the Front of Result String.
If Operand of Type CONSTANT then the first '-N' (Negative Constant value) bytes are eliminated from the Tail of Result String.
* MULTIPLY Operand (Find Right Half of Operand String, Replace with Left Half)
Returns result of multiplying "Source Addr" data by Operand data, result will be an integer.
String Replacement:
If parameters are Strings then Operand Data should be an even number of characters.
The second half of the Operand string is scanned for matches in the Source Data.
Each matching occurance is then replaced by the first half of the Operand string.
Example: If Operand contains "abcDEF", then the Source string register will be searched for "DEF". Each occurrence will be replaced by the string "abc".
For more complex handling of string replacements (not requiring search and replace strings of equal length, for instance), see the BIT-OR, BIT-AND, BIT-XOR functions.
/ DIVIDE BY Operand (Return 1st N (Operand-Value) of Source String)
Returns result of dividing "Source Addr" data by Operand data.
If Source Data is String Data then:
If Operand is of Type STRING then simply return first byte of Source String
If Operand of Type CONSTANT then the first 'N’ bytes are returned from Source String.
MODULO DIVIDE by Operand (Return Last N (Operand-Value) of Source String)
Returns result of MODULO dividing "Source Addr" data by Operand data.
Reals return fractional portion of result.
If Source Data is String Data then....
If Operand is of Type STRING then simply return last byte of Source String
If Operand of Type CONSTANT then the last 'N' (where is Contant value) bytes are returned from Source String.
> GREATER THAN Operand? (Including String Compare)
Returns a TRUE (or -1) if "Source Addr" data is greater than Operand data.
Also compares String using strcmp(). "-1" saved for TRUE and "0" for FALSE when the Result is cast as a String.
< LESS THAN Operand? (Including String Compare)
Returns a -1 (TRUE) if "Source Addr" data is less than Operand data.
Also compares String using strcmp(). "-1" saved for TRUE and "0" for FALSE when the Result is cast as a String.
== EQUAL TO Operand? (Including String Compare)
Returns a -1 (TRUE) if "Source Addr" data is equal to Operand data.
Also compares String using strcmp(). "-1" saved for TRUE and "0" for FALSE when the Result is cast as a String.
!= NOT EQUAL TO Operand? (Including String Compare)
Returns a -1 (TRUE) if "Source Addr" data is NOT equal to Operand data.
Also compares String using strcmp(). "-1" saved for TRUE and "0" for FALSE when the Result is cast as a String.
ASSIGN Operand to Result (Ignore Source Addr)
Put something into the Result from Operand while ignoring Source Addr. The Operand Data Type sets the function data type for saving into the Result Address.
If the Operand Type is “Constant” or “String”, the literal value in the Operand column is put into the Result Addr register in the local Internal Master unit RTDB.
If the Operand Type is RTDB, the Operand value should contain an RTDB register address in the Internal Master (or a Scratchpad register, if the Operand is a negative number) that is the source of data to put into the Result Addr register.
In order to assign a string to a null value (zero length), don’t use the ASSIGN function. Rather, use the INTEGER to ASCII BYTE function, and assign a constant value of 0 (or x00) to the string register.
GOTO LABEL - Jump if Source value is TRUE/Non-Zero, Operand=”Matching Label”
If "Source Addr" data is non-zero (Boolean/integer/real) then execute a search (non-case sensitive) through all rows containing the LABEL Function for matching Operand Strings. If the Label is found, jump to that POD row to continue processing functions.
Strings are not allowed in the Source Addr.
NOT GOTO LABEL - Jump only if Source value is FALSE/Zero, Operand="Matching Label"
If "Source Addr" data is zero (Boolean/integer/real) then execute a search (non-case sensitive) through all rows containing the LABEL Function for matching Operand Strings. If the Label is found, jump to that POD row to continue processing functions.
Strings are not allowed in the Source Addr.
LABEL ONLY in Operand as a STRING (Src and Result ignored)
"Source Addr" is ignored and GOTO LABEL searches for matching Operand String. Special string used by FOR_LOOP is “ENDLOOP?” where ‘?’ can range from 0 to 9. The ‘Operand Type’ must be set to “STRING” and the string must be unique in this POD.
FOR_LOOP Src=Enbl Oprnd=5CfgRgs 0=Index, 1=Init&LoopVal, 2=Limit, 3=Stop@(0 '=', 1 '>', -1 '<'), 4=IncrmentVal (Label @ ENDLOOP[0-9])
Source Address is the Enable flag for the FOR_LOOP. If the Enable is zero, the FOR_LOOP will not operate, but the logic steps between FOR_LOOP and ENDLOOP? will be executed one time.
The Operand is a reference to a starting register containing a group of 5 consecutive parameters. The Operand Type should be Constant if containing the actual starting register of the parameters (using the RTDB Register type will use INDIRECT addressing, where the Operand value is a register containing the value of the starting parameter register.)
NOTE: The five parameter registers must be Integer type — REAL32 and Strings are not allowed. Because the FOR_LOOP compares the Limit initially (when enabled), it will skip to the ‘ENDLOOP?’ tag immediately if Limit is exceeded. (To always run the loop logic on first-time execution, use REPEAT UNTIL.)
The five parameters are:
- Index : Can range from 0 to 9. Loop block terminus must be a row defined as a LABEL with “ENDLOOP?” where ‘?’ is also from 0 to 9. At ENDLOOP the Value is incremented by ‘Increment’ and compared as EQUAL, GREATER THAN or LESS THAN. If not, then jump back to row following FOR_LOOP statement. This is only implemented when the FOR_LOOP has been enabled.
- Init&LoopVal : Must be given a starting value before FOR_LOOP statement and then it is incremented at the “ENDLOOP?” label.
- Limit : Value to which ‘Init&LoopVal’ is compared for loop termination.
- StopType : Determines comparison used between ‘Limit’ and ‘Init&LoopVal’. 0 for Equal, 1 for ‘Init&LoopVal’ being Greater Than ‘Limit’, -1 for ‘Init&LoopVal’ being Less Than ‘Limit’.
- Increment : Positive or Negative delta amount added to ‘Init&LoopVal’ at “ENDLOOP?” label.
NOTE: All FOR_LOOP - “ENDLOOP?” pairs must use a unique Index number in a POD and any SUB_PODs that may be called by it.
REPEAT UNTIL Src=Enbl Oprnd=5CfgRgs 0=Index, 1=Init&LoopVal, 2=Limit, 3=Stop@(0 '=', 1 '>', -1 '<'), 4=IncrmentVal (Label @ ENDLOOP[0-9])
Repeat loop of POD code until condition is satisfied (similar to FOR_LOOP, except that REPEAT UNTIL will always run once, and then the condition is checked at the end).
The REPEAT UNTIL function uses 5 registers as parameters – see the FOR_LOOP section for a description of the parameters.
JUMP RELATIVE if Src is TRUE by Operand Rows (+/-)
If "Source Addr" data is non-zero (integer/real) then move the row pointer by the number of rows in the Operand data. Negative numbers jump to a previous row, positive numbers jump to a later row.
NOTE: 0 is invalid, and 1 moves pointer to the next row (i.e., no effect). Use 2 to skip over a single POD row step, or >2 for later rows.
Strings are not allowed in the Source Addr.
GO_SUB_POD Subroutine If Src=Enable Operand=POD_Index to drop into POD Subroutine
The same Scratchpad variables are used by the caller and called PODs.
Subroutines can be nested to a depth of 15 calls. The called POD must have one or more ‘RETURN’ statements to return to the calling POD.
EXIT Stop this POD processing if Source value is TRUE/Non-Zero
Return to normal Virtual Master Polling mode if value in Source Addr is non-zero.
Operand and Result Addr are ignored.
NOT EXIT Stop this POD processing if Source value is FALSE/Zero
Return to normal Virtual Master Polling mode if value in Source Addr is zero.
Operand and Result Addr are ignored.
RETURN If called by other POD then Return to Caller POD’s Row... Src=Enable
The same Scratchpad variables are used by the caller and called PODs. FOR_LOOP indexes are also shared.
RUN POD(nnn) if SrcAddr=TRUE where Operand=POD_INDEX (1 to 9999). POD won’t return.
If "Source Addr" data is non-zero (integer/real) then jump without return to POD(index).
Strings are not allowed in Source Addr.
The same Scratchpad variables are used by the caller and called PODs.
** COMMENT ** ... 11 Chars in Operand. Not a LABEL (Src and Result Ignored)
Whole row ignored by Interpreter. Type up to 11 characters into Operand and any number in Src/Result columns.
Other Functions
The remaining functions are listed in approximately alphabetical order.
ABSOLUTE VALUE Src=Value (Operand is ignored)
AGA3_1982 Src=Enbl, Oper=10PtrRgs-> 0=Pipe 1=Orif 2=Tb 3=Pb 4=SG 5=SH 6=DP 7=LT 8=LP 9=Fpv ==> SCFH
The Operand is an address to 10 Floating point values. They are Pipe Diameter(inches), Orifice ID(inches), Temperature-Base(degF), Pressure-Base(psig), Specific Gravity, Specific Heat, Differential Pressure (inch-H20), Line Temperature(degF), Line Pressure (psig), Supercompressibility Factor.
The Supercompressibility can be calculated using the NX_19 function described in a lower section.
The result is the Flowrate in Standard Cubic Feet per Hour.
ARCCOS(x) Src=Real32-(-1 to +1) Operand=Ignored Returns REAL32 ArcCOS(x)
Source Addr is a floating point number -1 to 1
Result is also floating point as arccosine of source.
Operand is ignored.
ARCSIN(x) Src=Real32-(-1 to +1) Operand=Ignored returns REAL32 ArcSIN(x)
Source Addr is a floating point number -1 to 1
Result is also floating point as arcsine of source.
Operand is ignored.
ARCTAN(x) Src=Real32-(-oo to +oo) Operand=Ignored returns ArcTAN(x)
Source Addr is a floating point number.
Result is also floating point as arctangent of source.
Operand is ignored.
ARCREAD Src=Enbl Opernd(AdrOf5CfgRegs) [0]=NameAdr 1=Offst 2=Rtu 3=Rtdb 4=Cnt
"Source Addr" data is the “enable”.
"Operand" data is a reference to a block of registers used to Read an Archive file.
1st Register=RTDB Address containing the string name of the archive (e.g. /tmp/data1.arc) (must be a STRING-256 RTDB element)
2nd Register=Byte offset into Archive 0 to N
3rd Register=RTU Number to Associate with Archive in associated Internal-Channel.
4th Register=RTDB Starting register to receive the data from the Archive
5th Register=Count of RTDB Registers
Returns a negative value if an error is encountered, or zero for success.
Strings are not allowed in Source Addr or Operand.
ARCWRITE Src=Enbl Opernd(AdrOf5CfgRegs) [0]=NameAdr 1=Offst 2=Rtu 3=Rtdb 4=Cnt
"Source Addr" data is the “enable”.
"Operand" data is a reference to a block of registers used to Write to an Archive file.
1st Register=RTDB Address containing the string name of the archive (e.g. /tmp/data1.arc) (must be a STRING-256 RTDB element)
2nd Register=Byte offset into Archive 0 to N
3rd Register=RTU Number to Associate with Archive in associated Internal-Channel.
4th Register=RTDB Starting register used to write data to the Archive
5th Register=Count of RTDB Registers (Only one String-32 or String-256 can be written at a time)
Returns a negative number if an error occurred, or zero if successful.
Strings are not allowed in Source Addr or Operand.
ARCZERO Src=Enbl Opernd(AdrOf3CfgRegs) [0]=NameAdr 1=Offst 2=Cnt
"Source Addr" data is the “enable”.
"Operand" data is a reference to a block of registers used to Zero in an Archive file.
1st Register=RTDB Address containing the string name of the archive (e.g. /tmp/data1.arc) – must be a STRING-256 RTDB element
2nd Register=Byte offset into Archive 0 to N
3rd Register=Count of bytes
Returns a negative number for an error, or zero for success.
Strings are not allowed in Source Addr or Operand.
ARCCHKSUM Src=Enbl Opernd(AdrOf3CfgRegs) [0]=NameAdr 1=Offst 2=Cnt
"Source Addr" data is the “enable”.
"Operand" data is a reference to a block of registers used to Zero in an Archive file.
1st Register=RTDB Address containing the string name of the archive (e.g. /tmp/data1.arc) (must be a STRING-256 RTDB element)
2nd Register=Byte offset into Archive 0 to N
3rd Register=Count of bytes to calculate a check sum (CRC-16)
Returns the 16 bit checksum for the range of the archive.
Strings are not allowed in Source Addr or Operand.
ASYNC-IN Src=Enbl Opernd=PtrAdr 5CfgRgs [0]=ComPort 1=MxLen 2=EndChr 3=TmOut 4=Demrk Result=TypeString
Read a series of characters from a serial port and store into a string register. This function uses the /dev/acscomm_ serial port driver, not the Linux ttyS driver.
Source Addr value is a reference to five Registers in the RTDB (e.g., use a constant Operand of "40001" to point to registers 40001-40005, which must be pre-initialized before calling this function).
1st Register=Async comm port number (0 to N, such as 1 for COM1).
2nd Register=Maximum Buffer Length (in bytes). Reading will terminate upon receiving the max number of characters. The maximum should be set to 31 or 255, depending on the type of Result string used. (The number of received bytes may be further limited if using End Message Marker=0, because of expanding non-printable characters.)
3rd Register=End Message Marker. The register must contain the ASCII code of a delimiter character that will be taken as end of message. If this is set to a value of -1, then no end marker will be used, and non-printable characters will be stored in original byte form. If this is set to a value of 0, no end marker will be used, and all non-printable characters (ASCII 1 to 31 and 128 to 255) will be stored in the result string as "\001", "\031", "\128", etc.
4th Register=Timeout to first byte (in milliseconds). The function will wait up to this amount of time to start receiving characters, or else terminate with null string. This timer also serves as a Demark timer for identifying the end of the message once bytes are received, if the End Message Marker is not received.
5th Register=Demark timer (in msec) for last byte. (Currently not implemented - 5/9/2018)
The Result Type must be a STRING register (STRING-32 or STRING 256).
ASYNC-OUT (acscomm) Src=Enbl Opernd=PtrAdr 4CfgRgs [0]=ComPort [1]=SendLength [2]=StringAdr [3]=FlushInput...Result=Integer
Write the characters in a string to a serial port. This function uses the /dev/acscomm_ serial port driver, not the Linux ttyS driver.
Source Register is an Enable for the function (non-zero value).
Operand value is a reference to four Registers in the RTDB (e.g., use a constant Operand of "40001" to point to registers 40001-40003, which must be pre-initialized before calling this function).
1st Register=Async comm port number (0 to N, such as 1 for COM1).
2nd Register=Character Send Length (number of bytes), up to 31 or 255 depending on the source string type.
3rd Register=RTDB Address of String to send (must point a STRING-32 or STRING-256 register)
4th Register=Flush the serial input buffer on the port before sending data (1=flush, 0=not flush). This can be useful when sending a string, and then immediately reading a response, to ensure that any old characters are eliminated from the buffer.
The Result Type is returned as an Integer
BIT-AND Operand (Strings replace all "<~Or?>" in SrcString with Operand String)
Integers will return result of bit AND-ing the "Source Addr" data with Operand data.
Strings are handled for Search/Replacement with BIT-OR. BIT-AND will search for all occurrences of “<~Or?>” text inside Source String and replaces the matching area with the Operand string.
When used with strings, the BIT-OR should have previously been used to place one or more “<~Or?>” strings in the original text.
REALs are invalid for this function and are ignored.
BIT-OR Operand (Strings find all OperString in Src and replace with "<~Or?>")
Integers will return result of bit OR-ing the "Source Addr" data with Operand data.
Strings are handled for Search/Replacement with BIT-AND.
When used with strings, the BIT-OR function will search for all occurrences of Operand String inside Source String and replace the matching area(s) with six characters: <~Or?>
After running BIT-OR with a string, you can use the BIT-AND function to replace any “<~Or?>” text with new text.
REALs are ignored.
BIT-PACK Src=>Start of Booleans Operand=1 to 16 bits to pack
Pack Booleans into an integer register, or ASCII bytes from an integer and concatenate into an ASCII string.
Source Addr is source register of Booleans.
Operand is the number of bits to pack (1 to 16) if the source i.
If the source is Boolean and the destination is an integer, the Boolean bits are packed and the Result is stored into the integer register. The Operand is the number of bits to pack (1 to 16).
If the source is integer and the destination is a string, the ASCII bytes of the integers are converted to their ASCII representations and the Result is stored in the String register. The Operand is the number of integer registers to convert. (For instance, an integer containing hex values x3031 becomes a string “01”).
BIT-UNPACK Src==>Integer Value Operand=1 to 16 bits to unpack to 1 or more Result Booleans.
Unpack bits of an integer register into Booleans.
Source Addr is source register of integer value.
Operand is the number of bits to unpack (1 to 16).
Result is stored into a series of Boolean registers.
BIT-XOR Operand (Strings find 1st OperString in Src and replace with "<~Or?>")
Integers will return result of bit exclusive or-ing"Source Addr" data with Operand data.
Strings are handled for Search/Replacement with BIT-AND.
When used with strings, BIT-XOR will search the FIRST occurrence of Operand String inside Source String and replace the matching area with six characters: <~Or?>
After running BIT-XOR with a string, you can use the BIT-AND to replace the “<~Or?>” text with new text.
REALs are ignored.
CENTI-SEC CLOCK Ignore Source and Operand. Free running centisecond Clock
Returns the current system time in centiseconds (1/100ths of a second) as an SINT32 value.
Source Addr and Operand are ignored.
This can be used, for instance, to set a timer for a certain event. Read the CENTI-SEC CLOCK and add 500 (five 1/100ths of a second) for 5.00 seconds from the current time. Then the POD can continue to read the CENTI-SEC CLOCK function, and when the system clock is greater than the stored value, the timer has effectively expired, and a defined action can be performed.
The system clock can also be used to store and/or publish data with a date/timestamp.
CHANNEL CONTROL Source=Chann(0 to 15), Operand=0-Disable,NonZero-Enable : Return NewMode
Enable or disable a Master Channel, which will start or stop the Scan Table polling entries for the channel.
“Source Addr” contains the channel number
“Operand” contains 0 to disable, or a non-zero positive value to enable.
Returns a 0 for the new disabled state, a negative number for an error, or an echo of the Operand for the new enabled state.
CHECK HTTPPOST Src=Enable, Opernd=Ignored, Returns String Message
Check the response of an HTTPPOST function.
Source Addr is an enable register to activate the function, if the register value is non-zero.
Result is a String message returned from the HTTP server in response to POST message.
Operand is ignored.
COPY_DATA_BLOCK Src=Enable, OprndCnst=> Rg[0]=Chn 1=Rtu 2=Rtdb 3=Cnt 4=Chn 5=Rtu 6=DstRtdb
This is one of the few functions that access other Master Channel's/RTU's data.
If "Source Addr" data is non-zero then the "Operand" data is used as a local RTDB starting Register Address.
The function then reads 7 values starting at this address and interprets them as...
1st Register=Source Channel Number (0 to 15)
2nd Register=Source RTU Number
3rd Register=Source Data Starting Register Address
4th Register=Source Data Count
5th Register=Destination Channel Number (0 to 15)
6th Register=Destination RTU Number
7th Register=Destination Data Starting Register Address (should be same data type as Source)
Returns a negative value for an error, or the number of registers copied.
Strings are not allowed in Source Addr or Operand.
Cannot copy data from ScratchPad elements or save to ScratchPad elements.
COSINE(x) Src=Real32-Radians Operand=Ignored Returns REAL32 cosine(x)
Source Addr is a floating point number of angle in radians.
Result is floating point as cosine of source value.
Operand is ignored.
DATA LOGGER Src=Enbl, Oprnd=PtrCfg-7 0=AddrStr256(Dir/File) 1=DataAddr 2=Count(Max=125) 3=MaxFiles 4=CSV? 5=w/HHMMss 6=Reserved
Source Addr is an enable register to activate the function, if the register value is non-zero.
The Operand value is the starting address to Six Configuration parameters with a seventh register used for persistent data used between calls. These registers should be either UINT16 or SINT32/UINT32 data types.
The first parameter is the numeric register address pointing to a STRING-256 data type containing the Directory path and root filename. Example: The first register contains 46001, where register 46001 is a STRING-256 register that might contain "/tmp/cflash/MeterLogs/IonMeter1" or "/tmp/usb/Floats/Voltages". The Data Logger function will verify that the directories exist and will append more information to the file name consisting of the Year-Month-Day, Starting Data Address by Number of Data Items, Time Stamp mode, and either ".csv" or ".bin". For example the first file name could be "../IonMeter1..2012-12-25_30001x012_TS.csv" for December 25th 2012, data from 30001 through 30012 saved as comma separated values with a Time Stamp.
The second parameter is the starting data address from the Internal Master RTU's RTDB running the POD which is to be logged. This can range from 1 to 60000.
The third parameter is the count of data values to be logged and is limited to 125 values.
The fourth parameter is Maximum number of files to be stored in the destination directory portion of the file name. At midnight the logger will see if the oldest file in the destination directory should be removed. Plus any “FILENAME*.csv” or “FILENAME*.bin” file will be gzip-compressed and renamed to either “FILENAME*.csv.CSV.gz” or “FILENAME*.bin.BIN.gz”. When the user copies the compressed files to a Windows PC then the freeware program “7-Zip” can uncompress them. The ".CSV" or ".BIN" is appended to prevent compressing a continuing live log file.
The fifth parameter is zero if the files are stored as binary records, and 1 if the data is to be stored as comma separated (CSV) values (future versions might store XML formatted records). If in binary mode then Boolean and INT8 registers will occupy one byte. INT16 occupy two bytes, INT32 and REAL32 use four bytes, STRING-32 use 32 bytes and STRING-256 uses 256 bytes. Data is ‘Little Endian’. CSV file records are terminated with a “,EOL” (for End Of Line) plus a ‘NEW LINE’.
The sixth parameter determines if a Time Stamp is to be prepended to each record. CSV records will have the HH,MM,SS,mSec, values in military mode (0-23 hours, using system timezone). The Binary mode time stamp will be an INT32 number of seconds since Jan 1, 1970 (using UTC timezone) followed by an INT32 microseconds. The File Name will either have “_TS” or “_noTS” whether the records are Time Stamped or not Time Stamped. A sample CSV record with Time-Stamp could appear as (at 13:23:09.774 or 1:23 PM) with PI, Feet-In-Mile, and Body Temperature as: 13,23,9,774,3.14,5280,98.6,EOL
The seventh parameter will be reserved for the logger to persist some information such as whether the Midnight Logic has been executed for the base file name. If set to zero on then the Data Logger will attempt to make the destination Directory required by the path name. If set to 128 (8th bit) then it will assume the destination Directory (pathname) is already created. The bottom 6 bits record the hour of the last time the file was written. The 7th bit is set the first time Midnight is detected and cleared when it is no longer Midnight.
NOTE 1: Be careful to use a unique File name for each Starting Data point or else the file management function will delete more files associated with the lower addressed set of data. Two dots (..) separate the end of the base File Name from the appended Date Stamp and other appended characters.
NOTE 2: The storage device must be mounted into a subdirectory of the /tmp/ folder (Ram Drive area). A customer’s startup script can be modified to automatically mount /dev/sda1 (USB Flash Drive) into /tmp/usb/. If no storage device is mounted into /tmp/ then any logging will be written to the Ram Drive Area to prevent damaging the on-board FLASH memory.
DB9-READ Src=ComPort(+128 if ttyS) Operand=None Result=Bit0=CTS 1=DCD 8=Error
Read CTS and DCD signals from a serial port.
Source Addr is the number of the serial port. Port numbers 1-127 refer to ‘acscomm’ serial drivers (console port 0 is not allowed). To read signals from the native Linux serial “/dev/ttyS_” driver, add 128 to the COM port number (129=ttyS1, 130=ttyS2, etc.).
Result is an integer with bits set according to the current state of handshaking signals, bit0=CTS, bit1=DCD (True indicates signal is activated), bit8=error reading port.
DB9-WRITE Src=ComPort(+128 if ttyS) Operand=BitMask Bit0=RTS Bit1=DTR Result...0=OK else Fail
Write RTS and DTR signals to a serial port.
Source Addr is the number of the serial port. Port numbers 1-127 refer to ‘acscomm’ serial drivers (console port 0 is not allowed). To read signals from the native Linux serial “/dev/ttyS_” driver, add 128 to the COM port number (129=ttyS1, 130=ttyS2, etc.).
Operand is a bit map, allowing control over the output state of the RTS and DTR signals. Bit0=RTS, Bit1=DTR (True forces an active signal, False forces an inactive signal).
Result is 0 if output is successful, or non-zero if unsuccessful.
DELAY If Src=TRUE then sleep Operand data Milliseconds
If "Source Addr" data is non-zero (integer/real) then sleep Operand data milliseconds.
Strings are not allowed in Source Addr.
DIAGLOG() Operand + Source Value as Strings
Data is sent to /tmp/director/DirectorFifo
If "Source Addr" data type is INTEGER then print Operand string, Int(SrcAddr), SrcValue %d
If "Source Addr" data type is REAL then print Operand string, IEEE(SrcAddr), SrcValue %g
If "Source Addr" data type is STRING then print Operand string, String(SrcAddr), SrcValue %s
DNP_CRC Source=StrtUINT8, Operand=Count-UINT8 : Result=CRC (and into UINT8 buffer)
Calculate the CRC of a DNP3 message.
Source Addr is starting UINT8 register of a sequence of bytes of a DNP3 message.
Operand is UINT8 count of byte registers.
Result is the CRC-16 word of the DNP3 byte array.
DNP_LOG Src=Enbl, Oper=2PtrRgs-> 0=EventBuf, 1=RtdbAdr, Result=0 Else Negative
The Operand is an address to 2 Integer values.
The first parameter is the RTDB address of an Event buffer normally set to 50001 up to 50004. Each Event buffer can hold up to 100 Events. The DNP3 Slave is the only service in the RediGate that can read/use this information. An Event is comprised of four 32-bit values. The first of the four holds the originating RTDB Data Address and Data type. The second holds the actual data value. The third element is the Linux 32-bit time value (seconds since 1970) and the fourth element has the number of microseconds offset into the seconds value.
The second parameter is the RTDB address that should be logged into the Events buffer.
DNP_PULSE_AT_RTDB SrcAddr=Ignored : Operand=RtdbAddress Associated with 1st Pulse Command : Rslt=Echo of Operand or -1 if error
Remap DNP3 pulse command parameters into integer RTDB registers. When a DNP3 pulse command is received on a DNP slave channel and passed to a master channel that supports pulse commands, the pulse parameters (on time, off time, etc.) are passed through. But if the DNP slave channel points to an internal RTDB register, these values would be otherwise lost, because the RTDB doesn’t know how to deal with pulses. This DNP_PULSE_AT_RTDB function allows information about the pulse commands to be stored into RTDB registers, where they may be used by other functions if necessary (such as echoing the pulse command to a built-in digital output board, for instance).
Source Addr is ignored.
Operand is an RTDB address of integer registers that should be associated with the first Pulse DNP3 point. Beginning at this integer register, consecutive sets of ?? registers will contain information about the DNP3 pulse commands received on the DNP slave channel.
Result is an echo of the Operand, or -1 if an error.
DUMP SCRATCHPADS to /tmp/director/S_PADpp.rr.txt where 'pp' is PodNdx & 'rr' is Row if Src=Enable
Store the value of all 40 Scratchpad registers to a file. The file name is hard-coded to “/tmp/director/S_PADpp.rr.txt”, where pp is the number of the POD running this function, and rr is the row number of the function.
Source Addr is an enable register to activate the function, if the register value is non-zero.
Operand and Result registers are ignored.
EDGE DETECT Src=BoolInput, Operand=Instance(0 to 9 RisingEdge, -1 to -9 Falling Edge)
Detect the rising or falling edge of the value of a Boolean register.
Source Addr is the Boolean register to monitor.
Operand is a numeric instance of a register to monitor, where the previous value of the Boolean is stored from the previous execution of EDGE DETECT. Up to 10 Boolean registers can be monitored (only 9 if using falling edge). Operand is positive (0 to 9) to detect rising edge, or negative (-1 to -9) to detect falling edge.
EXP(x) Src=Real32-InputValue Operand=Ignored Returns REAL32 'e to the x'
Calculate the exponential of a source value.
Source Addr is the floating point value of the input (x).
Result is a floating point containing the (ex) value.
Operand is ignored.
FORCE POD RTU STATUS Src=Enbl Oprnd=ThisRtuStateState (0=Good,2=Bad) Return:0=Ok, -1=Failed
Set the associated Internal Master RTU to the State value in the Operand.
Source Addr is an enable register to activate the function, if the register value is non-zero.
Operand is the desired state to which the Internal Master should be set (0=good, 2=bad).
Result is 0 if successful, or -1 if an error.
FORCE REGs to VALUE : Source=Enable : Operand=CfgPtr[4] (0=RTU 1=StartOfRegs 2=AdrOfValue 3=Count-1000Max) : Return Integer (0=Success)
Force a block of registers in Internal Master unit to a set value.
Source Addr is an enable register to activate the function, if the register value is non-zero.
Operand is a reference to a group of 4 consecutive parameters. Registers are:
1st Register = FieldUnit address of internal unit on this Internal Channel.
2nd Register = Starting register location to force the values.
3rd Register = Register should contain a pointer to an RTDB Address that contains the new value to set the registers.
4th Register = Count of registers to force to a new value (max 1000 Booleans, integers, or floats; max 127 String-32 or 16 String-256).
Result is 0 if successful, or -1 if an error.
FORMAT Specifier 'C' Printf in Operand for SrcData, Result should be UINT16,STR-32,STR-256
Format the value in Source Addr using Operand string formats such as "%d", "%f", "%s" (without quotes). Save the formatted output into the Result Addr register.
If Operand Type is String, then the Operand value (limited to 11 characters) is used as a format specifier for the output. For instance, with a source value of -21 (SINT16) and Operand of “Value=%d”, the resulting value will be saved as “Value=-21”.
If Operand Type is RTDB, the format specifier is taken from a register indicated by the Operand, which should be a String register.
Use a STRING data type for Cast Result As.
GET CHANNEL NAME Src=Enable, Operand=ChannNumb(0-15), Result=ChanName(Max 15 Chars) else "NOT-READ"
Read the Master Channel name from the configuration.
Operand is the channel number (0-15).
Result register and Cast Result As should be a String type. If unable to obtain the channel name, the result "NOT-READ" will be stored.
GET COLUMN FROM POLL RECORD Src=Ignored : Operand=> 0=SrcChn 1=SrcRtu 2=SrcAdr 5=DestRTDB
This function is used to pass parameters to a POD routine by placing values into a column of the Poll Record table. This may be useful, for instance, to have a general POD program that can be operated according to substitutable parameters passed in from the Poll Table.
Set the ‘Operand’ value to '0' to read the 'Src Chan' column, '1' to read the 'Src Rtu' column, ‘2’ to read the ‘Src Data’ column, or ‘5’ to read the “Dest Data” column. (Other columns can be read, but are not usable for general purpose because they are required for a POD Poll Table row.
GET RTU STATUS of Any RTU Src=Channel : Oprnd=RtuAddr : Result=(0=OK,-2=NoChan,2=Timeout,3=BadDat,4=FramErr,5=Stop,6=Trans,7=NoPoll)
Get comms status of a FieldUnit.
Source Addr is the Master Channel number.
Operand is the FieldUnit address.
Result register (should be integer type) returns the status:
- -2 = Incorrect channel or RTU address
- 0 = OK, good communication
- 2 = Timeout
- 3 = Bad Data
- 4 = Framing Error
- 5 = Stopped
- 6 = Trans
- 7 = No Polls
GET TIME Src/Oprnd=Ignored Result> INT16[0-6]=YYYY,MM,DD,HH,MM,SS,ms INT32=1970+Secs STRING=YYYYMMDD-HHmmSS.ds
Get the current system time and store into the RTDB. Source Addr and Operand are both ignored.
If Result is cast to INT16 then the time will be saved to seven consecutive registers with YYYY, MM, DD, HH, mm, SS, mSec
If Result is cast to INT32 then the time will be saved to two consecutive 32-bit registers. 1st=Seconds since Jan. 1, 1970. 2nd=milliseconds in the current second.
If Result is cast to REAL32 then the time will be saved to two consecutive registers. 1st=YY*10000.0 + MM*100.0 + DD. 2nd=HH*10000.0 + mm*100.0 + SS.
If Result is cast to STRING then the Result will be saved to one register, as "YYYYMMDD-HHmmSS.ds" (ds=1/10th seconds)
HTTPPOST Src=Enable Opernd=2PtrCfgs [0]=StartAdrOfStrings 1=CountofStrings
If "Source Addr" non-zero (integer/real) then attempt HttpPost. The Operand references the starting address of two configuration parameters:
1st Register=String Starting Register Address
2nd Register=Number of String Registers to send to HttpPost process.
This uses the “POST_XML_FILE=1” parameter in the /usr/director/bin/customer file to determine if the Strings should be used as the “File Name” to Post or as the verbatim ASCII payload to Post.
Returns an Integer Result of zero if successful
INDEXed GET : SourceAddr value is RegAddr used as SrcData=> ResultAdr : Operand Ignored
"Source Addr" data is used to read RTDB for actual Data. Operand is ignored.
Strings containing a new register address with be converted to integer value.
INDEXed SAVE : Src=Data2Save, Opernd=AddressOfSave, Result=Overidden by Operand
"Source Addr" contains the data to be Saved
"Operand" contains the destination to save Source Data. It will overide the "Result Addr"
"Result Addr" is overidden by "Operand"
INTEGER to ASCII BYTE (Ignore Source Address, CHR$(Operand Value))
Convert the decimal value contained in ‘Operand’ and convert the output to the appropriate single character string. For example if the Operand contains a ‘13’ or ‘x0d’ then the output is a single byte string representation of the CARRIAGE RETURN character. Common characters are…
0 or x00 → NULL (Use this to create NULL Strings)
7 or x07 → BELL
9 or x09 → TAB
10 or x0a → LINEFEED
13 or x0d → CARRIAGE-RETURN
27 or x1b → ESCAPE
32 or x20 → SPACE
36 or x24 → DOLLAR-SIGN
124 or x7c → VERTICAL-BAR
INVERT Bool=Not-Bool, IntBits=iNTbITS, Real=1.0/Real, String=gnirtS (SrcVal-Cast-to-ResultType) Ignore-Operand
The Source Data is first cast to the ‘Cast Result As’ type before being inverted.
For Boolean Results: If "Source Addr" data was TRUE, then Result is FALSE, and vice versa.
For CHAR/SHORT/LONG Result, the data bits are inverted 1s to 0s and 0s to 1s.
For REAL32 result the Result is 1.0 divided by the "Source Addr" data.
For STRING result the Source string is reversed.
The Operand is ignored.
LOG(x) Src=Real32-InputValue Operand=Ignored Returns REAL32 NaturalLog(x)
Calculate the natural logarithm of a number.
Source Addr is the floating point value of the source (x).
Returns floating point of ln(x).
Operand is ignored.
LONG to REAL Copies 32 bits from Source Value to 32 bits of a Real32 value.
Convert long integer to REAL32 (floating point) number as 4-byte memory copy, in case a floating point value was stored improperly into a long integer register. This allows the value to be access as a true floating point.
Source Addr is the source long integer value.
Result is the floating point output.
Operand is ignored.
MODBUS WRITE Src=Enable Opernd=>PtrAdr 5-CfgRgs [0]=SrcData 1=Cnt 2=DstChn 3=Rtu 4=DataAdr
Must use Integer parameters.
Source Adr is the Enable. The Operand is a reference to a group of 5 consecutive parameters.
They are....
1st Register=Source Data Address from Local RTDB
2nd Register=Number of Registers
3rd Register=Destination Channel (0 to 15)
4th Register=Destination RTU
5th Register=Destination Data Address
If successful then return the number of registers written.
Will not write if too many pending inter-process communication messages pending in destination protocol.
Cannot use ScratchPad elements as SrcData values to be written to Destination RTU. Typically, the Operand contains the actual register number of the starting parameter, and you should use an Operand Type of “Constant”. (Or to use indirect reference, if the Operand contains a register number, which in turn contains a value of the starting parameter register, you should use Operand Type of “RTDB Address”.)
MQtt SEND CMD Src=Enbl (2=MQ-X0,3=MQ-X1 else MQtt), Opernd=CfgReg-5 0=TopicAdr 1=DataAddr 2=DataCount 3=QOS 4=PRIority : Return Handle
Publish a message using the MQTT protocol. This produces a payload compatible with the MQ-RBE (APSI) message format.
Source Addr is an enable register to activate the function. Using a value of 2 or 3 for the Enable value will send data using the MQTT Extra object (instance 0 or 1, respectively)—otherwise, any other non-zero Enable value will use the original MQTT object configuration.
Operand is a register pointing to 5 integer registers with parameters of the function.
1st: Pointer to the String register containing the Topic on which to publish.
2nd: Starting register of data to be published.
3rd: Count of registers to be published.
4th: Quality of service to publish on (0-2).
5th: Priority of the publish: 0=Low, 1=Medium, 2=High
Returns the MQTT “handle” for this publication, which can be used by the PUBQUERY function to check the status of the publication.
MY RTU ADDRESS Returns INTEGER
Returns the Internal Master RTU Address running this instance of POD.
Source Addr and Operand are ignored.
NX_19_Fpv Src=Enable, Oprnd=5PtrReg-> 0=Temp 1=Press 2=SpGrv 3=%CO2 4=%N2 ==> Fpv
The Operand is an address to 5 Floating point values. They are Temperature (degF), Pressure (psig), Specific Gravity(0.5 to 0.7), Mole%-CO2 and Mole%-N2. The result is the supercompressibility factor (around 1.0).
PACK TIME Src=Enbl Oprnd=PtrCfg-6 YY,DD,MM,HH,MM,SS : RETURN SecondFrom1970
If "Source Addr" data is non-zero (integer/real) then Operand is used as Address of 6 Parameters: Year (from1900), Month, Day, Hour, Minutes and Seconds.
Returns number of seconds since January 1, 1970.
PARSE MQtt RBE Data Src=Enbl, Opernd=CfgPtr3 0=CountTopics 1=TopicAddr 2=DstChan-Rtu-DataMin/MaxAddr-StatReg(X5) : Return Seq-Number
Parse an MQTT RBE message received from a broker via a subscription topic.
Source Addr is an enable register to activate the function, if the register value is non-zero.
Operand is a pointer to three registers with parameters of the function:
1st: Count of MQTT topics that will be parsed by this function.
2nd: Pointer to the first of consecutive String registers (based on “Count”) containing the MQTT topics to be parsed.
3rd: Pointer to the first of four integer registers, containing the destination of the data being parsed.
1st register: Destination channel
2nd register: Destination RTU address of RTDB
3rd register: Minimum address in the payload to save into the RTDB.
4th register: Maximum address in the payload to save into the RTDB. The minimum and maximum addresses allow you to filter out only a certain set of registers in the MQTT RBE payload.
5th register: Status register
For instance, an MQTT RBE payload might contain 100 Boolean registers and 100 holding registers, but you only want to parse 5 Booleans and 5 integers in the payload. To do this, include two String registers containing the same MQTT topic, and two sets of 5 registers defining the range of points to parse (such as min=10001, max=10005; and min=30001, max=30005). All other points in the RBE packet will be discarded.
Returns the sequence number of the RBE packet into the Result Addr. Sequence numbers from an RBE packet are sequential integers.
PC-104 DS-DMM-16-AT SrcAs5Addr=>Rg[0-4]=Ao(1-4)+DigOut8 : Operand=CardPortAdr : Rslt=Regs[0-21] DIs,AIs,CIs,Brd-ID
Access I/O from the Diamond Systems DS-DMM-16-AT board board.
Source Addr is a pointer to the first of five integer registers which will be used as output registers to the analog and digital outputs on the board.
- 1st-4th: Registers to be sent to four analog outputs
- 5th: Register containing bits to be sent to 8 digital outputs (LSB=DO 0)
Operand is the card’s I/O address as hex string beginning with “x”, such as “x160”. This must match the address jumper setting of the board. Use “Constant” as the Operand Type.
Result Addr is a pointer to the first of 22 integer registers which will contain the analog and digital input values from the board.
- 1st: Register containing bits from 8 digital inputs
- 2nd-17th: Registers containing 16 analog inputs
- 18th-21st: Registers containing 4 counter inputs
- 22nd: Board ID (type) value read from the TS-ADC16 board.
PC-104 IN-8 Src=Ignored Operand=CardPortAdr : Returns 8 Bit Packed Integer
Read 8 Discrete Inputs from PC-104 IN-8 card addressed as Operand Data.
Source Addr is unused.
Operand is the card’s I/O address as hex string beginning with “x”, such as “x160”. This must match the address jumper setting of the board. Use “Constant” as the Operand Type.
Result Addr returns INTEGER packed with 8 bits. Use BIT UNPACK for individual RTDB bits.
PC-104 IN-16 Src=Ignored Operand=CardPortAdr : Returns 16 Bit Packed Integer
Read 16 Discrete Inputs from PC-104 IN-16 card addressed as Operand Data.
Source Addr is unused.
Operand is the card’s I/O address as hex string beginning with “x”, such as “x160”. This must match the address jumper setting of the board. Use “Constant” as the Operand Type.
Result Addr returns INTEGER packed with 16 bits. Use BIT UNPACK for individual RTDB bits.
PC-104 MULTI-IO-16se SrcAs2Addr=>Rg[0]=Ao1 Rg[1]=Ao2 Operand=CardPortAdr Rslt=Regs[0-20]
Source Addr value is a reference to two integer registers which will be used for the two analog outputs to the board.
Operand is the card’s I/O address as hex string beginning with “x”, such as “x160”. This must match the address jumper setting of the board. Use “Constant” as the Operand Type. Add 0x30000000 to the address on a RediGate 400.
Result Addr is a pointer to the first of 21 consecutive registers which will contain the analog and digital input values from the board.
1st Register=8 Discrete Input packed bits
2nd Register=Analog Input 1 (Single Ended)
3rd Register=Analog Input 2
4th Register=Analog Input 3
5th Register=Analog Input 4
6th Register=Analog Input 5
7th Register=Analog Input 6
8th Register=Analog Input 7
9th Register=Analog Input 8
10th Register=Analog Input 9
11th Register=Analog Input 10
12th Register=Analog Input 11
13th Register=Analog Input 12
14th Register=Analog Input 13
15th Register=Analog Input 14
16th Register=Analog Input 15
17th Register=Analog Input 16
18th Register=Counter Input 1 (1st DI) … Up to 10 Hertz
19th Register=Counter Input 2 (2nd DI)
20th Register=Counter Input 3 (3rd DI)
21st Register=Counter Input 4 (4th DI)
The POD only supports one Multi-IO card.
PC-104 MULTI-IO-8-DIFF SrcAs2Addr=>Rg[0]=Ao1 Rg[1]=Ao2 Operand=CardPortAdr Rslt=Regs[0-12]
Source Addr value is a reference to two integer registers which will be used for the two analog outputs to the board.
Operand is the card’s I/O address as hex string beginning with “x”, such as “x160”. This must match the address jumper setting of the board. Use “Constant” as the Operand Type. Add 0x30000000 to the address on a RediGate 400.
Result Addr is a pointer to the first of 13 consecutive registers which will contain the analog and digital input values from the board.
1st Register=8 Discrete Input packed bits
2nd Register=Analog Input 1 (Differential Measurements)
3rd Register=Analog Input 2
4th Register=Analog Input 3
5th Register=Analog Input 4
6th Register=Analog Input 5
7th Register=Analog Input 6
8th Register=Analog Input 7
9th Register=Analog Input 8
10th Register=Counter Input 1 (1st DI) … Up to 10 Hertz
11th Register=Counter Input 2 (2nd DI)
12th Register=Counter Input 3 (3rd DI)
13th Register=Counter Input 4 (4th DI)
The POD only supports one Multi-IO card.
PC-104 OUT-8 Src=8-PackedBits Operand=CardPortAdr
Write 8 Discrete Outputs to PC-104 RELAY-8 card addressed as Operand Data.
Source Addr is a pointer to an integer registers containing 8 packed digital bits which will be used to control the digital outputs on the board.
Operand is the card’s I/O address as hex string beginning with “x”, such as “x160”. This must match the address jumper setting of the board. Use “Constant” as the Operand Type.
PC-104 OUT-16 Src=16-PackedBits Operand=CardPortAdr
Write 16 Discrete Outputs to PC-104 OUT-16 card addressed as Operand Data.
Source Addr is a pointer to an integer registers containing 16 packed digital bits which will be used to control the digital outputs on the board.
Operand is the card’s I/O address as hex string beginning with “x”, such as “x160”. This must match the address jumper setting of the board. Use “Constant” as the Operand Type.
PC-104 TS-ADC16 SrcAs5Addr=>Rg[0-4]=Ao(1-4)+DigOut : Operand=CardPortAdr : Rslt=Regs[0-21] DIs,AIs,CIs,Brd-ID
Access I/O from the Technologic Systems PC/104 TS-ADC16 board.
Source Addr is a pointer to the first of five integer registers which will be used as output registers to the analog and digital outputs on the board (i.e., use "40001" to point to registers 40001-40005).
1st-4th: Registers to be sent to four analog outputs (write values of 0-4095)
5th: Register containing bits to be sent to 16 digital outputs (LSB=DO 0)
Operand contains the PC/104 card’s I/O address as a hex string beginning with “x”, such as “x160”. This must match the address jumper setting of the board. Use "Constant" as the Operand Type.
The lower 4 bits of the Operand are masked out and are used to select operation of the analog inputs.
- Bits 0-1: Selection of analog input voltage range.
00 = 0 to +5 Volt input, 01 = -5 to +5 Volts, 10 = 0 to +10 Volts, 11 = -10 to +10 Volts - Bit 2: Select single-ended or differential analog inputs.
0 = 16 single-ended analog inputs, 1 = 8 differential analog inputs - Bit 3: Select whether to use an analog filter routine.
0 = no filtering, 1 = analog value averages current reading with 75% weight and previous reading with 25% weight (reduces jitter from sample to sample).
Below is a table of some examples of the Operand value (combination of the card I/O address and analog settings):
| Operand value | Lower 4 bits | PC/104 card address | Voltage range | AI type | Jitter filtering |
|---|---|---|---|---|---|
| x100 | 0000 | 0x100 | 0 to 5 volt | 16 single-ended | No |
| x160 | 0000 | 0x160 | 0 to 5 volt | 16 single-ended | No |
| x168 | 1000 | 0x160 | 0 to 5 volt | 16 single-ended | Yes |
| x166 | 0110 | 0x160 | 0 to 10 volt | 8 differential | No |
| x16E | 1110 | 0x160 | 0 to 10 volt | 8 differential | Yes |
Result Addr is a pointer to the first of 22 integer registers which will contain the analog and digital input values from the board.
1st: Register containing bits from 4 digital inputs (bits 0-4) and state of digital output (bit 5)
2nd-9th: Registers containing analog inputs 1-8 (value of 0-65535)
10th-17th: Registers containing analog inputs 9-16 (unused in differential mode, value of 0-65535)
18th-21st: Registers containing counter inputs 1-4 (up to 4 MHz)
22nd: Board ID (type) value read from the TS-ADC16 board (0x3E).
PID-LOOP Src=Enbl, Oprnd=11Cfg-> 0=Ndx 1=(0=P,PI,PID,PIDp=3) 2=K.1% 3=T0(s/rpt) 4=T1 5=DirctAct 6=PV 7=SP 8=Man 9=Ovrd 10=MxErr =>0-4095
"Source Addr" is the enable.
"Operand" is Starting Register Address to 11 Integers
0=PID Index (0 to 7)
1=Mode ? 0=P+BIAS(T1), 1=P+I, 2=PID(slope of error), 3=PID(slope of PV)
2=K Proportional Band (0 to 1000 to represent 0.0 to 100.0%)
3=T0 BIAS or Seconds per Repeat
4=T1 (rate) Percent per second (0 to 5)
5=Action 0=Reverse-Action, Non-zero=Direct-Action
6=PV Process Variable (0 to 4095 counts)
7=SP Setpoint (0 to 4095 counts)
8=Man Manual Mode if Non-Zero (You should set Override to Output Value if Automatic)
9=Override if in Manual Mode (in Automatic Mode set Override equal to Output)
10=MaxErr, Maximum error Allowed in calculations (0 to 4095)
"Result Addr" is output 0 to 4095 counts
POWer (x^y) Src=Mantissa, Operand=Exponent Returns REAL32
Calculate the value of a number raised to a power.
Source Addr is the value of the source (x).
Operand is the exponent (y).
Returns floating point of xy.
Operand is ignored.
PUBCONN Connection Status with MQtt Broker Src=Enbl(2=MQ-X0, 3=MQ-X1 else MQtt) : Return=(1=TryConnect, 2=Connected, 0=Disconnect)
Source Addr is an enable register and selection of which MQTT process, if the register value is non-zero (must be Integer, strings are not allowed).
- 0=disable function
- 1=check status of MQClient (non-instanced object)
- 2=check status of MQClient Extra (instance 0)
- 3=check status of MQClient Extra (instance 1)
The Operand is ignored.
Returns number: 0=Not Connected, 1=Connecting to MQTT broker, 2=Connected to MQTT broker.
PUBHOST Which Host Table Entry is being used SrcAddr=Enable(2=MQ-X0, 3=MQ-X1 else MQtt) : Return=(Int[0-N-row], String[Iface,IP@ -1])
The PUBHOST function is used where there are multiple IP host addresses in the MQTT configuration object, where it may be desired to check which of the Host Entries is currently being used as the active MQTT connection.
Source Addr is an enable register and selection of which MQTT process, if the register value is non-zero (must be Integer, strings are not allowed).
- 0=disable function
- 1=check status of MQClient (non-instanced object)
- 2=check status of MQClient Extra (instance 0)
- 3=check status of MQClient Extra (instance 1)
If ResultType is an integer, the function returns the index number of the Host Entry table being used (0 to N) for the MQTT connection.
If ResultType is String, then the function returns two string values containing information about the Host Entry table:
Result Addr: Contains interface name and Host Entry (0 to N) being used for the MQTT connection (such as “eth0 1”).
Scratchpad [-1]: Contains the IP address, port number, and the Host Entry (0 to N) being used for the MQTT connection (such as “10.100.1.2:1883 1”).
PUBLISH Src=Enbl(2=MQ-X0, 3=MQ-X1) Oprnd(AdrOf-8) 0=AddrTopic256 1=QOS 2=Retain 3=Priority 4=Rtu 5=RtdbAdr 6=Count 7=BigEnd : Rtn=Handle
Publish an MQTT message to a broker. This creates a binary data payload with values of a block of registers. This is NOT the same binary data payload used by MQ-RBE (APSI) – see the MQtt SEND CMD for that format.
Source Addr is an enable register and selection of which MQTT process, if the register value is non-zero (must be Integer, strings are not allowed).
- 0=disable function
- 1=check status of MQClient (non-instanced object)
- 2=check status of MQClient Extra (instance 0)
- 3=check status of MQClient Extra (instance 1)
Operand is a Starting address of 8 RTDB Register values.
The contents of the eight registers are interpreted as:
1st Register=Address of a STRING-256 TOPIC String (cannot be ScratchPads)
2nd Register=Quality of Service: 0=Fire/Forget, 1=Acknowledged, 2=Delivered Only Once
3rd Register=Retained Data?
4th Register=Priority: 0=Low, 1=Medium, 2=High
5th Register=RTU Number under the same Internal Channel
6th Register=Starting RTDB data register to publish
7th Register=Count of above elements to publish
8th Register=BIG Endian data stored in MQtt payload? 1=Big Endian, 0=Little Endian
Returns an Integer Handle (1 to 32000) to track this Published data, or -3 if topic is not a String-256 data register. The handle can be used by PUBQUERY to track the status of the publication.
If the 5th, 6th and 7th values are set to zero then the ‘TOPIC’ is actually a file name composed of two parts. The portion preceding the last FORWARD SLASH (/) character is the complete Directory Path. The portion following the last SLASH (/) is used as both the ‘Topic Name’ and ‘File Name’. TILDE (~) characters in the ‘File Name’ will be converted to SLASH (/) characters before being published as the ‘Topic Name’. Any characters following DOUBLE TILDEs (~~) are removed.
For instance, you could create a STRING-256 register with the following value: “/tmp/sdcard/RTU~OMNI~hourly~~19230948238”. The entire string, including tildes, is the complete filename containing data that will be published (in this example, the “19230948238” represents the timestamp of the data in milliseconds). The MQTT Topic name will be converted to “RTU/OMNI/hourly”, discarding everything before the last SLASH and after the DOUBLE TILDE.
Strings are not allowed in Source Addr.
PUBNUMQ Number of Pending MQtt Messages Src=Enbl(2=MQ-X0, 3=MQ-X1)
Source Addr is an enable register and selection of which MQTT process, if the register value is non-zero (must be Integer, strings are not allowed).
- 0=disable function
- 1=check status of MQClient (non-instanced object)
- 2=check status of MQClient Extra (instance 0)
- 3=check status of MQClient Extra (instance 1)
The Operand is ignored.
Returns number of Messages pending to be delivered to the MQtt Broker on the specified MQTT client task.
Strings are not allowed in Source Addr.
PUBQUERY Check state of a message on the Q. Src=Enbl(2=MQ-X0, 3=MQ-X1) : Operand=QueHandle : Retrn=(-1[NotFound) to 7[GotPubACK])
Check state of a message on the MQTT queue, using the “handle” returned in the MQTT SEND CMD or PUBLISH functions.
Source Addr is an enable register and selection of which MQTT process, if the register value is non-zero (must be Integer, strings are not allowed).
- 0=disable function
- 1=check status of MQClient (non-instanced object)
- 2=check status of MQClient Extra (instance 0)
- 3=check status of MQClient Extra (instance 1)
The Operand is the “handle” of the published message created by MQTT SEND CMD or PUBLISH.
Returns state (0 to 7) of the published packet on MQTT queue identified by the handle. If no matching Handle, return ‑1; otherwise, 0=Idle, 1=MailSent, 2=MailRecv, 3=Connecting2Broker, 4=WaitConnACK, 5=SentPacket, 6=WaitPacketACK, 7=GotBadACK
Strings are not allowed in Source Addr.
PUBWALK Walk the MQtt-Broker Connection Table SrcAddr=Enable(2=MQ-X0, 3=MQ-X1)
Force the MQtt-Client to walk the Host Connection Table (i.e., switch to the next host IP address in the list).
Source Addr is an enable register and selection of which MQTT process, if the register value is non-zero (must be Integer, strings are not allowed).
- 0=disable function
- 1=check status of MQClient (non-instanced object)
- 2=check status of MQClient Extra (instance 0)
- 3=check status of MQClient Extra (instance 1)
The Operand is ignored.
Strings are not allowed in Source Addr.
PULSE FACTOR Src=RawCount, Oprnd=3PtrCfg-> [0]=K(Pls/Vol), 1=PrevRawCnt, 2=TotalVolume, Result=New Volume Increment
Integrate raw 16 bit integer counter with a K factor (Pulses/UnitVolume) divisor.
Source Value is raw input pulses. Operand is starting address of three Long Integers elements.
Element[0] is the K-factor.
Element[1] is automatically updated with the previous raw counts.
Element[2] is automatically updated with the Total Unit Volume and rolls over after 99,999,999 units.
The Result value is the number of new Unit Volume counts added to the Previous Total Volume
QUALITY ASSIGNMENT Src=RegWithQuality, Opernd=Address Of Reg To Assign : Returns 0 if Src Quality GOOD else -1 if BAD
Assign the quality flag from one register to another. Quality flag indicates good/stale state.
Source Addr is register with the existing quality flag
Operand is address of register to assign quality.
Result Addr contains 0 if the quality is good, or -1 if quality is bad.
Cast Result As should be SINT16 or SINT32.
RANDOM Number (Ignore Source) Operand=Seed (e.g. Time), Returns 0 to 2147483647
Generate a random number.
Source Addr is ignored.
Operand is an integer containing the seed value of the randomization.
Returns a random number as a long integer, 0 to 2147483647.
REAL to LONG Copies 32 bits from Source Value to 32 bits of an Int32 value
Convert REAL32 (floating point) number to long integer as 4-byte memory copy, in case an integer value was stored improperly into a floating point register. This allows the value to be access as a true integer.
Source Addr is floating point number, Operand is ignored.
Returns a long integer.
REVERSE [1,2,4] BYTE WORD Src=OriginalBits, Operand=1,2,4 Bytes-SrcData Rslt=Bits Reversed (Force to INTEGER)
Reverse 8, 16 or 32 bits of Source Value and place into a INT8,INT16 or INT32 register.
Operand contains value of 1 (8 bit), 2 (16 bit), or 4 (32 bit) conversion.
RTU NAME SrcAddr=Channel : Operand=RtuAddr : Result is STRING
"Source Addr" data Channel Number, Operand Data is Rtu Number. Forces Return data type to STRING.
Parameters Must be INTEGER data types.
Returns an error message of “?RTU NOT FOUND?” for invalid Channels or RTU Addresses.
SCRAMBLE Src=Enbl Opernd=PtrAdr 3CfgRgs [0]=StringAdr 1=TextLen 2=Scramble? Result=Converted String
Scramble (encrypt) or unscramble (unencrypt) a hex string. The Input String must be ASCII-HEX such as A2B527 to represent binary 0xa2b527.
Source Addr is an enable register to activate the function, if the register value is non-zero.
Operand is a pointer to the first of three registers:
1st: Address of the input String data.
2nd: Length of the text string to scramble.
3rd: Non-zero number to scramble the data, or 0 to unscramble an ASCII-HEX value previously scrambled using this function.
The result will also be ASCII-HEX String.
SEGRECV Src=Enable Operand=PtrAdr-7CfgRgs 0=ComPrt 1=RtdbStrt 2=Cnt 3=BigEndn? 4=CkSm(1=Sum,2=CRC,3=CRCrevrs) 5=TmOt 6=Dmrk: Retrn=NumByte(Negtiv=Err)
Receive raw bytes on a serial port and pack them into consecutive RTDB registers, filling register with maximum allowed bytes.
Must use Integer parameters. Source Value is the Enable.
Operand Value is a reference to a start of 7 configuration registers.
1st Register=Comm Port to receive bytes (1 to 80 for /dev/acscomm_).
2nd Register=Starting Register to save data to.
3rd Register=Count of Register to fill with bytes
4th Register=Big Endian Data and ChkSum? 1=Big Endian, 0=Little Endian
5th Register=Whether to calculate CheckSum on received message. 0=no checksum, 1=totalized checksum (addition of bytes, use Big Endian flag to determine order of checksum bytes), 2=Elecsys CRC (little-Endian), 3=Elecsys CRC (big-Endian).
6th Register=Timeout in msec
7th Register=Demark in msec
Returns number of bytes received
SEGSEND Src=Enable Opernd=7PtrCfgs [0]=ComPort 1=StrtAdr 2=Count 3=BigEndn 4=Check(1=Sum,2=CRC,3=CRCrevrs) 5=TmoutMsc 6=DemrkMsc : Return=NumByteSent
Send raw bytes from consecutive RTDB registers to a serial port.
Source Addr is an enable register to activate the function, if the register value is non-zero.
The Operand is the pointer to the first of five registers:
1st: Numeric value of the serial port, using custom serial “/dev/acscomm_” driver.
2nd: Starting RTDB address of data to send.
3rd: Count of registers to send.
4th: Send data in Big Endian, 1=Big Endian, 0=Little Endian
5th: Whether to add a checksum on the block of data, 0=no checksum, 1=totalized checksum (little-Endian), 2=totalized checksum (big-Endian), 3=Elecsys CRC (little-Endian), 4=Elecsys CRC (big-Endian).
6th: Timeout (milliseconds)
7th: Demark (milliseconds)
Strings are not allowed in Source Addr.
Returns number of bytes sent.
SEND BIRTH/DEATH CERTIFICATE Src=Enbl(2=MQ-X0, 3=MQ-X1 else MQtt) Oprnd=3CfgRgs[] 0=Chan 1=Rtu 2=(1=Birth,0=Death) Return:0=Ok -1=Fail
Send MQTT birth certificate or death certificate.
If "Source Addr" data is non-zero (integer/real) then Operand is used as address of three Parameters:
1st: Master Channel (0 to 15)
2nd: RTU Address
3rd: Type of Certificate (1=Birth certificate, 0=Death certificate).
Returns 0=SUCCESS or -1=Failure.
SET RTU STATUS Src=Enbl Oprnd=3CfgRgs[] 0=Chan 1=Rtu 2=State(0=Good,2=Fail) Return:0=Ok, -1=Failed
Set the communication status of an RTU in the RediGate.
Source Addr is an enable register to activate the function, if the register value is non-zero.
Operand is the pointer to the start of three registers:
1st: Master Channel (0 to 15)
2nd: RTU Address
3rd: State to set the RTU status (0=good, 2=failed)
Returns 0=SUCCESS or -1=Failure.
SINE(x) Src=Real32-Radians Operand=Ignored : Returns REAL32 SINE(x)
Source Addr is a floating point number of angle in radians.
Result is floating point as sine of source value.
Operand is ignored.
SQUARE ROOT of Source Value
Mathematical square root of "Source Addr" data.
Strings are not allowed in Source Addr.
The Operand is ignored.
STRING DROP PART Src=String, Oprnd=NumBytes (Negatv=Left: Positv=Right)
Drop a number of bytes from start or end of a string. A negative value in Operand drops that number of bytes from the left of the string, and a positive number drops the number of bytes from the right.
STRING GET PART Src=String, Oprnd=NumBytes (Negatv=Left: Positv=Right)
Keep only a number of bytes from start or end of a string. A negative value in Operand keeps that number of bytes from the left of the string, and a positive number keeps the number of bytes from the right.
STRING HEADER Src=Original_String Operand=Delimiter : Result=String to Left of 1st Delimiter
Returns the bytes preceeding the matching delimiter in the Source String.
Source Addr is the original String.
Operand is a String of the delimiter character to search for.
Result is a String containing the characters to the left of the first delimiter in the original.
STRING LENGTH of Src=String, Operand=Ignored, Result=Integer Length of String
Return length of a string as an Integer.
STRING TO LOWER Convert SrcString to Lower case, Ignore Operand.
Convert string to lowercase.
Source Addr and Result are both Strings, Operand is ignored.
STRING TO UPPER Convert SrcString to Upper case, Ignore Operand.
Convert string to uppercase.
Source Addr and Result are both Strings, Operand is ignored.
STRING TRAILER Src=Original_String Operand=Delimiter : Result=String to Right of Last Delimiter
Returns the bytes following the matching delimiter in the Source String.
Source Addr is the original String.
Operand is a String of the delimiter character to search for.
Result is a String containing the characters to the right of the last delimiter in the original.
STRING VALUE of Src=String with Operand ignored, Result=Integer value of String
"Source Addr" data is the String representation of a numeric value
"Result Type" determines the output type (Int16, Int32, Float, Boolean), into which the String is converted to a numeric value. If Result Type is Boolean, a 0 converts to FALSE and a non-zero string value converts to TRUE. Integer values greater than allowed by the data type get truncated.
Operand is ignored.
SUBSCRIBE TO TOPIC Src=Enable(2=MQ-X0,3=MQ-X1 else MQtt) : Opernd=TopicString-256 : Result=SubscribeQueIndex
Issue MQTT subscription for a data topic.
Source Addr is an enable register to activate the function, if the register value is non-zero.
Operand is STR-256 containing the topic to be subscribed to (full TOPIC including slashes, + and # characters).
Result is an integer of the Queue index of the subscription. Up to 16 subscriptions are allowed in the RediGate (index 0-15).
SUBSCRIBED RECV'd DATA Src=Enable : Opernd=Cfgs[3] 0=AddrOfTopic 1=AddrOfUint8Data 2=Spare : Return=CntDataBytes
Receive raw MQtt packet payloads directly into RTDB registers, one byte per register except if RTDB is STR-256 then receive up to 255 bytes per RTDB register.
The SUBSCRIBE function must be called at least once for one or more topics to be received.
The Operand must contain the number of a starting RTDB register containing parameters for the SUBSCRIBED RECV'd DATA function, where three registers are:
1st: Register or scratchpad containing String of subscribed topic
2nd: Starting RTDB register to store packet data
3rd: Reserved
Returns the count of data bytes received from an MQtt packet payload.
SYSTEM COMMAND Src=Shell_Script, Operand= Shell_Script_Parameters : Returns (Integer) 0 if Successful
"Source Addr" and Operand Values must both be strings.
The 'system()' function is called by placing a space ' ' between the two strings. This allows the Operand to be used to contain parameters for the script contained in Source Addr, but since they are simply separated by spaces in the system call, it isn’t limited to parameters of a script but could be two parts of a lengthy command line.
Returns (Integer) 0 if successful.
TABLE-23B Src=Observd-Density(kg/m^3) : Opernd=Temp-degF : Result=Density @60degF
Calculate Table-23B relative density correction.
TANG(x) Src=Real32-Radians Operand=Ignored Returns REAL32 TANG(x)
Source Addr is a floating point number of angle in radians.
Result is floating point as tangent of source value.
Operand is ignored.
TEXT FIND Src=SrchString, Operand=ResultBufSize(<256) : Returns up to BufSize bytes after Search-String
[Note: if you need to read the text before a delimiter, see the TEXT READ function.]
After opening a text file (TEXT OPEN), the entire contents of the file are read into a temporary internal buffer, and a pointer is placed at the beginning of the buffer. Use TEXT FIND to find a String of characters in the buffer. If the String is found, then return the MaxBytes (Operand value) after the Found String as the Result String. Also move the starting pointer of the Buffer to the end of the Found String for a subsequent TEXT FIND.
"Source Addr" data is Search String (or empty to just get next available characters).
"Operand" data is number of bytes (must be less than 256) to return from successful search (empty search string is always successful).
Returns a STRING.
TEXT FLUSH Buffer
Frees memory allocated by the TEXT OPEN call and read of file.
Strings are not allowed in Source Addr.
TEXT OPEN Src=FileName : Result is File Size, ignore Operand
TEXT OPEN creates a buffer containing the entire contents of a text file and closes the original file. After opening the file and creating the buffer, a pointer is placed at the beginning of the file. Other TEXT functions then process String fragments from this buffer, which may involve moving this pointer through the buffer.
"Source Addr" data is FileName to open. Operand is ignored.
Returns file size in bytes as an Integer.
TEXT READ Src=Delimiter(s) Operand=MaxBytes, Returns String before the Delimiter
[Note: if you need to read the text after a delimiter, see the TEXT FIND function.]
After opening a text file (TEXT OPEN), the entire contents of the file are read into a temporary internal buffer, and a pointer is placed at the beginning of the buffer. Use TEXT READ to find any of the characters in the Delimiter String. If any of the characters is found, then return as the Result String the MaxBytes (Operand value), starting from the previous pointer location, up to (but not including) the found delimiter. Also move the starting pointer of the Buffer to the character after the delimiter for a subsequent TEXT READ. If the delimiter isn’t found before the end of the file, the MaxBytes will be returned starting from the previous pointer location.
"Source Addr" data is Delimiter/Terminating character(s) to find (or use an empty string to just get next available characters – however, in any case this must point to a valid RTDB string register, or a Scratchpad register that has been initialized with a String value).
"Operand" is a number of bytes to return from successful search (if Source Addr is empty, the search is always successful). Number of bytes is limited to 255 at a time, into an STR‑256 String buffer.
Returns a STRING.
TEXT REMAINING : Ignore Src/Oprnd. Number of Bytes Still unread remaining in Buffer
Returns the number of bytes in buffer which have not yet been scanned.
Source Addr and Operand are ignored.
TTYsIN Src=Enbl Opernd=PtrAdr 5CfgRgs [0]=ComPort 1=MxLen 2=EndChr 3=TmOut 4=Demrk Result=TypeString
Source Addr value is a reference to five Registers in the RTDB.
1st Register=ComPortNdx 0 to N.
2nd Register=Maximum Buffer Length.
3rd Register=End Message Marker. If -1 then no end marker
4th Register=Timeout to first byte in milliseconds
5tht Register=Demark timer in msec for last byte
The Result Type is returned as a String
Uses Native Linux /dev/ttyS_ driver
TTYSOUT Src=Enbl Opernd=PtrAdr 4CfgRgs [0]=ComPort [1]=SendLength [2]=StringAdr [3]=FlushInput
Operand Value is a reference to three Registers in the RTDB.
1st Register=ComPortNdx 0 to N.
2nd Register=Character Send Length.
3rd Register=Adress of String
4th Register=Flush input buffer on the port before sending data (1=flush, 0=not flush)
The Result Type is returned as an Integer
Uses Native Linux /dev/ttyS_ driver
UNIT NAME from Apex System Object as from 'hostname'
"Source Addr" and “Operand” are ignored. The result is cast to a STRING data type.
‘White-space’ in the name is replaced with the Underscore ‘_’ character. Uses ‘hostname’.
XML GET COUNT Src=Enabl, Opernd=PtrReg-> 4CfgRgs [0]=ElemntName 1=Parent 2=Attrib1 3=Attrib2
<<< First Open XML file with TEXT OPEN function >>>
"Source Addr" data the Enable flag.
"Operand" data is Reference Address to multiple CHAR-32 Strings for XML searching.
1st String=Element Name to Count (up to 32 chars)
2nd String=Parent Element Name containing Element being counted. But first Parent Element Attributes must be read to differentiate other Parent Elements (up to 32 chars)
3rd String=A complete matching attribute in Parent to locate this child element. e.g. chan="1" (up to 32 chars)
4th String=A complete matching attribute in Parent to locate this child element. e.g. rtu="10" (up to 32 chars)
If Attributes are empty then topmost Parent is the matching element.
Returns an INTEGER of the count of Elements.
XML GET FIELD Attributes Src=Enabl, Opernd=PtrReg-> 6CfgRgs [0]=ElemntName 1=Parent [2-5]=AttributeNames
<<< First Open XML file with TEXT OPEN function >>>
"Source Addr" data the Enable flag.
"Operand" data is Reference Address to multiple CHAR-32 Strings for XML searching.
1st String=Element Name to Get Attributes from (up to 32 chars)
2nd String=Parent Element Name containing Element being read. But first Parent Element Attributes must be read to differentiate other Parent Elements (up to 32 chars)
3rd String=First attribute to read from Element. If Attrib1 is.. chan= ..then result would be chan="1" (up to 32 chars)
4th String=Second attribute to read from Element. If Attrib2 is.. rtu= ..then result would be rtu="27" (up to 32 chars)
Nth String=Nth attribute to read from Element. If AttribN is.. blah= ..then result would be blah="BLAH-BLAH" (up to 32 chars)
After reading all sub elements from parent element then use XML NEXT FIELD to advance the parent pointer.
Returns ONE or MORE Attribute/Value STRING-32s starting at "Result Addr"..
XML NEXT FIELD Src=Element Name to Advance, Opernd=Ignored Returns INTEGER Number of bytes still in Buffer
Not required for Child Elements after calling Get Field. Only Parent Elements don't auto advance.
ZERO All Scratchpad Elements (-1 to -40)
Reset all 40 Scratchpad registers back to zero or NULL strings.
"Source Addr" data and Operand data are ignored.